

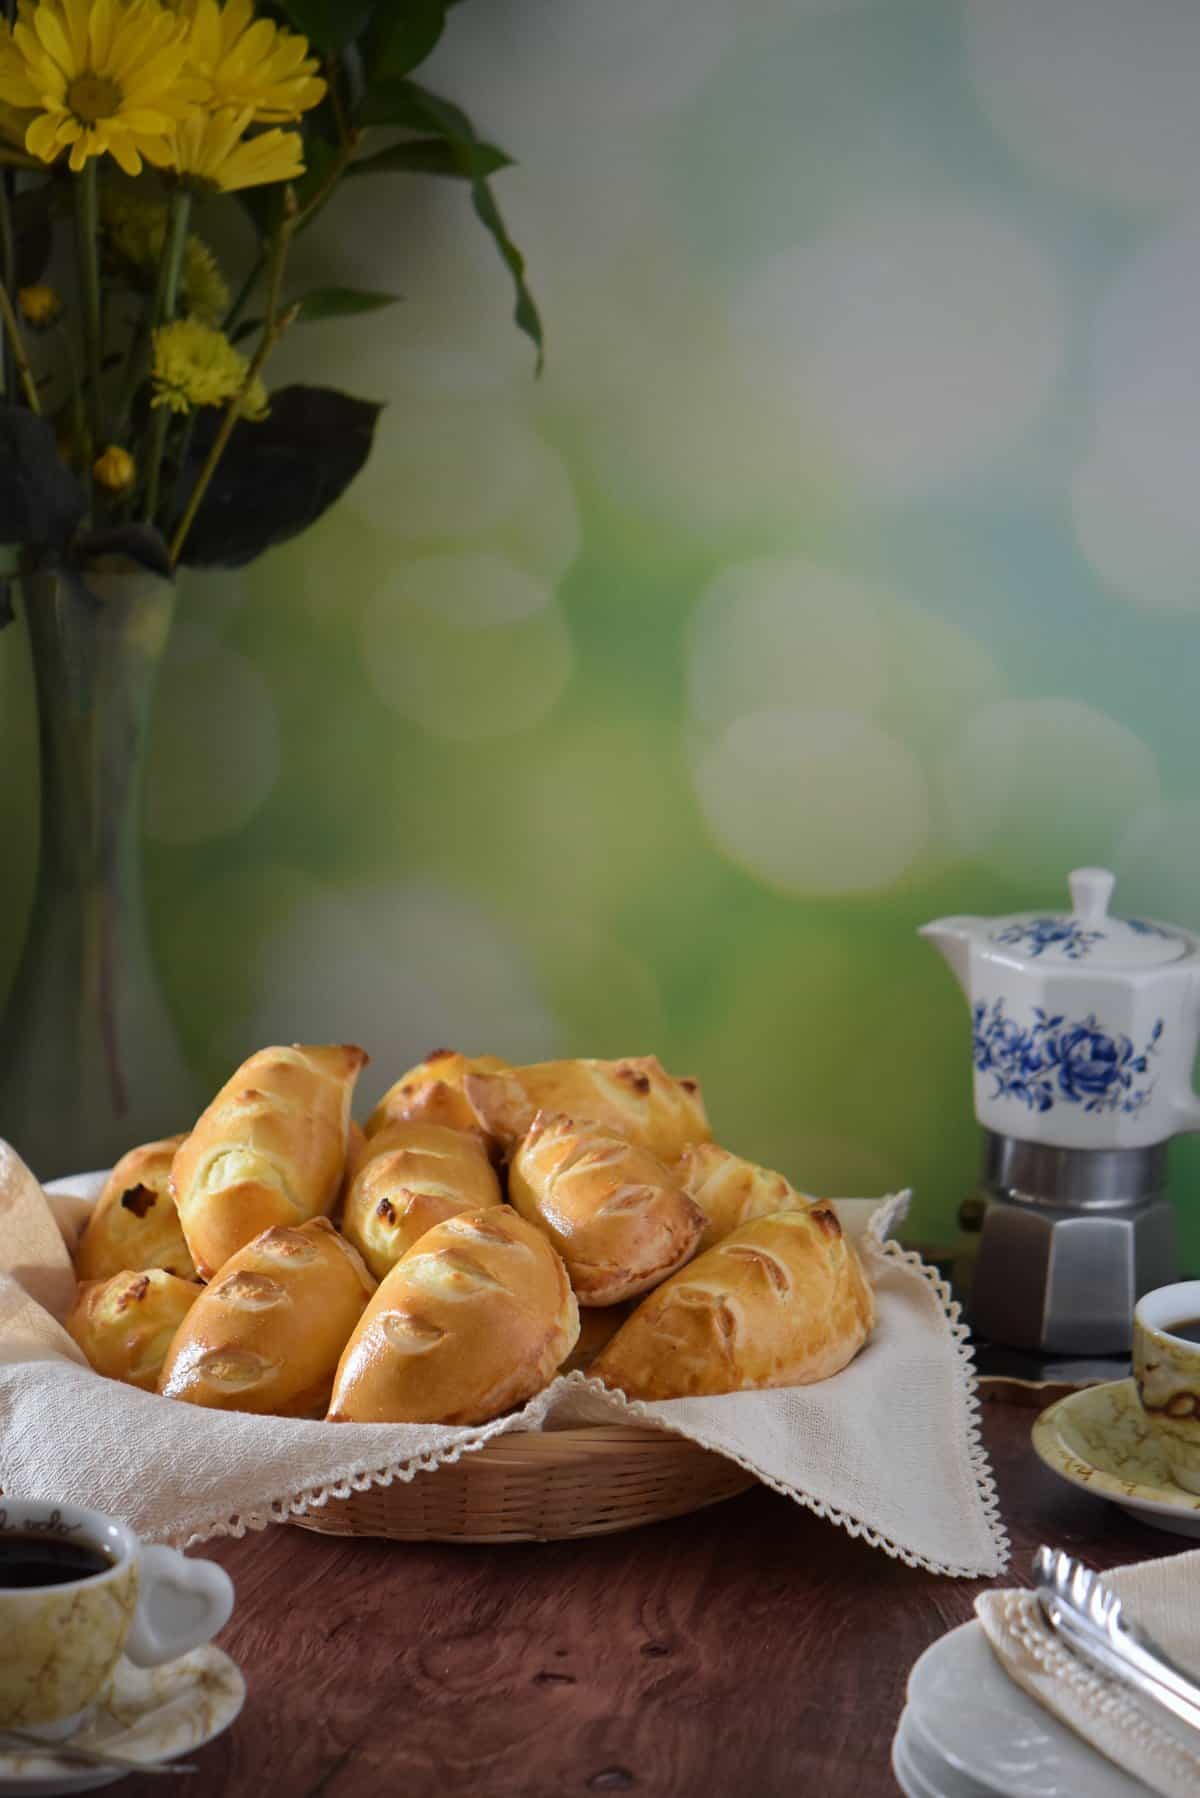
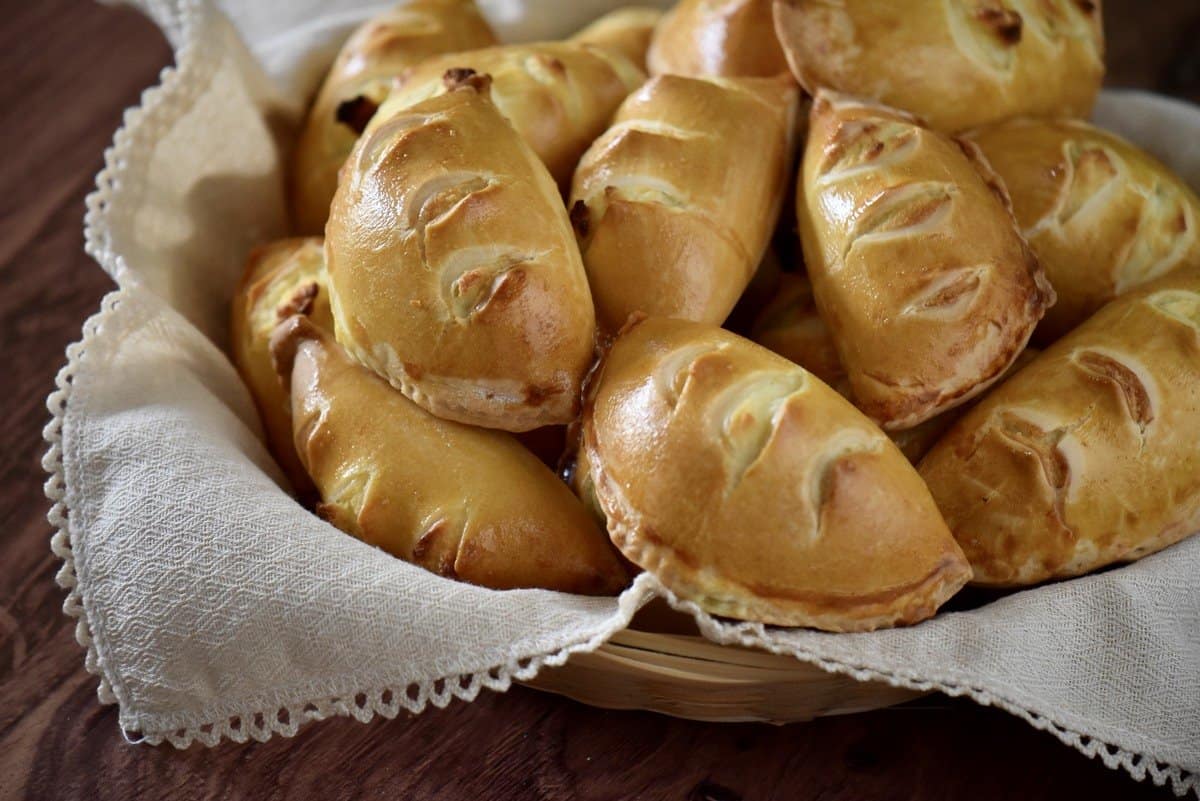
Are you looking for an authentic Italian Easter dessert? Look no further than these sweet mini ricotta Easter pies, Fiadoni Dolci con Ricotta! These hand pies have an oil-based pastry dough encasing a lightly sweetened ricotta filling and are baked to perfection.
This family recipe originates from the Molise region of Italy. Southern Italian Easter desserts usually include ricotta, and this Italian dessert stuffed with ricotta is a delicious example.
Something wonderful happens to ricotta when you add a little bit of sweetness.
It can take the shape of a rice ricotta Easter pie, ricotta cookies, ricotta cheesecake, ricotta strudel, pastiera, or even, ricotta pie!
Today, I’m sharing another Italian pastry for Easter called fiadone. These are a childhood favorite and another perfect example of ricotta’s versatility.
They are simple and tasty with a delicate flavor; the ricotta is lightly sweetened to satisfy your Easter dessert cravings!
Jump to:
Fiadone vs cassatelle
If you are familiar with Italian regional cuisine, you probably know that the names of certain recipes may differ, even though the final product is very similar.
Take, for example, these sweet ricotta hand pies.
In the Italian region of Molise, more specifically Ripabottoni, where my paternal grandmother was born, they are called “fiadone di ricotta,” or as my nonna would call them in her dialect, “h’iatun.”
If you are interested, my nonna also made a savory Italian cheesepie, called fiadone di formaggio, similar to pizza rustica. But I digress…
The filling of these sweet half-moons includes ricotta, eggs and sugar. Wikipedia defines fiadone as large sweet ricotta-stuffed ravioli, served mainly at Easter.
In the nearby region of Campania, more specifically, a small town called Molinara, where my maternal grandmother was born, they are referred to as cassatelle. She would make two types of ricotta-filled pastry: one with only a ricotta filling, the other with rice and ricotta.
Interestingly enough, if you were to travel to Sicily, you would also find a ricotta-based dessert called “cassatelle di ricotta” served during carnival season. This sweet ricotta cream filling also includes chocolate chips. This variation is usually fried and then dusted with icing sugar.
So as you can see, there are so many traditional Italian Easter desserts that vary from region to region.
These ricotta-stuffed sweet ravioli, known as fiadone in Molise, cassatelle in Campania, and Sicily are part of a large sweet type of ravioli tradition in Southern Italy.
No matter what you call them, once you taste them, I’m sure you’ll agree that all of these variations are delicious!
This article provides a step-by-step process with modern-day equipment, which will guide you on making my family’s recipe for fiadone.
Make the dough
The dough we will be making for these mini ricotta pies is oil-based, creating a light pastry crust.
We will be using a stand mixer for this recipe, with the whisk attachment first, followed by the dough hook. You may also make the dough by hand. It will take a little longer and require more elbow grease!
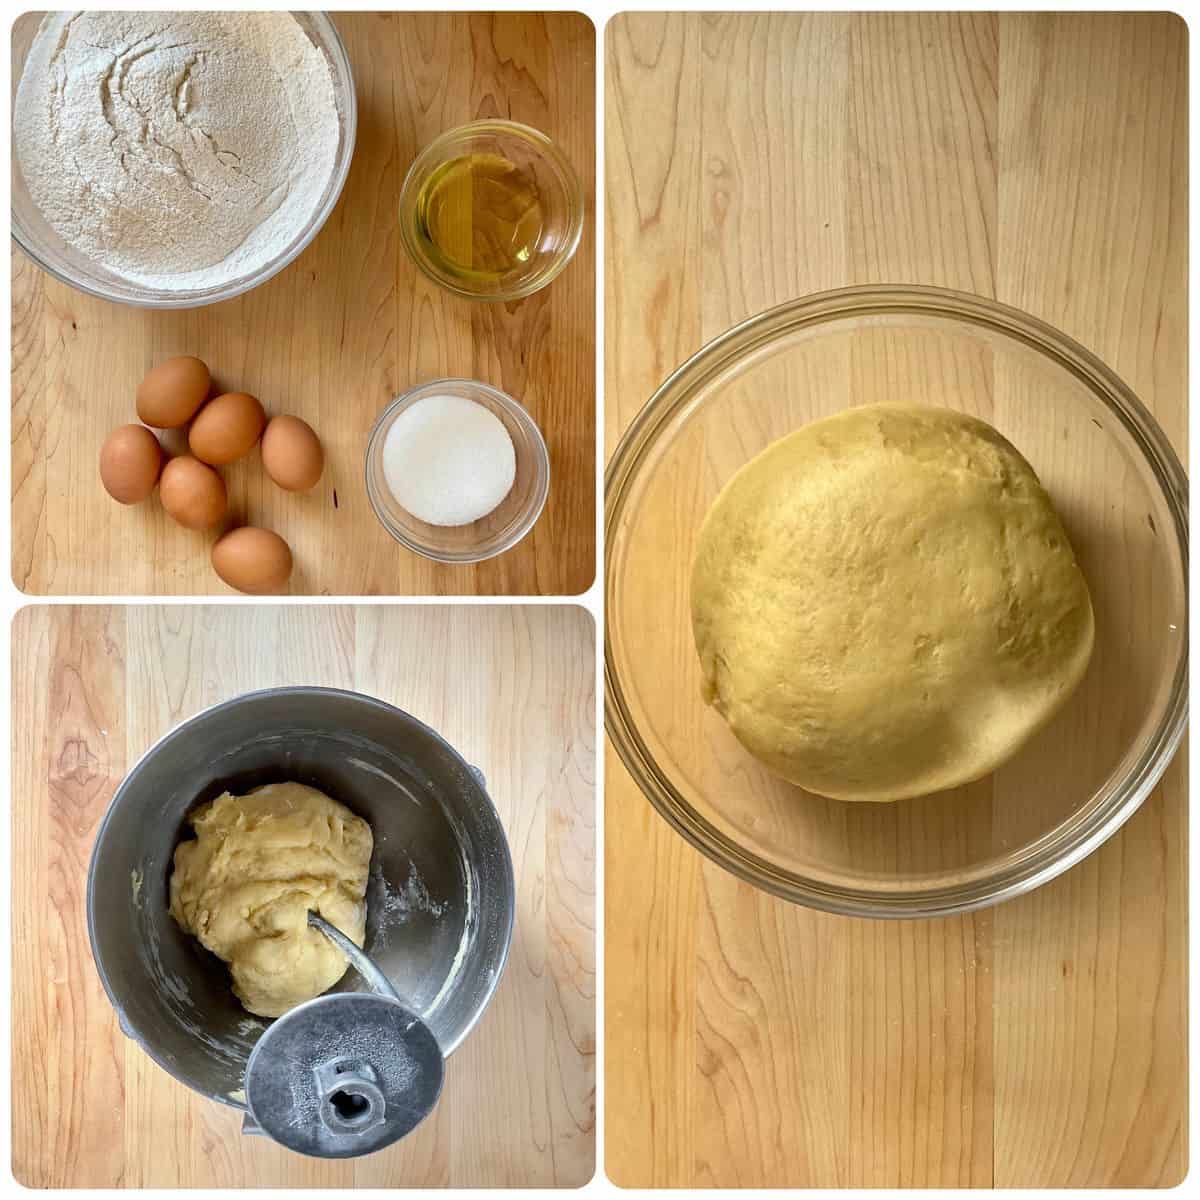
In the bowl of your stand mixer, whisk 6 room temperature eggs at medium speed for about one minute, then slowly add 6 tablespoons of sugar, one tablespoon at a time, and whisk for another minute.
Add 6 tablespoons of vegetable oil and whisk for another minute.
You will need 4 cups of all-purpose flour or approximately 568 grams.
Add about a quarter to a third of the total amount of the flour and whisk for 1-2 minutes.
Switch to the dough hook. With the mixer on low speed, add the rest of the flour, one tablespoon at a time. You may not need to use all of the flour. Reserve the 1-2 tablespoons of flour for later. Knead for 8-10 minutes.
The dough should be soft, smooth, and slightly sticky at the end of this process. You will notice the dough pulling away from the sides of the bowl while still adhering to the bottom.
With damp hands, remove the dough from the dough hook. Then on a lightly floured surface, knead for 30 seconds until smooth. The dough should no longer be tacky. If it is, dust with flour and knead a little more. Shape the dough into a ball and place it in a bowl, lightly greased with olive oil. Turn once to coat. Cover with plastic wrap and let it rest for one hour.
Alternatively, you can knead the dough by hand on a lightly floured surface for about 10-15 minutes.
Make the ricotta filling
A few hours before you plan on mixing the ingredients to make the ricotta cheese filling, place 900 grams of fresh ricotta in a strainer lined with cheesecloth. This will help remove any excess moisture from the cheese.
You can also leave the ricotta cheese in the strainer overnight to remove as much moisture as possible in the refrigerator. Be sure to cover the ricotta cheese in the strainer with plastic wrap so that it doesn’t dry out.
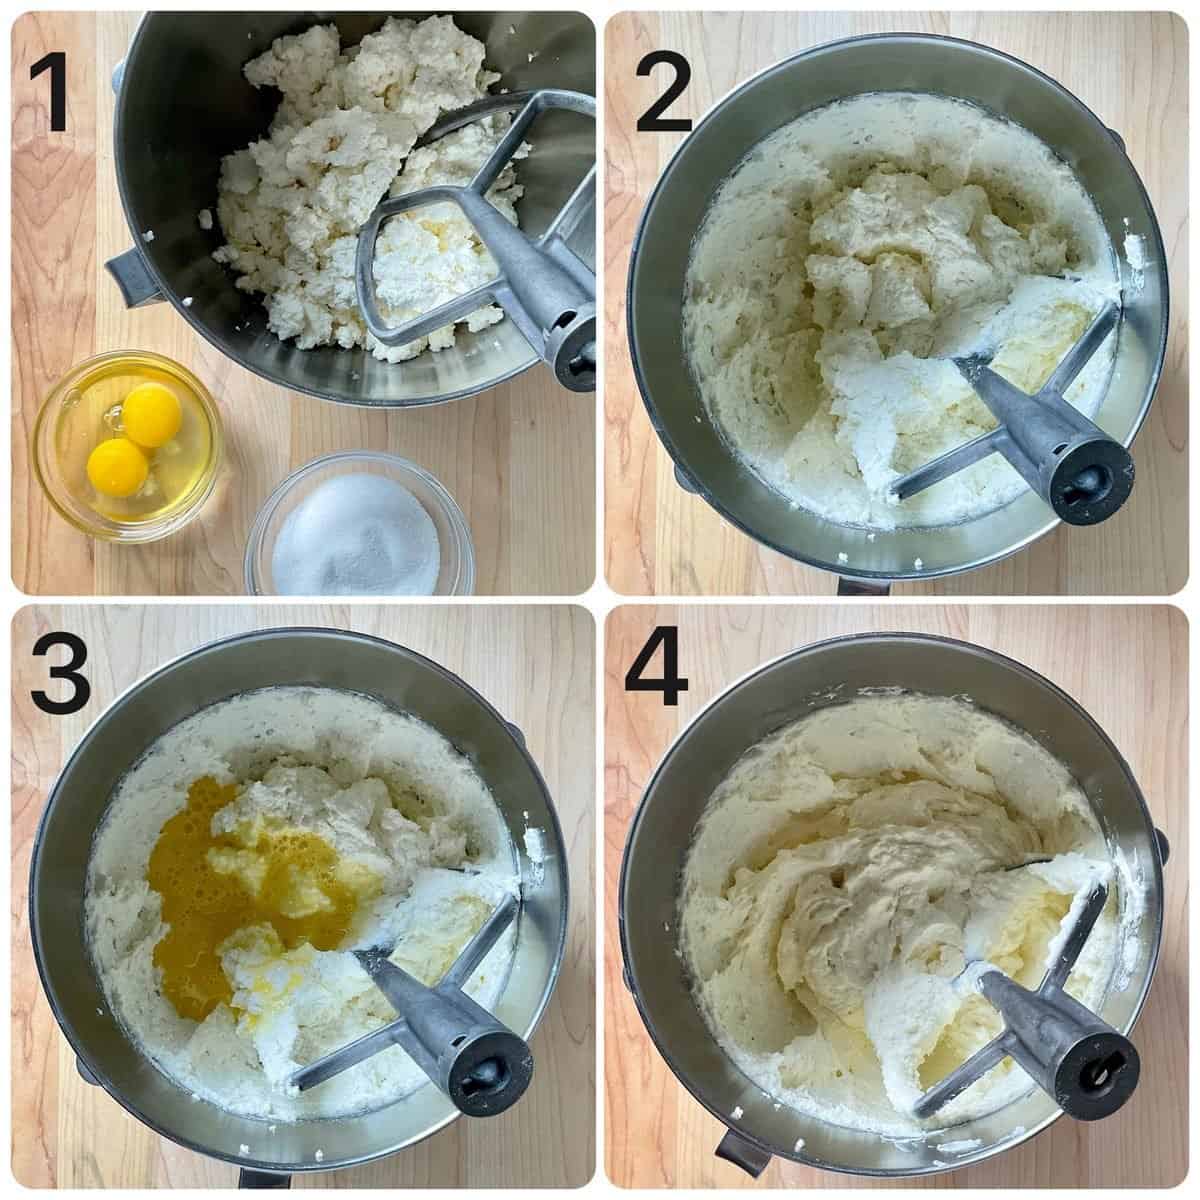
- Place the ricotta in the bowl of a stand mixer and with the paddle attachment, mix the ricotta for one minute on low speed.
- Add 6 tablespoons of granulated sugar, one at a time. Mix on low speed for one minute.
- Add 2 lightly beaten eggs. Mix to combine. You may need to scrape down the sides of the bowl with a rubber spatula.
- The ricotta filling is now ready.
To assemble the pies
Preheat the oven to 350°F (180 °C), line two baking sheets with parchment paper and set them aside.

- Prepare your workstation. Have your measuring tools ready; this includes a tablespoon or scooper, a pastry cutter, or knife. Use a dough press, a 4-inch biscuit cutter, or glass to cut out circles. (Not shown in the photo is the pasta roller). You will also need the ricotta cheese filling you prepared earlier and the dough.
- Lightly flour your work area and cut off one-fourth of the dough.
- Work with one section at a time, cover the rest of the dough with plastic wrap to keep it from drying out. Sprinkle dough with flour.
- Using your fingertips, slightly flatten the dough. If the dough is too sticky, sprinkle a little more flour.
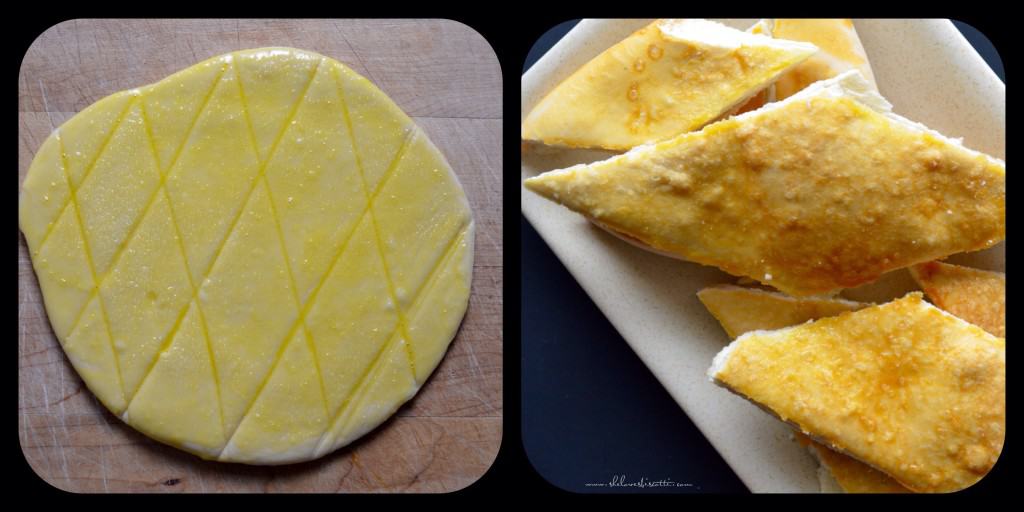
- Run the dough through a pasta roller 2-3 times on the widest setting, dusting with flour if necessary to prevent sticking. Now change to the next smaller setting and repeat until you reach the third setting. Roll out the dough as thinly as possible, using a rolling pin if you are working by hand. It should be about one-sixteenth of an inch in thickness.
- Place the sheet of dough on a lightly floured surface. Using a pastry cutter or knife, cut off a square from the dough and run it through the number 4 setting of the pasta roller only once. Place it in the center of the dough press.
- Fill the dough with the ricotta cheese filling, about 26 grams, using a tablespoon or small ice cream scooper.
- Smooth out the filling, then fold and press to squeeze and seal. Make sure you have a tight seal.
- Remove from the press and use your fingertips to seal the edges properly. You can also use the tines of a fork. Alternatively, use a biscuit cutter or glass to cut out circles.
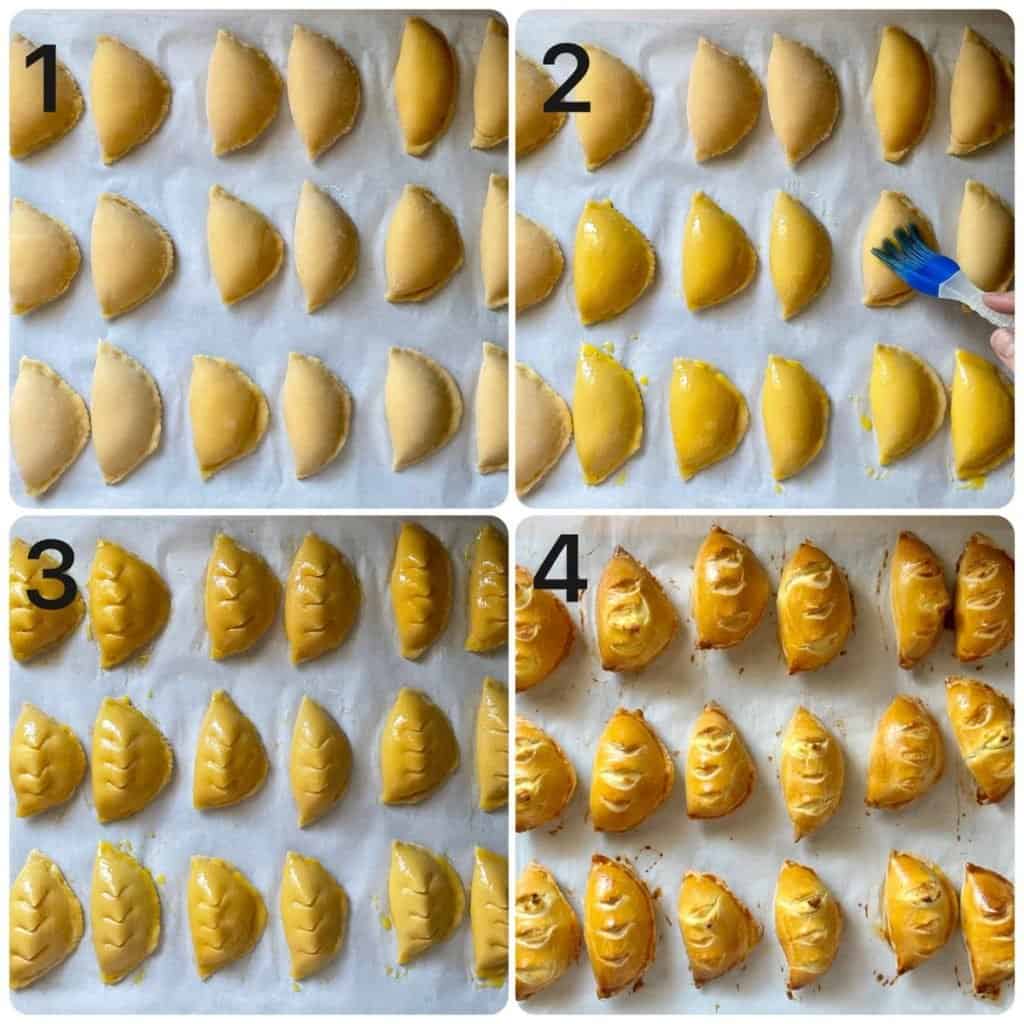
- Carefully transfer the ricotta pies to the prepared baking sheets, making sure they are one inch apart, not touching each other. Reroll the scraps of dough and repeat with the remaining filling and dough.
- Brush the tops of the mini pies with an egg yolk wash (whisk together 2 egg yolks with a teaspoon of milk).
- Then, with a scissor, make three small cuts on the surface of each ricotta pie. This will allow steam to escape during baking.
- Bake in the oven for 20 minutes, then lower the heat to 325 °F (160 °C) and bake for an additional 30 minutes or until the ricotta pies are golden brown in color and the underneath is lightly browned. Depending on your oven, you might want to loosely place a sheet of aluminum paper over the pies to prevent them from over-browning.
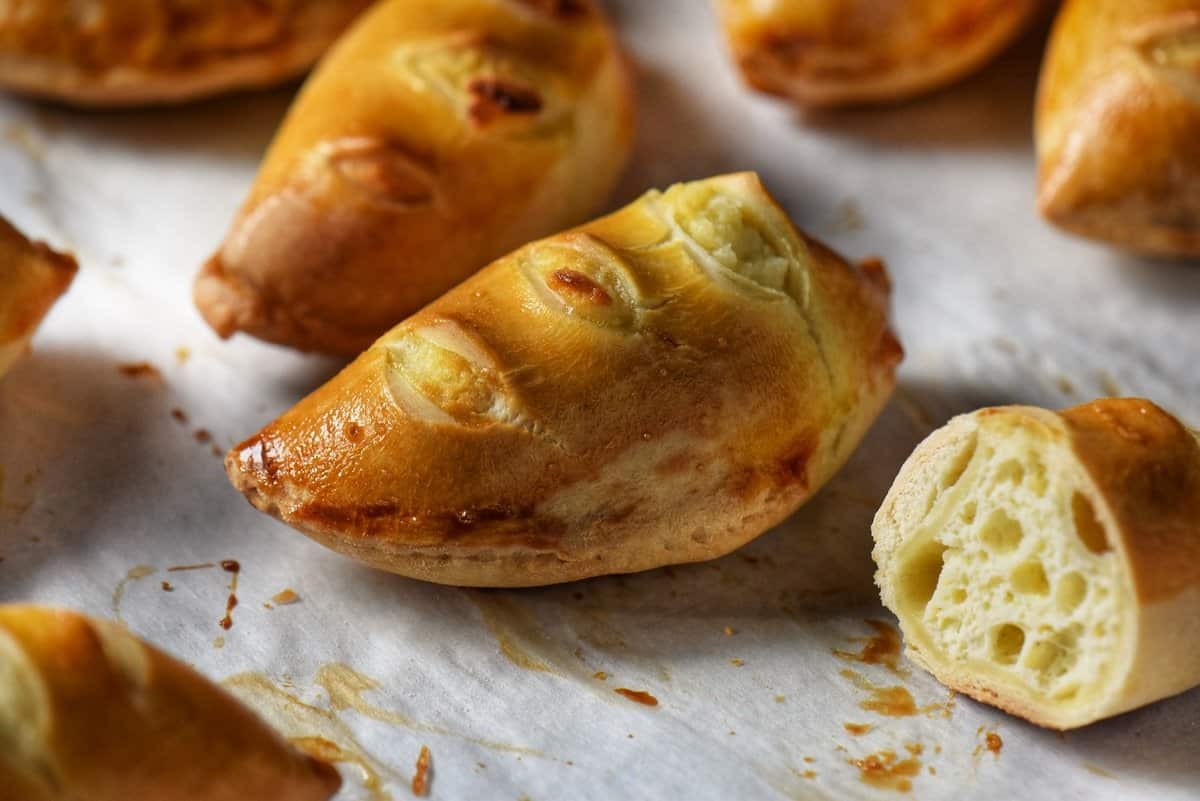
Remove from the oven and let them cool on the baking sheet for about five minutes, then transfer to a wire rack to finish cooling.
Serve at room temperature or cold.
Recipe variations
Please note that I have documented the quantities and ingredients my nonna used to preserve the integrity of the recipe and my family tradition. Here are a few variations that are popular in other parts of Southern Italy:
- adding chocolate chips or candied fruit to the ricotta filling;
- adding orange or lemon zest to the ricotta filling;
- the addition of a flavoring like vanilla extract or ground cinnamon;
- a dusting of confectioners’ sugar
How to store
These ricotta pies will keep for up to three days refrigerated. They can also be frozen for up to three months. To freeze the ricotta pies, allow them to cool completely and then place them in a freezer-safe container. Use parchment paper to separate the layers.
When you need them, remove them from the freezer and leave them at room temperature for 30 minutes before serving. You can also thaw overnight in the refrigerator and serve them cold or bring them to room temperature.
Tips
- The most precise technique to measure flour is by weight. If you don’t have a kitchen scale, fluff your flour and then scoop it using a dry measuring cup and level it off with the back of a knife. For reference, 1 cup of all-purpose flour = 142 grams [source].
- The dough should turn out soft but not sticky. For example, if it is a very sticky dough, add flour, a tablespoon at a time, until you get the texture we are looking for.
- Lightly flour your work surface, the dough press and the pasta roller to prevent the dough from sticking.
- It’s important to remove as much moisture from the ricotta before baking. Place it in a cheesecloth-lined colander over a bowl and let sit for several hours or ideally overnight, covered with plastic wrap so that top doesn’t dry out too much.
- It is important that the ricotta pies are not overfilled, otherwise they will ooze their filling during baking.
- If the ricotta pies are not properly sealed, the filling will leak out during baking. Properly seal the edges by pressing the dough together with your fingertips or using the tines of a fork.
- Feel free to adjust the level of sweetness of the ricotta filling by increasing or decreasing the amount of sugar.
Recipe origins
As I have previously mentioned, my paternal grandmother was born in Ripabottoni, in the province of Campobasso, in the Italian region of Molise.
Both my paternal grandparents lived with my family when I was growing up, and so I witnessed firsthand the mass production of these wonderful homemade pies… dozens and dozens of them.
Would you believe me if I told you that my dad made a wooden cutting board for my mom and nonna? It was 3 x5 feet!
I don’t know about you, but my wooden board is 14 x 20 inches.
Growing up in an Italian household, there were often delicious smells coming from the kitchen. Whether it was biscotti, taralli, or pasta dishes made with cavatelli. Even today, the smells and flavors bring me back to my childhood.
I want to take a minute to explain to you these two pictures.
My parents immigrated to Montreal with one suitcase in hand and the clothes on their back (like so many European immigrants) to find a better way of life for themselves, but mostly for their children.
When I tell you that nothing went to waste… nothing went to waste. In this recipe, the leftover scraps of dough would be re-rolled with the help of a rolling pin. Naturally, my mom’s rolling pin was 4 feet long to match her wooden board.
The dough was slightly scored, brushed with egg wash and sprinkled with sugar before being baked.
My siblings and I would camp out in front of the stove, waiting for my mom to pull this out of the oven, and then argue over who got to eat the most! So simple and yet so so good.
And so, with this recipe for Italian ricotta cheese pie, my baking marathon for Easter is complete.
If you are celebrating Easter, Happy Easter to you and your family. And to my friends celebrating Passover…blessings and good wishes to you and your family!
Buona Pasqua!
If you haven’t already joined, here is the link where you can sign up for my weekly e-mail newsletter. This way, you won’t miss any of my new recipes and it’s free!
THANKS SO MUCH for following and being part of the She Loves Biscotti community, where you will find Simple & Tasty Family-Friendly Recipes with an Italian Twist.
Ciao for now,
Maria
★★★★★ If you have made this sweet ricotta fiadone recipe, I would love to hear about it in the comments below and be sure to rate the recipe!
Recipe

Authentic Italian Mini Ricotta Easter Pies Recipe
Ingredients
The dough:
- 6 eggs room temperature
- 6 tablespoons sugar granulated
- 6 tablespoons vegetable oil
- 4 cups all-purpose flour 568 grams
- extra flour for rolling
The ricotta filling:
- 900 grams ricotta cheese scant 2 pounds, strained
- 6 tablespoons sugar granulated
- 2 eggs lightly beaten
The egg wash:
- 2 egg yolks slightly beaten with 1 teaspoon of milk
Instructions
To make the dough:
- In the bowl of your stand mixer, whisk the eggs at medium speed for about one minute.
- Slowly add the sugar, one tablespoon at a time, and whisk for another minute.
- Add the oil and whisk another minute.
- Add about a quarter to a third of the total amount of the flour and whisk for 1-2 minutes.
- Switch to the dough hook. With the mixer on low speed, add the rest of the flour, one tablespoon at a time. You may not need to use all of the flour. Reserve the 1-2 tablespoons of flour for later.
- "Knead" dough for about 8-10 minutes. The dough should be soft, smooth, and slightly sticky at the end of this process. You will notice the dough pulling away from the sides of the bowl while still adhering to the bottom. Alternately, you can knead by hand.
- With damp hands, remove the dough from the dough hook. Then on a lightly floured surface, knead for 30 seconds until smooth. The dough should no longer be tacky. If it is, dust with flour and knead a little more.
- Shape the dough into a ball and place it in a lightly greased bowl, turn once to coat. Cover with plastic wrap and let it rest for one hour.
To make the ricotta filling:
- Place the ricotta in the bowl of a stand mixer and with the paddle attachment, mix the ricotta for one minute on low speed.
- Add the granulated sugar, one tablespoon at a time. Mix on low speed for one minute.
- Add the lightly beaten eggs. Mix to combine. You may need to scrape down the sides of the bowl with a rubber spatula.
- The ricotta filling is now ready.
To assemble the pies:
- Preheat the oven to 350°F (180 °C). Line two baking sheets (or one large) with parchment paper and set them aside.
- Prepare your workstation. Have your measuring tools ready, this includes a tablespoon or scooper, a pastry cutter or knife. Use a dough press or a 4-inch biscuit cutter or glass to cut out circles. You will also need the ricotta cheese filling you prepared earlier and the dough.
- Lightly flour your work area and cut off one-fourth of the dough. Work with one section at a time, cover the rest of the dough with plastic wrap to keep it from drying out. Using your fingertips, slightly flatten the dough. If the dough is too sticky, sprinkle a little more flour.
- Run the dough through a pasta roller 2-3 times on the widest setting, dusting with flour if necessary to prevent sticking. Now change to the next smaller setting and repeat until you reach the number 3 setting. If you are working by hand, roll out the dough as thinly as possible, using a rolling pin. It should be about one-sixteenth of an inch in thickness.
- Place the sheet of dough on a lightly floured surface. Using a pastry cutter or knife, cut off a square from the dough and run it through the number 4 setting of the pasta roller only once. Place it in the center of the dough press.
- Fill the dough with the ricotta cheese filling, about 26 grams, using a tablespoon or small ice cream scooper.
- Smooth out the filling, then fold over and press (refer to step-by-step photos in the article).
- Smooth out the filling, then fold over and press, to squeeze and seal. Make sure you have a tight seal.
- Remove from the press and use your fingertips to properly seal the edges. You can also use the tines of a fork. Alternatively, use a biscuit cutter or glass to cut out circles.
- Carefully transfer the ricotta pies to the prepared baking sheets, making sure they are one inch apart, not touching each other. Reroll the scraps of dough and repeat with the remaining ricotta filling and dough.
- Brush the tops of the mini pies with an egg yolk wash (whisk together 2 egg yolks with a teaspoon of milk). Then, with a scissor, make three small cuts on the surface of each ricotta pie. This will allow steam to escape during baking.
- Bake in the preheated oven for 20 minutes, then lower the heat to 325 °F (160 °C) and bake for an additional 30 minutes or until the ricotta pies are golden brown in color and the underneath is lightly browned. Depending on your oven, you might want to loosely place a sheet of aluminum paper over the pies to prevent them from over-browning.
- Remove from the oven and let them cool on the baking sheet for about five minutes, then transfer to a wire rack to finish cooling.
- Serve at room temperature or cold. Can also be frozen.
Notes
- The most precise technique to measure flour is by weight. If you don’t have a kitchen scale, fluff your flour and then scoop it using a dry measuring cup and level it off with the back of a knife. For reference, 1 cup of all-purpose flour = 142 grams [source].
- When making the dough, it should turn out soft, but not sticky. If it is a very sticky dough, add flour, a tablespoon at a time, until you get the texture we are looking for.
- Lightly flour your work surface, the dough press and the pasta roller to prevent the dough from sticking.
- It’s important to remove as much moisture from the ricotta before baking. Place it in a cheesecloth-lined colander over a bowl and let sit for several hours or ideally overnight, covered with plastic wrap so that top doesn’t dry out too much.
- It is important that the ricotta pies are not overfilled, otherwise, they will ooze their filling during baking.
- If the ricotta pies are not properly sealed, the filling will leak out during baking. Properly seal the edges by pressing the dough together with your fingertips or using the tines of a fork.
- Feel free to adjust the level of sweetness of the ricotta filling by increasing or decreasing the amount of sugar.
Nutrition
This post was originally published on April 5, 2015, and republished on April 12, 2022, with updated content and photos. Thanks for sharing!
Letizia
Can’t wait to try them. I ‘ve always loved them but never made them.
I’m a former Montrealer living in San Diego, and I love your blog.
How big is the dough press ?
I have 3 sizes.
Maria
Great question Letizia! The one I use is 4 inches in diameter. You can really make them any size you want… you only have to adjust the amount of filling and the bake time. I will update this measurement in the recipe. Truly appreciate you dropping by. Have a great day 🙂
Jackie
Hi Maria,
thank you so much for this recipe.. I will be making them this weekend…they look amazing!
Maria
My pleasure Jackie! Appreciate you taking the time to comment 🙂
Jackie
Hello Maria,
This is a recipe both my mom and grandma used to make, it brings alot of memories especially around Easter, I want to try to make them myself, I understand you have to leave them at room temperature for about 6 hours, I was wondering if you need to add magic baking powder or dry yeast for the dough to double in size, did you forget to mention that?.. Thank you so much!!
Maria
Hi Jackie! Welcome 🙂 No magic powder and no yeast… that’s the way my mom and nonna would make them. Thanks so much for dropping by 🙂
Julie
Maria,
I forgot to mention in my earlier email that my grandparents came from
Campobasso too!!
Julie
Maria
All your recipes bring back so many memories of my grandmother’s
cooking. This is the best website ever! Than you for getting back to me so quickly!
Maria
It is truly my pleasure Julie ♥♥♥ Have a wonderful day!
Julie
These look so delicious! Should the dough rest at room temperature or in the refrigerator? Thank you for all your wonderful recipes!!
Maria
Thanks so much Julie ♥ I leave the dough out at room temperature. Appreciate your comment, will update the recipe. Thanks so much for dropping by 🙂
Phyllis
Hi,
Do you have to let the dough rest that long?
I was hoping to make them this evening.
Thanks,
Phyllis
Maria
Hi Phyllis, the longer the dough rests, the easier it is to work with. Let me know if I can help with anything else 🙂
toni
Can u add fruit and how much. Thank you
Maria
Hi Toni, I have tasted some versions that will have candied fruit …not sure if that is what you are referring to. As to the amounts, you would have to experiment … If you are referring to regular fruit -my concern would be the high water content. Once again, the recipe would have to be tested. Appreciate your comment. Thanks for dropping by 🙂
toni
Thank you, maybe I’ll try cinnamon or nutmeg, what do u think?
Maria
Yes, that would definitely work! A few pinches of each spice will give the ricotta a nice depth of flavor. When I wrote down this recipe, my goal was to document the way my grandmother and mother made the recipe. As you can tell, it has very uncomplicated flavors. I appreciate you taking the time to comment, thanks Toni 🙂
Karen
Since my beloved grandmother passed away, I have not seen such wonderful Easter pies! I have been looking for the very recipe you have given us. Thank you, thank you. I remember my grandmother sending me these beautiful Easter pies when I went away to college my freshman year so that I would not be homesick. You are bringing me back to my childhood. Thank you, so much, again.
Maria
Hi Karen,
Your words really hit home for me. Thank-you for your kind thoughts. I also have so many fond memories of my grand-mother and my mom. I am always amazed at how food has the power to elicit so many wonderful memories. I truly appreciate you taking the time to comment.
Thalia @ butter and brioche
These little ricotta pies look VERY delicious. I wish I had one now!
Maria
Hi Thalia,
My Mom and Grandmother would make Ricotta Pies in half moon shapes…but then again, they would make dozens! I like these little pies because the ratio of filling to crust is just right. Appreciate your comment, thanks!