Italian Panini Bread Recipe: Soft and Fluffy
Make authentic Italian panini bread with a soft crust and tender crumb using a simple stretch-and-fold technique. This panini recipe is perfect for sandwiches, easy to follow, and requires no stand mixer.
Servings 8 servings
Calories 242kcal
Ingredients
- 350 grams water 1⅔ cups, lukewarm
- 33 grams olive oil 2 ½ tablespoons, extra virgin
- 450 grams bread or pizza flour approx. 3¼ cups
- 7 grams active dry yeast 2 ¼ teaspoons
- 8 grams salt 1 ¼ teaspoons
- additional flour for dusting the wooden board
Instructions
- Mix liquids: Whisk water and olive oil in a bowl.
- Mix dry ingredients: Whisk flour and yeast in a separate bowl. Transfer to a rectangular dish.
- Combine: Make a well in the flour mixture, pour in liquids, and mix into a shaggy dough. Cover and rest for 2–3 minutes.
- Add salt: Sprinkle salt over the dough and mix until well incorporated. Cover and let the dough rest in a warm spot for 15 minutes. (Oven with light on or proof mode works well.)
- Stretch and fold: Perform 2 sets of stretch-and-folds and 2 sets of coil folds, resting for 15 minutes between each (REFER TO RECIPE NOTES FOR DETAILS).
- Preheat the oven to 425°F (220°C) with a pizza stone on the middle rack and a metal pan on the lower rack.
- Turn out and divide: Invert onto a floured surface, divide into 6–8 portions.
- Shape and form panini: Fold, roll, cup, and shape each portion into an oblong-shaped roll. Place seam-side down on a parchment-lined surface. (REFER TO RECIPE NOTES FOR DETAILS).
- Final proof: Cover loosely with plastic wrap and a tea towel and proof for 30 minutes at room temperature.
- Score & bake: Shallow cut lengthwise, transfer the panini onto the hot pizza stone. Add ice cubes to the pan on the lower rack, and bake for 25-30 minutes until tops are pale golden and the bottoms sound hollow when tapped.
- Cool: Transfer to a wire rack before slicing.
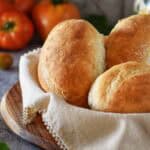
- Makes 8 rolls, each about 5" (13 cm) × 2½" (6 cm) — perfect for slicing and filling.
- Detailed step-by-step photos are included in the article. You can also watch the video on the recipe card to see how to shape these Italian panini.
Video
Notes
Stretch & fold — 1st and 2nd set
- With damp hands, lift the top right corner of the dough, stretch upward, and fold toward the center.
- Repeat from the top middle and top left.
- Rotate the dish 180° and repeat from the opposite edge (right, middle, left) — a total of 6 folds.
- The dough will now be slightly mounded in the center. Slide your hands under the sides (short end), lift gently, and flip it upside down so the smooth side is facing up, keeping its long side aligned with the dish. This flip helps redistribute the gas bubbles and creates a smoother surface for the next rise.
- Gently stretch the edges to settle it back into a rectangular shape.
- Cover and rest 15 minutes, then repeat the stretch-and-fold once more.
- With damp hands, lift the dough from the middle so it sags down on both sides.
- Drop back down into the pan.
- Gently stretch the corners to maintain a rectangular shape.
- Cover and rest for 15 minutes, then repeat the coil fold one more time.
- Lightly flour your hands and work surface.
- Working with one piece of dough at a time (it will be roughly rectangular from cutting), start at the narrow end and roll it tightly away from you. Tuck in the ends as you roll. Gently press down with each turn to keep the shape tight.
- Once rolled, cup your hands around the dough and gently pull it toward you to create surface tension, forming a smooth cylinder with a taut top. You can also use a bench scraper to help tighten the shape.
- Place the oblong-shaped roll seam-side down on a parchment-lined surface.
- Cover loosely with plastic wrap and a tea towel to prevent drying.
- Repeat with the remaining dough portions
- Lukewarm water (105–110°F / 40–43°C)
- Wet fingertips to handle sticky dough
- Rest periods make folds easier
- Warm proof (80°F / 27°C) — oven light on works great
- Score to guide the rise (optional)
- Steam for a soft crust & full rise
Nutrition
Serving: 1serving | Calories: 242kcal | Carbohydrates: 41g | Protein: 7g | Fat: 5g | Saturated Fat: 1g | Polyunsaturated Fat: 1g | Monounsaturated Fat: 3g | Sodium: 391mg | Potassium: 65mg | Fiber: 2g | Sugar: 0.2g | Vitamin A: 1IU | Vitamin C: 0.003mg | Calcium: 10mg | Iron: 1mg
