

Make authentic Italian panini bread with a soft crust and tender crumb using a simple stretch-and-fold technique. This panini recipe is perfect for sandwiches, easy to follow, and requires no stand mixer.
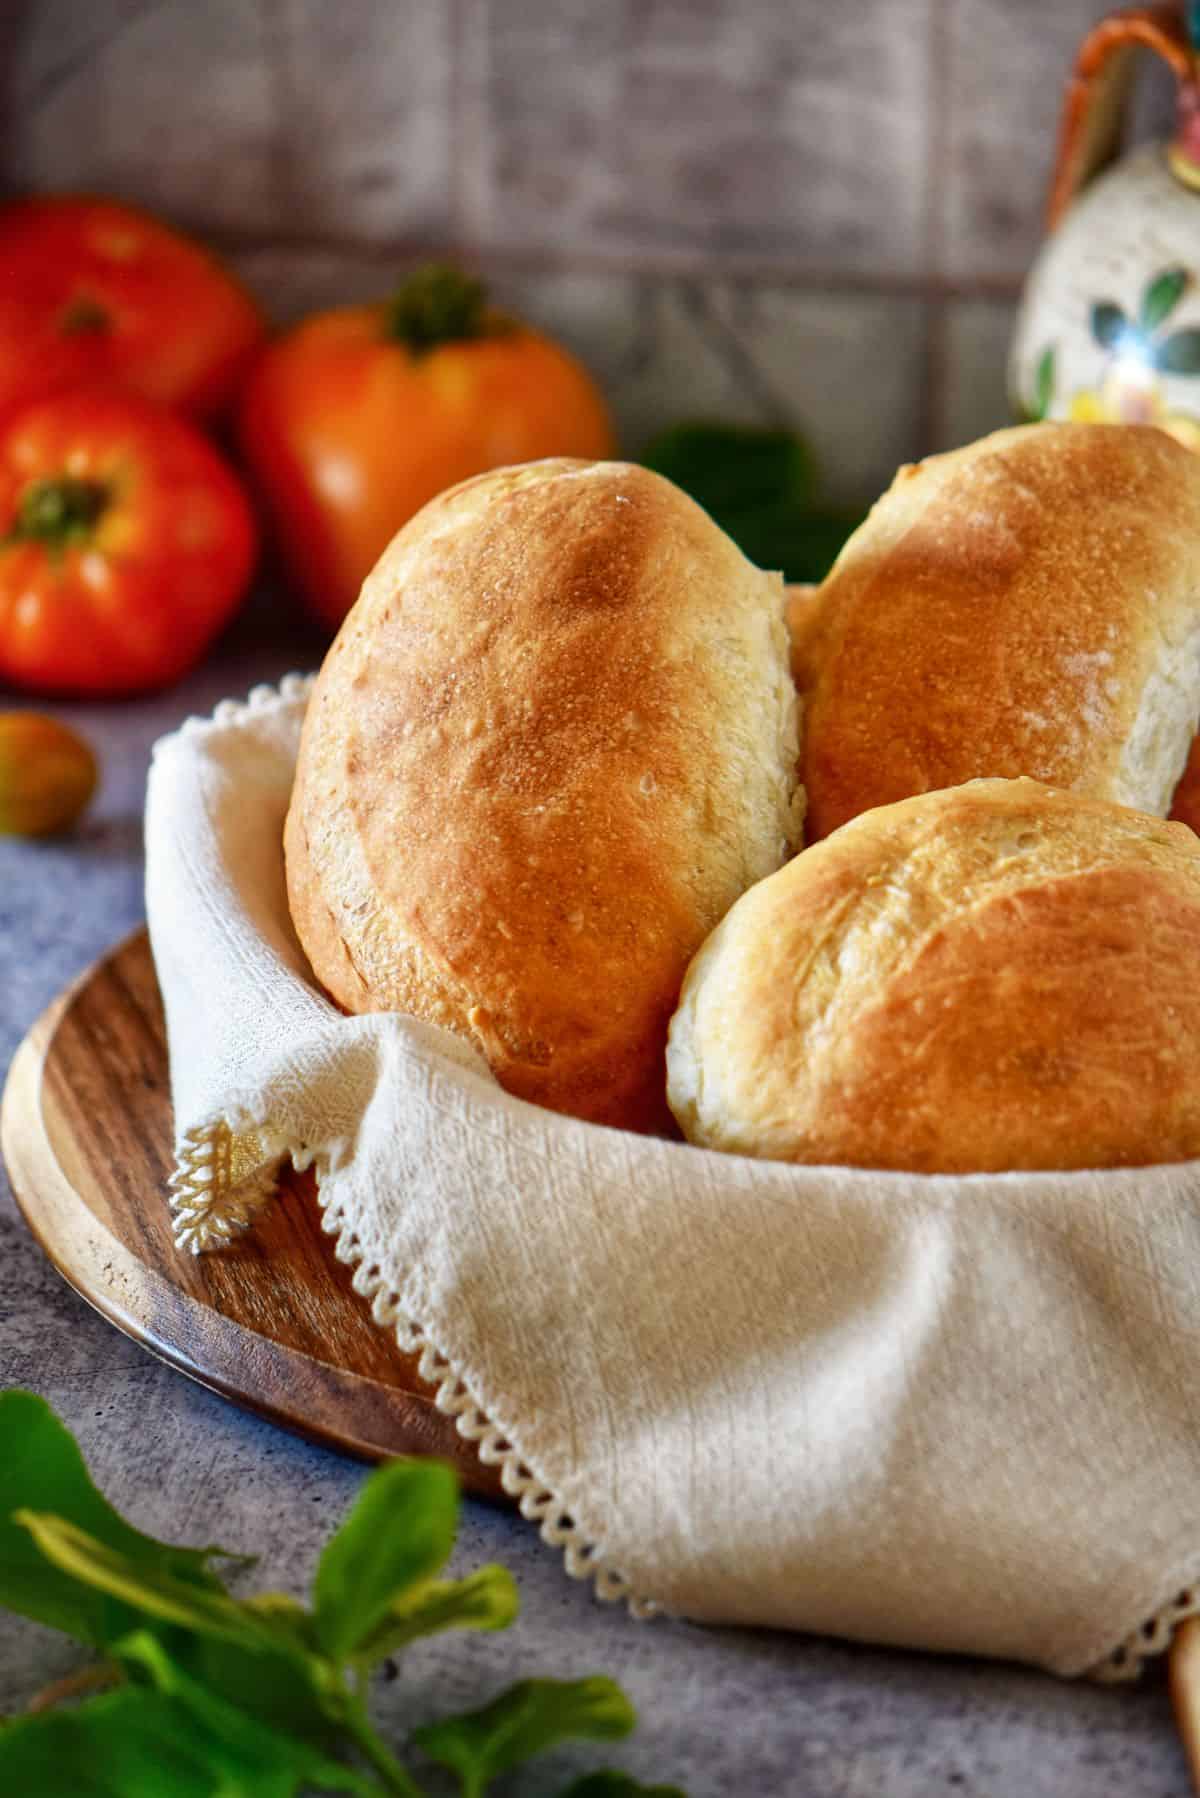
Growing up in an Italian household, there was nothing better than a sandwich made with fresh panini bread. The first bite always had that perfect balance of chewiness and softness, and the aroma while it baked in the oven was absolutely irresistible.
If you're not familiar, panino (singular of panini) literally means a small bread roll. Over time, the word has also come to refer to a sandwich made with Italian panini bread: the roll is sliced horizontally, filled with Italian deli ingredients or vegetables, and can be enjoyed warm, grilled, or even at room temperature.
If you've ever wondered how to recreate that bakery-style panini at home, this bread recipe is for you.
Using a beginner-friendly no-knead method, we'll combine stretch-and-fold and coil folds to build structure without heavy kneading-so your rolls bake up light, airy, and full of flavor.
And the best part? No overnight wait. Just a slow gluten build, a little steam during baking, and shaping tips to get that ideal sandwich size every time.
Are you ready to make your bakery-style panini bread at home? Let's get started.
Jump to:
Prep and Bake Time
- Active prep time: ~45 minutes
- Resting & proofing: ~2 hours
- Baking: 25-30 minutes
- Cooling: 15 minutes
Total time: ~3 hours 30 minutes
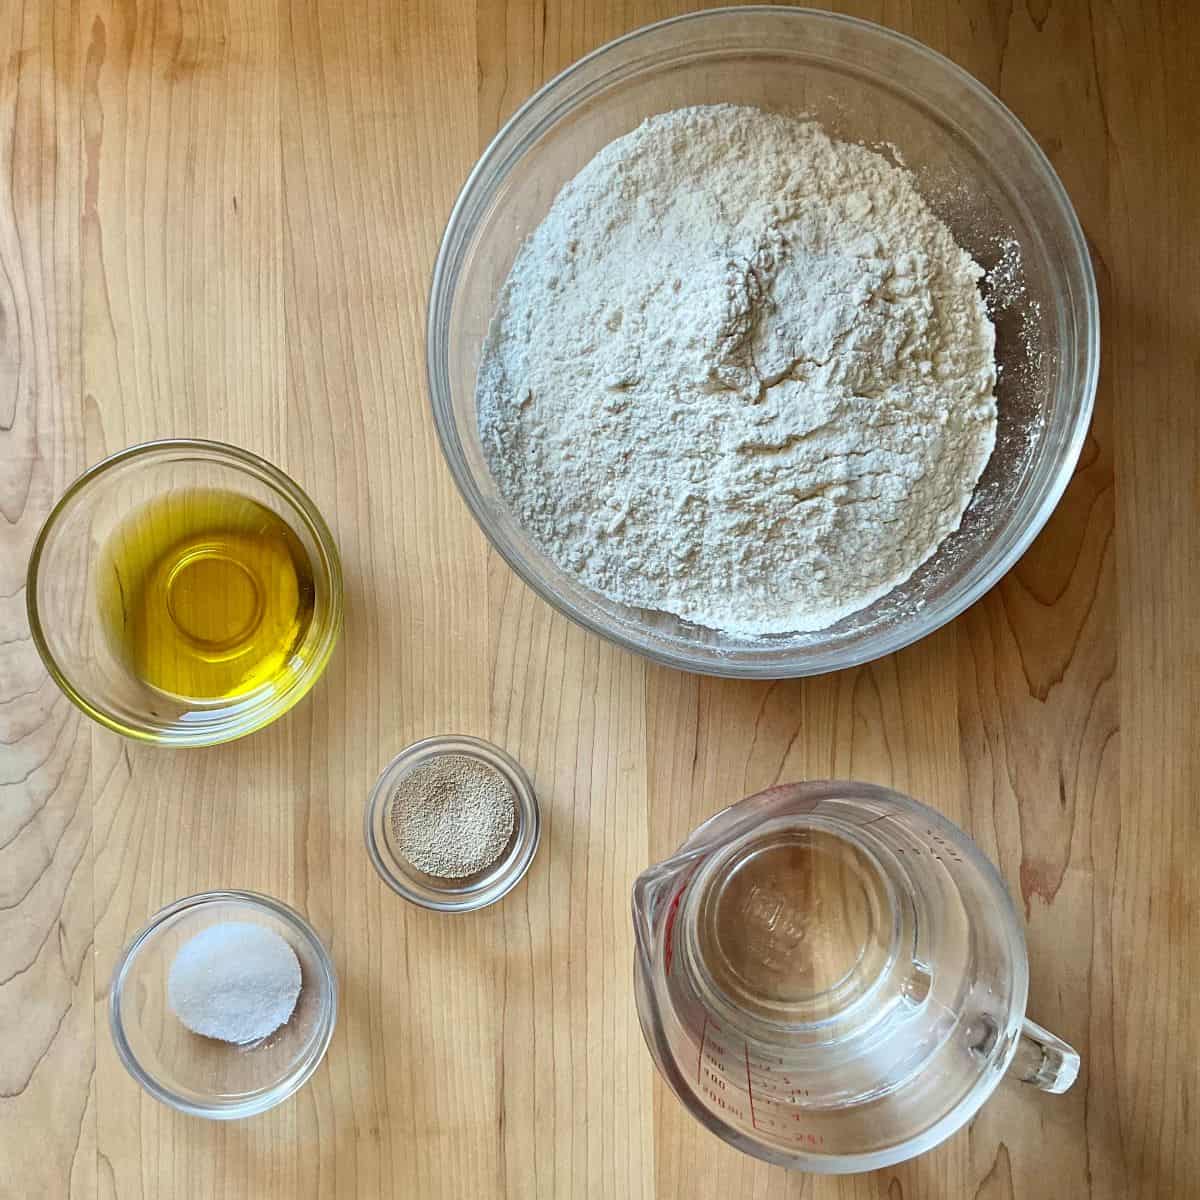
Ingredients
- Bread or pizza flour: This high-protein flour helps create a light, airy structure for our bread.
- Active dry yeast: The leavening agent that makes the dough rise. Be sure it's active for the best results-if unsure, proof it in warm water with a pinch of sugar before adding to the recipe.
- Extra virgin olive oil: Adds richness and helps keep the crust tender.
- Lukewarm water: Warm to the touch, about 43°C / 110°F. I also like to use the liquid left over from making ricotta (whey) for extra flavor.
- Salt: Essential for flavor. I like to add it after the initial mix for better gluten development.
- Ice cubes: Optional, but the easiest way to create steam for a bakery-style texture.
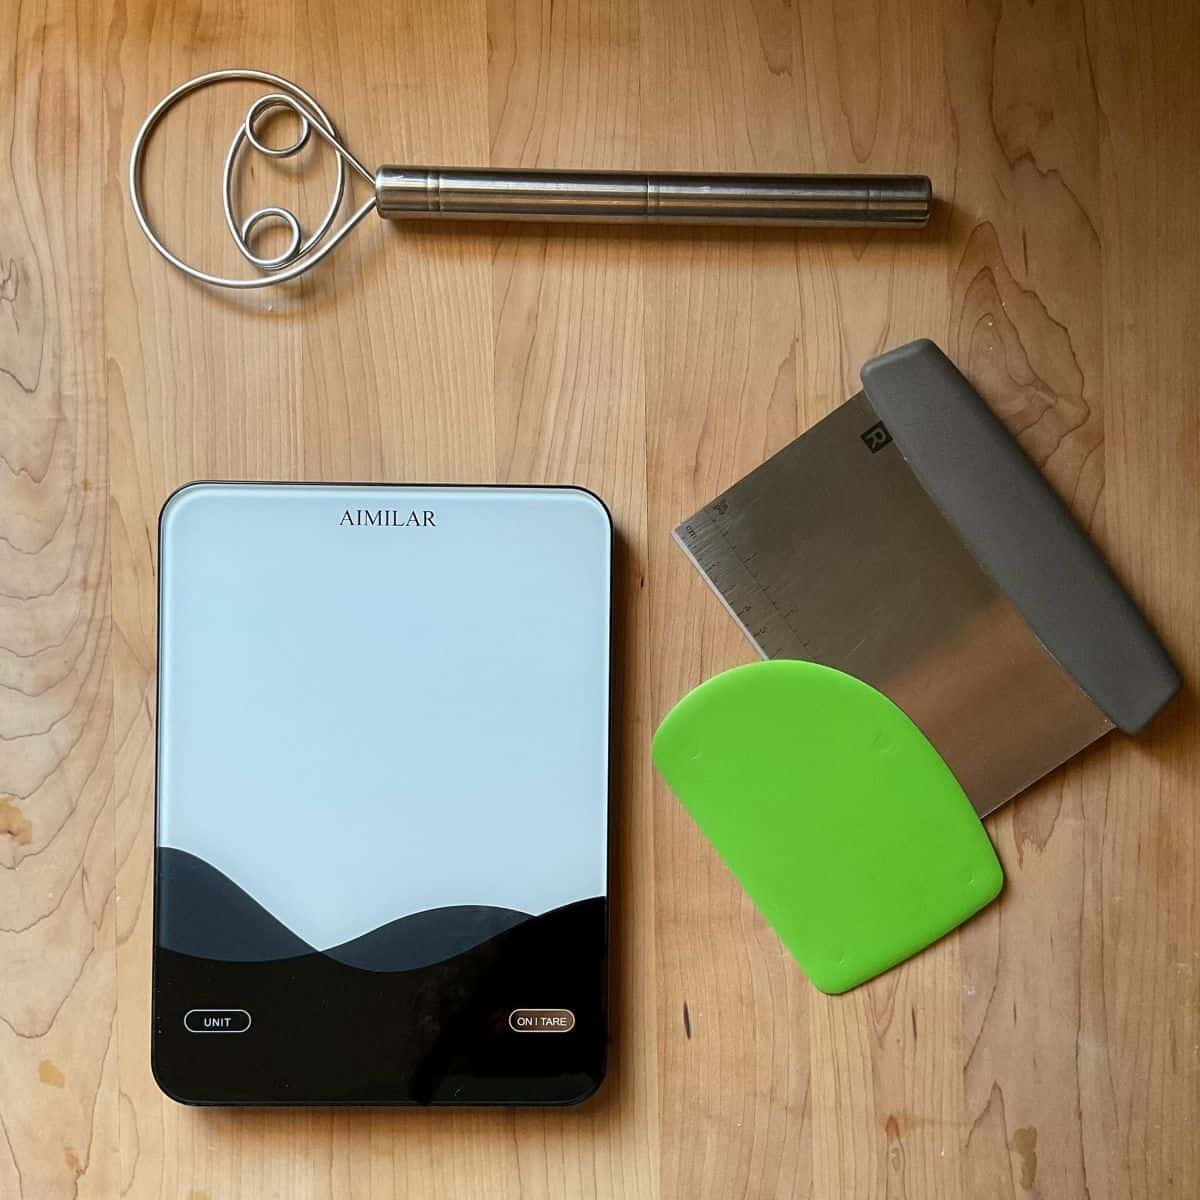
Equipment
- Pizza stone (or alternative) - A pizza stone helps create even heat and a crisp bottom crust. If you don't have one, use an upside-down heavy baking sheet that has been preheated in the oven.
- Large rectangular baking dish - Ideal for the initial mixing and resting phases, giving the dough room to spread.
- Dough whisk or wooden spoon - For mixing the shaggy dough without overworking it.
- Small dough scraper or bench scraper - Perfect for folding, dividing, and lifting sticky dough without tearing it.
- Digital kitchen scale - For precise measurements. This is a key factor when baking bread.
- Oven-safe metal pan - To hold ice cubes and create steam in the oven (avoid glass, as it can shatter).
- Parchment paper - Makes transferring the shaped dough to the oven easier and prevents sticking.
- Sharp knife or bread lame - For scoring the dough just before baking.
- Wire cooling rack - Allows the bread to cool evenly without trapping steam underneath.
How to Make Homemade Panini Bread
Mix the liquid and dry ingredients
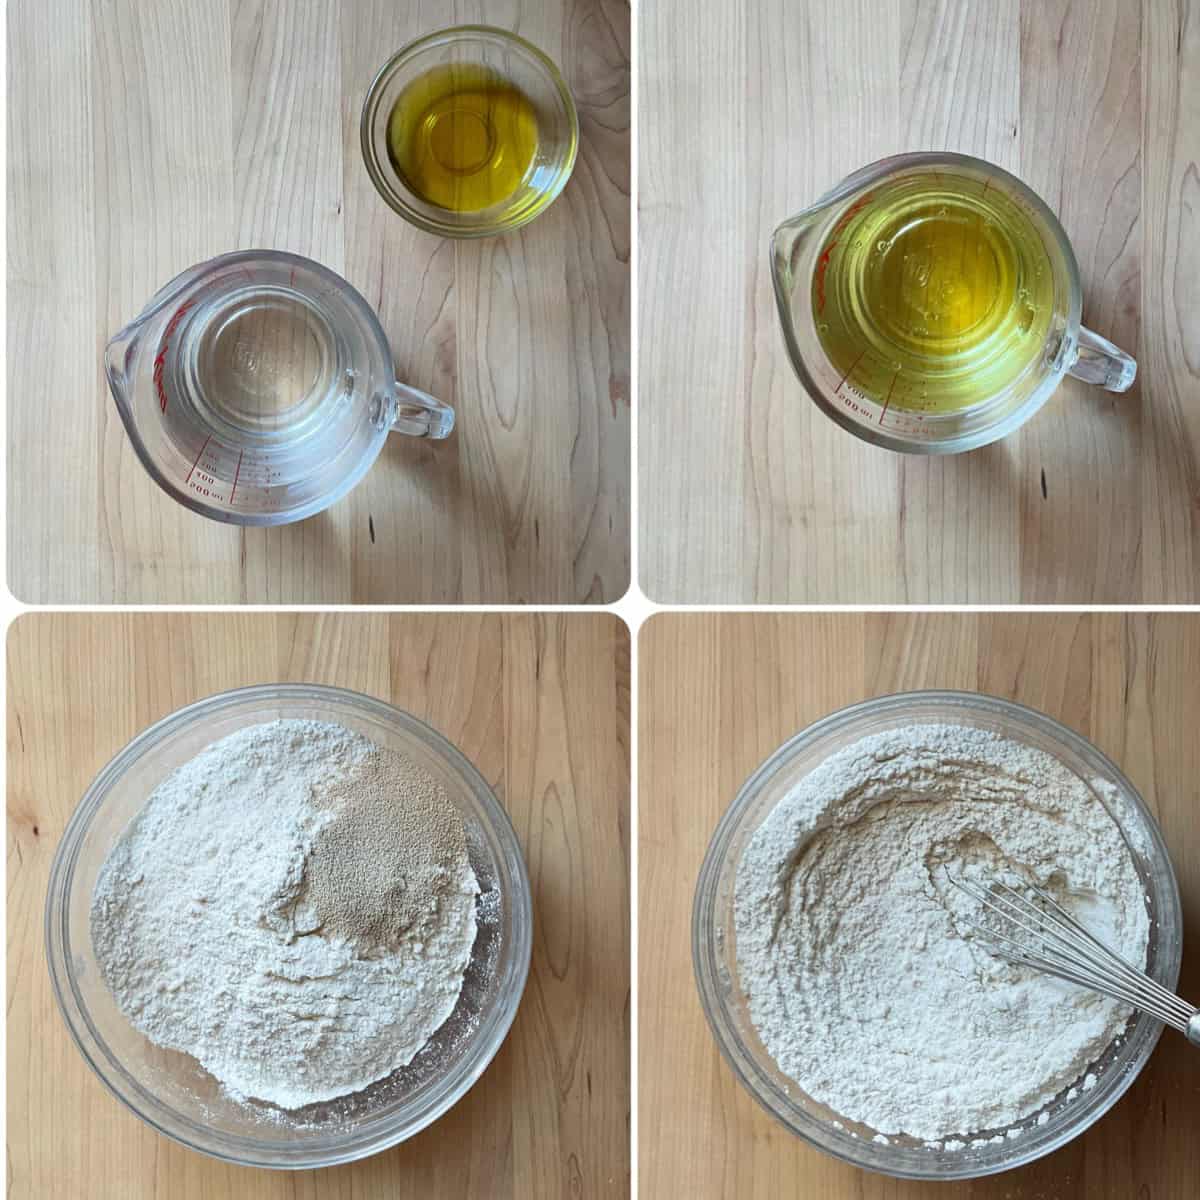
- In a bowl or large measuring cup, whisk together lukewarm water (350 grams / 1 ⅔ cups) and extra-virgin olive oil (33 grams / 2 ½ tablespoons).
- In another bowl, whisk together bread flour (450 grams / about 3 ¼ cups) and active dry yeast (7 g / 2 ¼ teaspoons).
Combine and rest
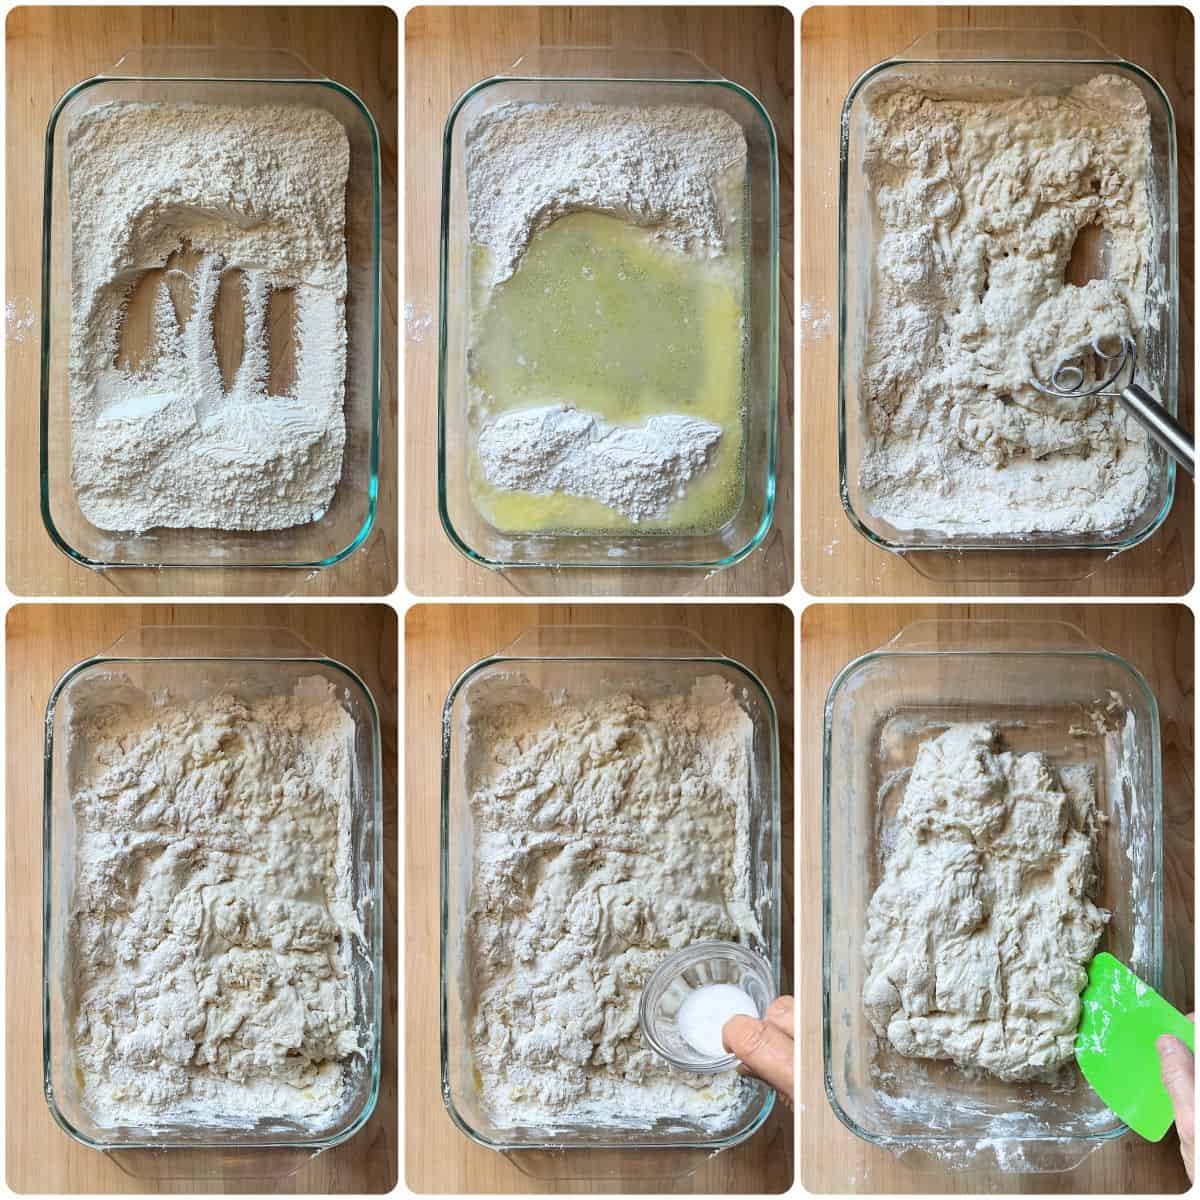
- Transfer the flour-yeast mixture into a large rectangular baking dish.
- Make a well in the center and pour in the water-oil mixture.
- Using a dough whisk or wooden spoon, mix until you get a shaggy dough.
- Cover with a damp kitchen towel or plastic wrap and let rest 2-3 minutes.
- Sprinkle kosher salt (8 grams / 1 ¼ teaspoons) evenly over the dough.
- Mix with a dough scraper, wooden spoon, or hands until the flour is incorporated.
- Gently spread the dough out in the dish.
- Cover and let the dough rest in a warm spot for 15 minutes. (Oven with light on or proof mode works well.)
Stretch & fold - 1st and 2nd set
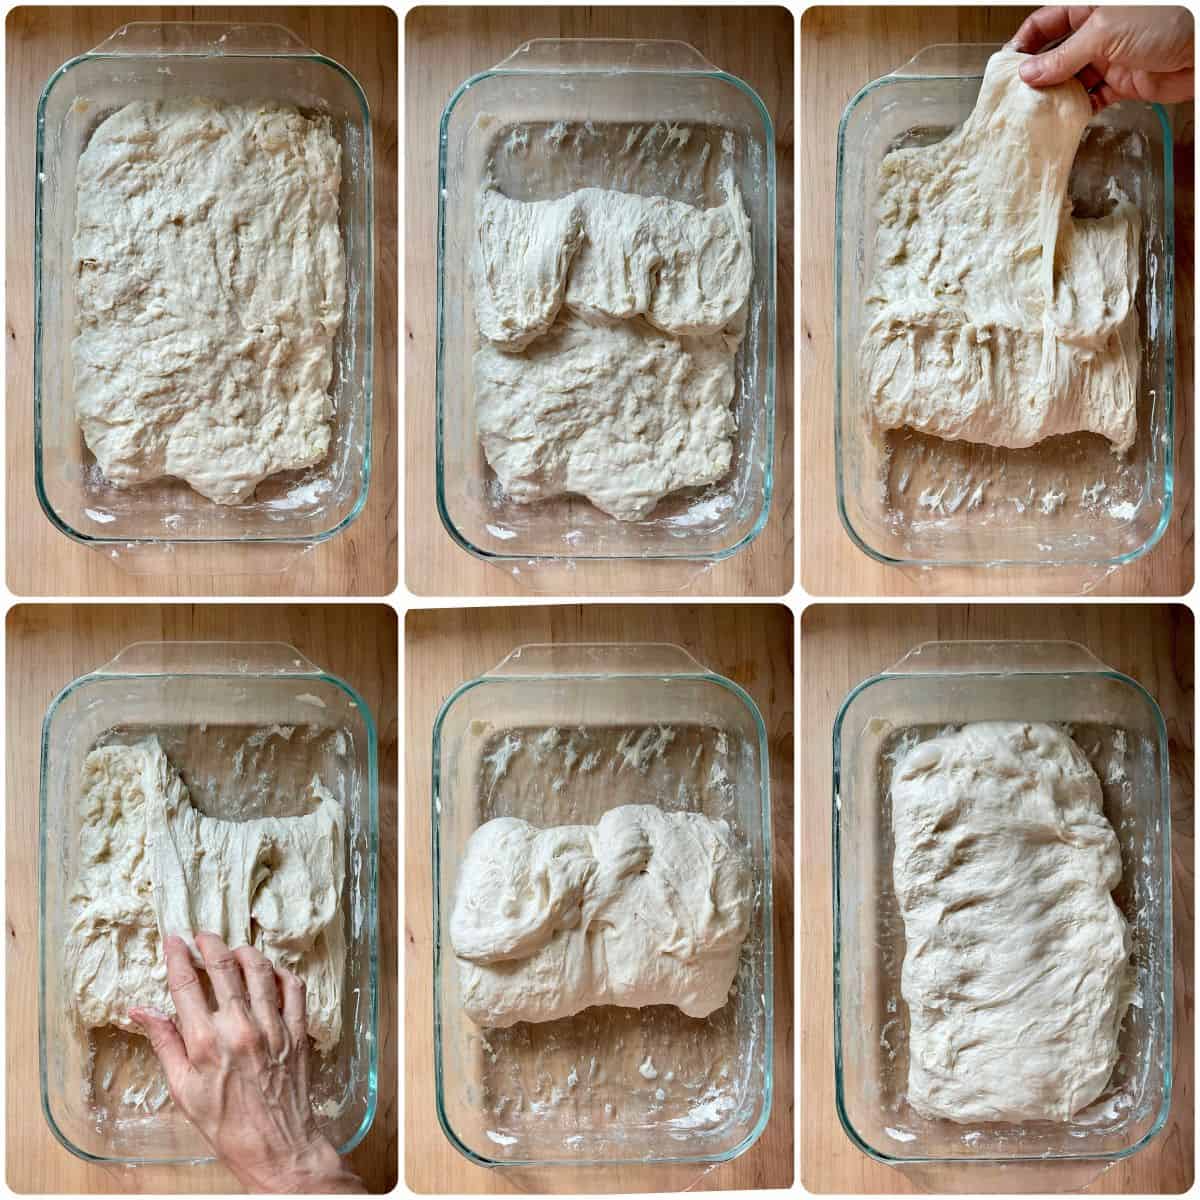
- With damp hands, lift the top right corner of the dough, stretch upward, and fold toward the center.
- Repeat from the top middle and top left.
- Rotate the dish 180° and repeat from the opposite edge (right, middle, left) - a total of 6 folds.
- The dough will now be slightly mounded in the center. Slide your hands under the sides (short end), lift gently, and flip it upside down so the smooth side is facing up, keeping its long side aligned with the dish. This flip helps redistribute the gas bubbles and creates a smoother surface for the next rise.
- Gently stretch the edges to settle it back into a rectangular shape.
- Cover and rest 15 minutes, then repeat the stretch-and-fold once more.
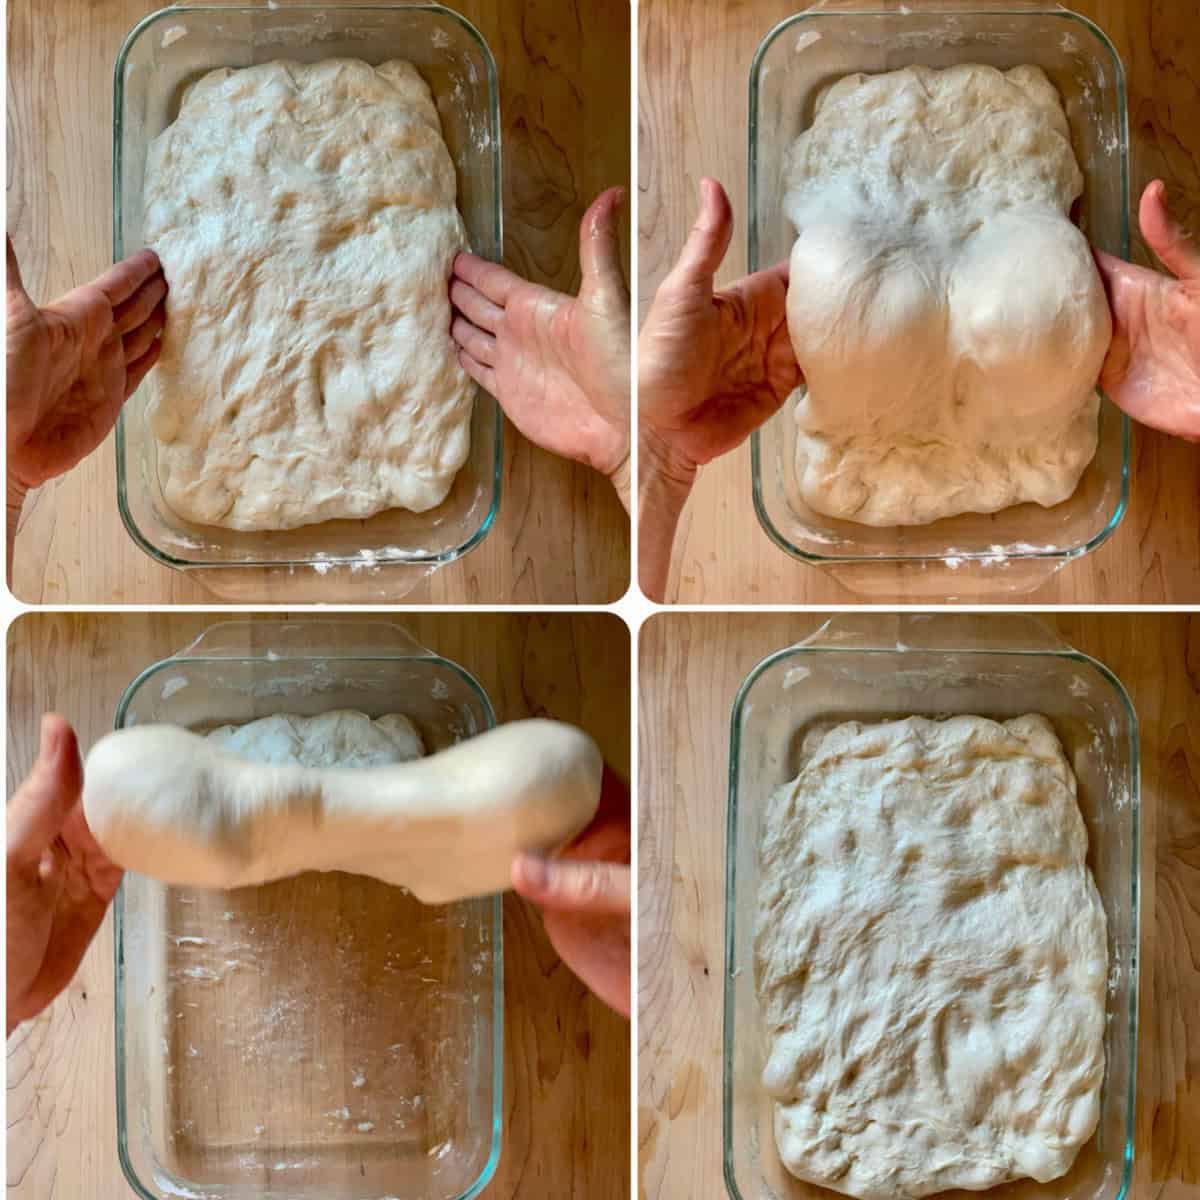
Coil folds - 3rd and 4th set
- With damp hands, lift the dough from the middle so it sags down on both sides.
- Drop back down into the pan.
- Gently stretch the corners to maintain a rectangular shape.
- Cover and rest for 15 minutes, then repeat the coil fold one more time.
Preheat the oven and prepare the setup
- Start preheating your oven to 425°F (220°C).
- Place a pizza stone on the middle rack of the oven. Place another rack directly below this one. Place a metal pan (not a glass pan) on this lower rack.
Turn out and divide the dough

- After the final rest, sift the flour over a wooden board or a clean, flat surface.
- Quickly invert the baking pan over the floured surface and let the dough release by gravity - avoid pulling it to prevent tearing the gluten.
- Sift a little flour over the top.
- Using a large metal bench scraper, cut the dough into 6 to 8 equal rectangular portions. Eyeball the size or weigh for accuracy.
Shaping and forming the panini
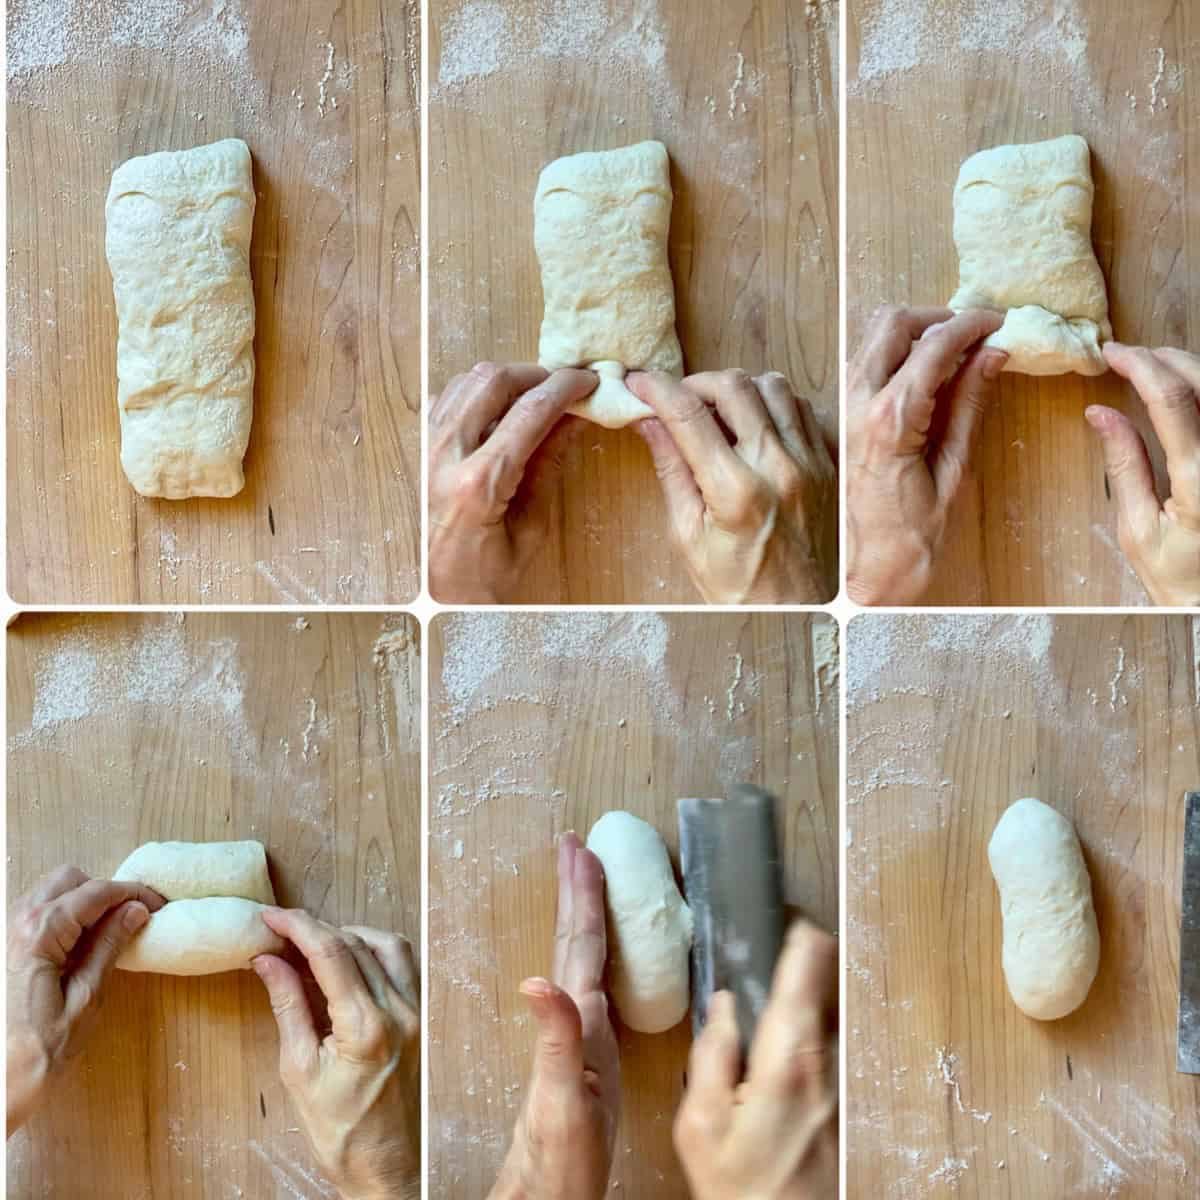
- Lightly flour your hands and work surface.
- Working with one piece of dough at a time (it will be roughly rectangular from cutting), start at the narrow end and roll it tightly away from you. Tuck in the ends as you roll. Gently press down with each turn to keep the shape tight.
- Once rolled, cup your hands around the dough and gently pull it toward you to create surface tension, forming a smooth cylinder with a taut top. You can also use a bench scraper to help tighten the shape.
Rest, score and bake
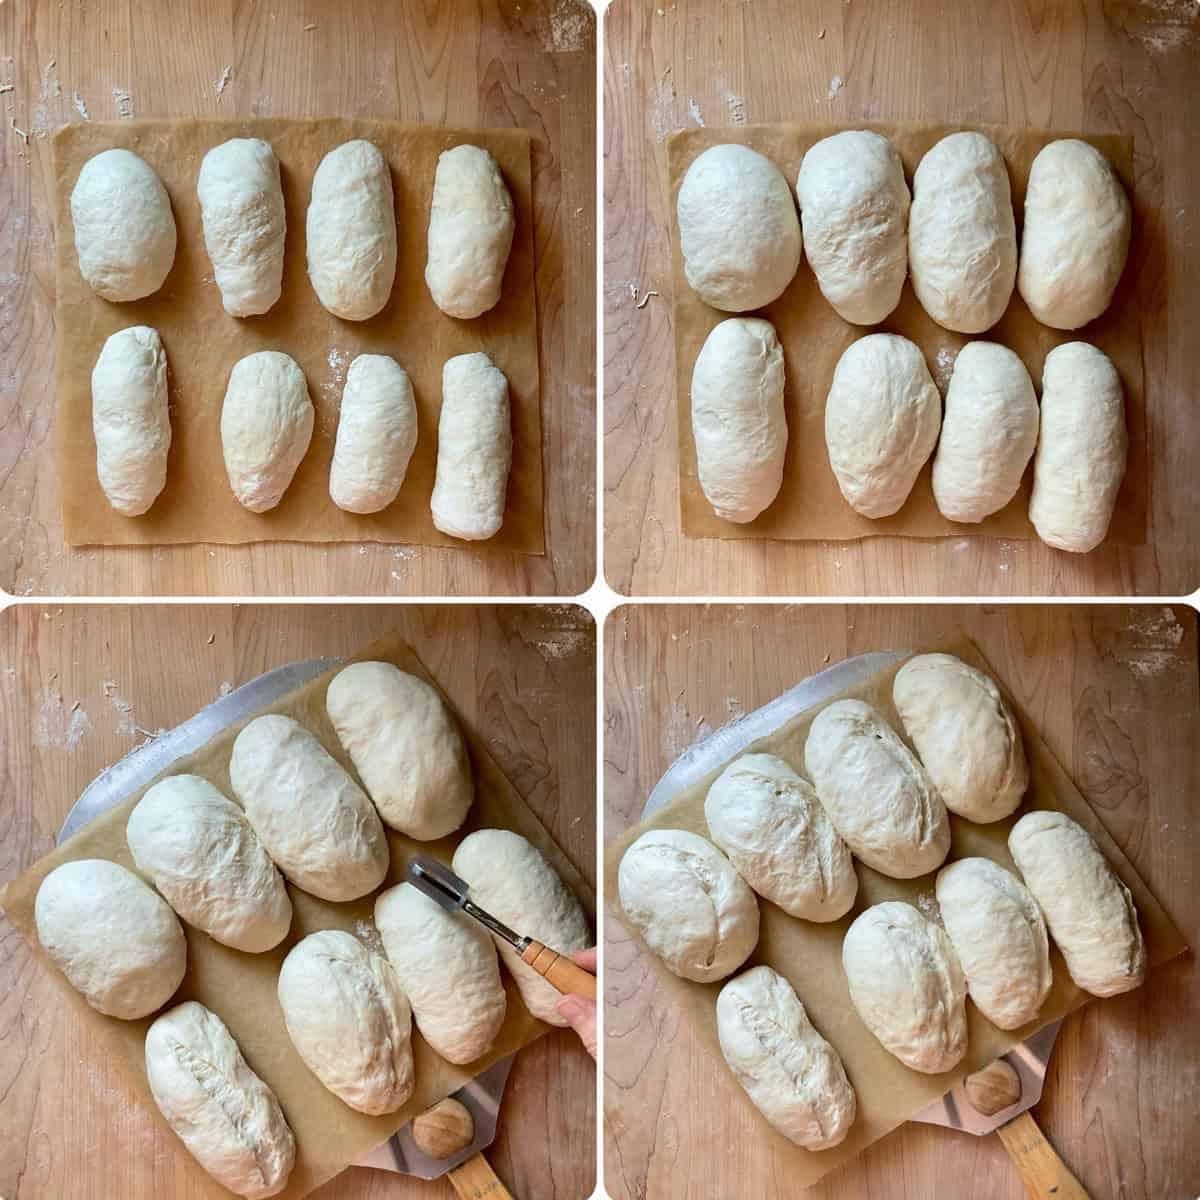
- Place the shaped roll seam-side down on parchment paper and cover with plastic wrap or a clean towel while you shape the remaining pieces.
- Let them rise at room temperature for about 30 minutes, or until noticeably puffy.
- Just before baking, use a sharp knife or lame to make a shallow (¼-inch / 6 mm) lengthwise cut down the center of each roll.
- Slide the rolls (with parchment) directly onto the preheated pizza stone. I like to use my pizza peel for this.
- Carefully add 1-2 cups of ice cubes to the hot metal pan on the lower rack.
- Bake 25-30 minutes, until the tops are pale golden and the bottoms sound hollow when tapped.
Cool and serve
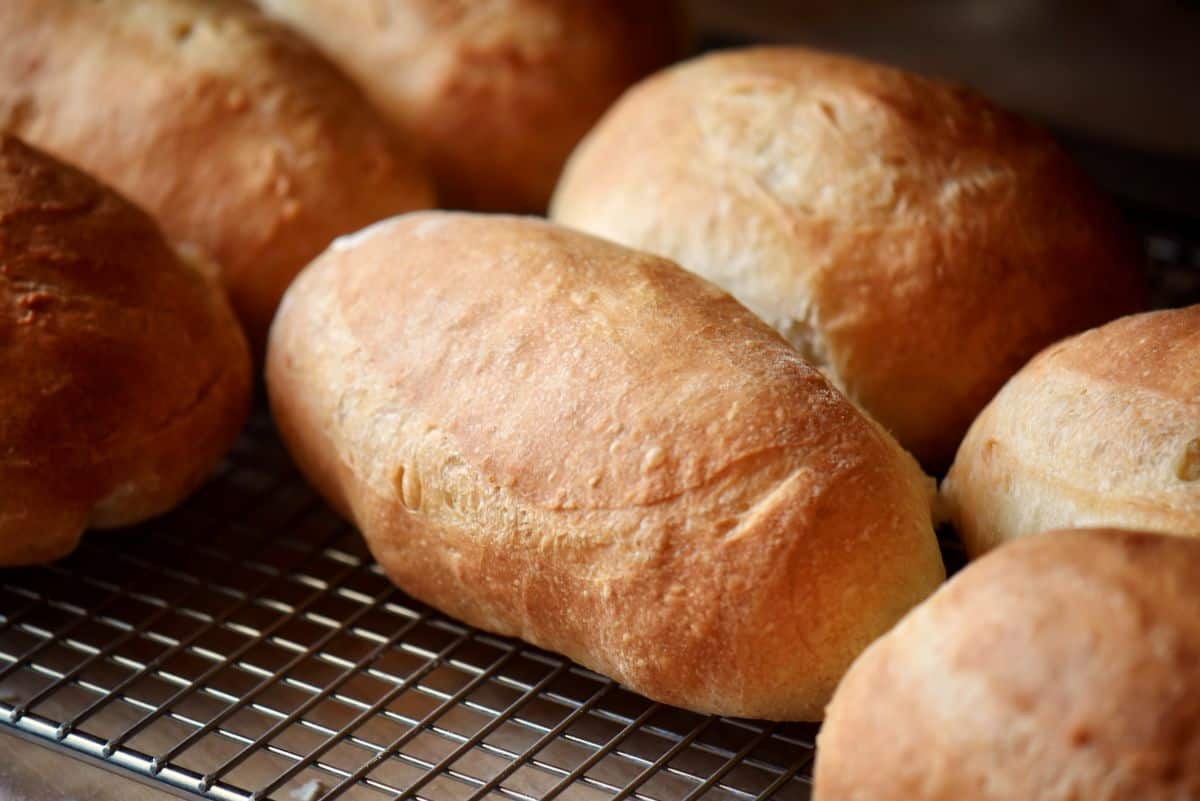
- Transfer to a wire rack and cool completely before slicing.
Tips
- Use lukewarm water - too hot will kill yeast, too cold will slow the rise. Aim for 105-110°F (40-43°C).
- Handle sticky dough easily with wet fingertips - keep a small bowl of water nearby to dip your fingers in when working with the dough..
- Don't skip the rest periods - they let the gluten relax, making folds easier.
- Let the dough proof in a warm spot for best results - use an oven with the light on, set the oven proofing option to 80°F (27°C), or choose a draft-free kitchen counter.
- Score the top (optional) - helps direct the rise.
- Create steam - it keeps the crust soft and lets the rolls rise fully in the oven.
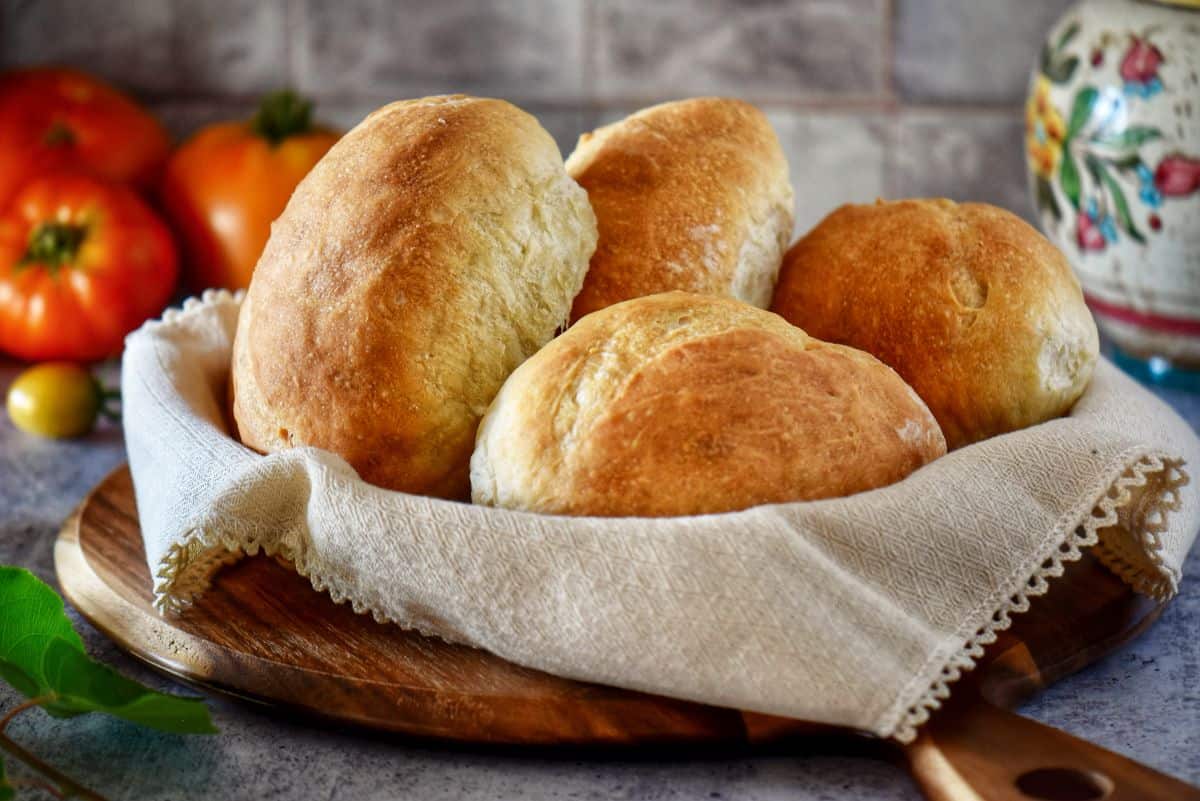
Serving Suggestions
- Classic Italian panini sandwich- Layer fresh mozzarella, ripe tomatoes, and basil, then drizzle with extra-virgin olive oil and a pinch of sea salt.
- Grilled pressed sandwiches - Fill with cured meats like prosciutto or salami, add provolone, and grill until the bread is crisp and the cheese melts.
- Vegetarian grilled sandwich - Fill with grilled zucchini, marinated roasted red peppers, fresh arugula, and provolone or goat cheese.
- Breakfast rolls - Slice and fill with scrambled eggs, sautéed spinach, and a sprinkle of Parmesan.
- Dipping bread - Serve warm alongside soups, stews, or a small dish of olive oil and balsamic vinegar.

FAQ
Yes, but the texture will be slightly less chewy and airy. If using all-purpose flour, you may need to reduce the water slightly since it absorbs less.
No. A preheated heavy baking sheet or an inverted cast-iron skillet can give similar results. Just make sure it's fully heated before placing the dough on it.
This usually happens if the dough wasn't proofed long enough, the yeast was inactive, or the oven wasn't hot enough at the start of baking. Make sure to proof until the dough is visibly puffy and use proper steam in the oven.
Let the bread cool completely, then store it in an airtight container at room temperature for up to 2 days. For longer storage, freeze for up to 2 months and reheat in a 180°C / 350°F oven until warm.
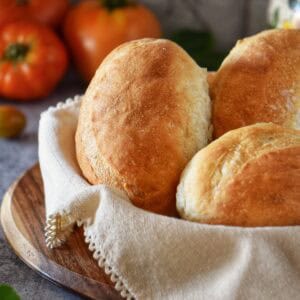
If you divide the dough into 8 equal portions, each roll will bake up to about 5 inches (13 cm) long and 2½ inches (6 cm) wide.
Italian Bread Recipes
Recipe Origins
The smell of bread baking is pure magic - warm, comforting, and impossible to ignore.
Growing up in an Italian household meant plenty of homemade food, but when my mom made bread, it was an event. We'd gather in the kitchen, waiting for that first slice of soft, tender-crumb bread - I couldn’t wait to dunk it into the Sunday sauce bubbling on the stove! .
Recently, I set out to bring that memory back to life, starting with my mom's recipe as the foundation. Over the past few weeks, I tweaked and tested, consulting my well-worn bread-baking cookbooks and experimenting with stretch-and-coil folds.
There were plenty of trial runs - and a few panini that didn't quite make the cut - but each batch taught me something new.
Eventually, I created a method that shapes panini beautifully every time. I've even included a short video in the recipe card so you can follow along. My family loves this bread, and I'm so excited for you to try it too.
It bakes up with a light, airy texture and a soft golden crust every time. I think you'll enjoy making it as much as I do - and once that aroma fills your kitchen, you'll know it was worth it.
When you tell friends and family it didn't come from an Italian bakery, don't be surprised if they don't believe you.
Just for you! A printable baking checklist to help you keep track of all your baking needs.
If you love to bake, this is for you! Simply subscribe to my weekly newsletter and receive this FREE BAKING CHECKLIST PRINTABLE!
This way, you won't miss any of my new recipes, and it's FREE!
THANKS SO MUCH for following and being part of the She Loves Biscotti community, where you will find Simple & Tasty Family-Friendly Recipes with an Italian Twist.
Ciao for now,
Maria
★★★★★ If you have made this recipe for Italian panini, I would love to hear about it in the comments below and be sure to rate the recipe!
Recipe
Italian Panini Bread Recipe: Soft and Fluffy
WANT TO SAVE THIS RECIPE?
Ingredients
- 350 grams water 1⅔ cups, lukewarm
- 33 grams olive oil 2 ½ tablespoons, extra virgin
- 450 grams bread or pizza flour approx. 3¼ cups
- 7 grams active dry yeast 2 ¼ teaspoons
- 8 grams salt 1 ¼ teaspoons
- additional flour for dusting the wooden board
Instructions
- Mix liquids: Whisk water and olive oil in a bowl.
- Mix dry ingredients: Whisk flour and yeast in a separate bowl. Transfer to a rectangular dish.
- Combine: Make a well in the flour mixture, pour in liquids, and mix into a shaggy dough. Cover and rest for 2-3 minutes.
- Add salt: Sprinkle salt over the dough and mix until well incorporated. Cover and let the dough rest in a warm spot for 15 minutes. (Oven with light on or proof mode works well.)
- Stretch and fold: Perform 2 sets of stretch-and-folds and 2 sets of coil folds, resting for 15 minutes between each (REFER TO RECIPE NOTES FOR DETAILS).
- Preheat the oven to 425°F (220°C) with a pizza stone on the middle rack and a metal pan on the lower rack.
- Turn out and divide: Invert onto a floured surface, divide into 6-8 portions.
- Shape and form panini: Fold, roll, cup, and shape each portion into an oblong-shaped roll. Place seam-side down on a parchment-lined surface. (REFER TO RECIPE NOTES FOR DETAILS).
- Final proof: Cover loosely with plastic wrap and a tea towel and proof for 30 minutes at room temperature.
- Score & bake: Shallow cut lengthwise, transfer the panini onto the hot pizza stone. Add ice cubes to the pan on the lower rack, and bake for 25-30 minutes until tops are pale golden and the bottoms sound hollow when tapped.
- Cool: Transfer to a wire rack before slicing.
- Makes 8 rolls, each about 5" (13 cm) × 2½" (6 cm) - perfect for slicing and filling.
- Detailed step-by-step photos are included in the article. You can also watch the video on the recipe card to see how to shape these Italian panini.
Video
Notes
- With damp hands, lift the top right corner of the dough, stretch upward, and fold toward the center.
- Repeat from the top middle and top left.
- Rotate the dish 180° and repeat from the opposite edge (right, middle, left) - a total of 6 folds.
- The dough will now be slightly mounded in the center. Slide your hands under the sides (short end), lift gently, and flip it upside down so the smooth side is facing up, keeping its long side aligned with the dish. This flip helps redistribute the gas bubbles and creates a smoother surface for the next rise.
- Gently stretch the edges to settle it back into a rectangular shape.
- Cover and rest 15 minutes, then repeat the stretch-and-fold once more.
- With damp hands, lift the dough from the middle so it sags down on both sides.
- Drop back down into the pan.
- Gently stretch the corners to maintain a rectangular shape.
- Cover and rest for 15 minutes, then repeat the coil fold one more time.
- Lightly flour your hands and work surface.
- Working with one piece of dough at a time (it will be roughly rectangular from cutting), start at the narrow end and roll it tightly away from you. Tuck in the ends as you roll. Gently press down with each turn to keep the shape tight.
- Once rolled, cup your hands around the dough and gently pull it toward you to create surface tension, forming a smooth cylinder with a taut top. You can also use a bench scraper to help tighten the shape.
- Place the oblong-shaped roll seam-side down on a parchment-lined surface.
- Cover loosely with plastic wrap and a tea towel to prevent drying.
- Repeat with the remaining dough portions
- Lukewarm water (105-110°F / 40-43°C)
- Wet fingertips to handle sticky dough
- Rest periods make folds easier
- Warm proof (80°F / 27°C) - oven light on works great
- Score to guide the rise (optional)
- Steam for a soft crust & full rise
GrannyBird
They look Amazing! Can I use breadmachine to make dough then just shape and bake once it’s out of the bread maker? My dough cycle is about 90 minutes – with 3 rises, I believe.
Maria
Thank you so much! This a great question! Yes, it should work. If your dough cycle is about 90 minutes with 3 rises, just keep an eye on the texture — it should be smooth and elastic when you take it out. Once the cycle is done, remove the dough, divide it into 8 pieces, and shape them as described in the recipe. Let them rest for the final proof before baking. You might find the crumb slightly different from the stretch-and-fold method, but they should still bake up beautifully. I would love to hear about your results if you do decide to try it. Thanks again!