

Learn how to make fette biscottate, the classic Italian breakfast toast also known as Italian rusks. These twice-baked slices are wonderfully crisp and golden, perfect with butter, jam, or jelly.
I first discovered fette biscottate many decades ago while visiting family in Italy, and they quickly became one of my favorite ways to start the day. Light, airy, and crunchy, they're a simple pleasure that pairs beautifully with coffee or cappuccino.
If you've never tried them, think of fette biscottate as the Italian cousin of biscotti - but in toast form. Made with the most basic pantry ingredients, their secret lies in the second bake, which gently dries the bread until it's crisp and shelf-stable. (Not to be confused with bruschetta, which is a savory Italian toast topped with tomatoes and olive oil.)
What I love most is their versatility. In the morning, they're perfect with your favorite jam or jelly. For a savory twist, try them with olive oil, fresh tomatoes, or a little ricotta cheese. However you top them, these golden slices fit seamlessly into any home.
Ready to try them? Let's walk through how to make homemade fette biscottate step by step.
Jump to:
Prep and Bake Time
- Active prep time: 30 minutes
- Rise time: 1 hour 15 minutes
- Bake time: 1 hour (includes first and second bake)
- Cooling Time: 2 hours (minimal)
- Total Time: about 5 hours
Ingredients
- Whole wheat flour for that nutty, rustic flavor. Sometimes I mix in a little bread flour if I want a lighter crumb, but all whole wheat works beautifully.
- Yeast to give the loaf its gentle rise.
- Sugar, just enough to help with browning and balance the flavors.
- Salt - because bread without salt just tastes flat.
- An egg for a little richness and structure.
- Milk, which softens the crumb and also gives us that golden finish when brushed on top.
- Olive oil for moisture and that subtle Mediterranean touch.
Instructions
Mixing the Dough for Fette Biscottate
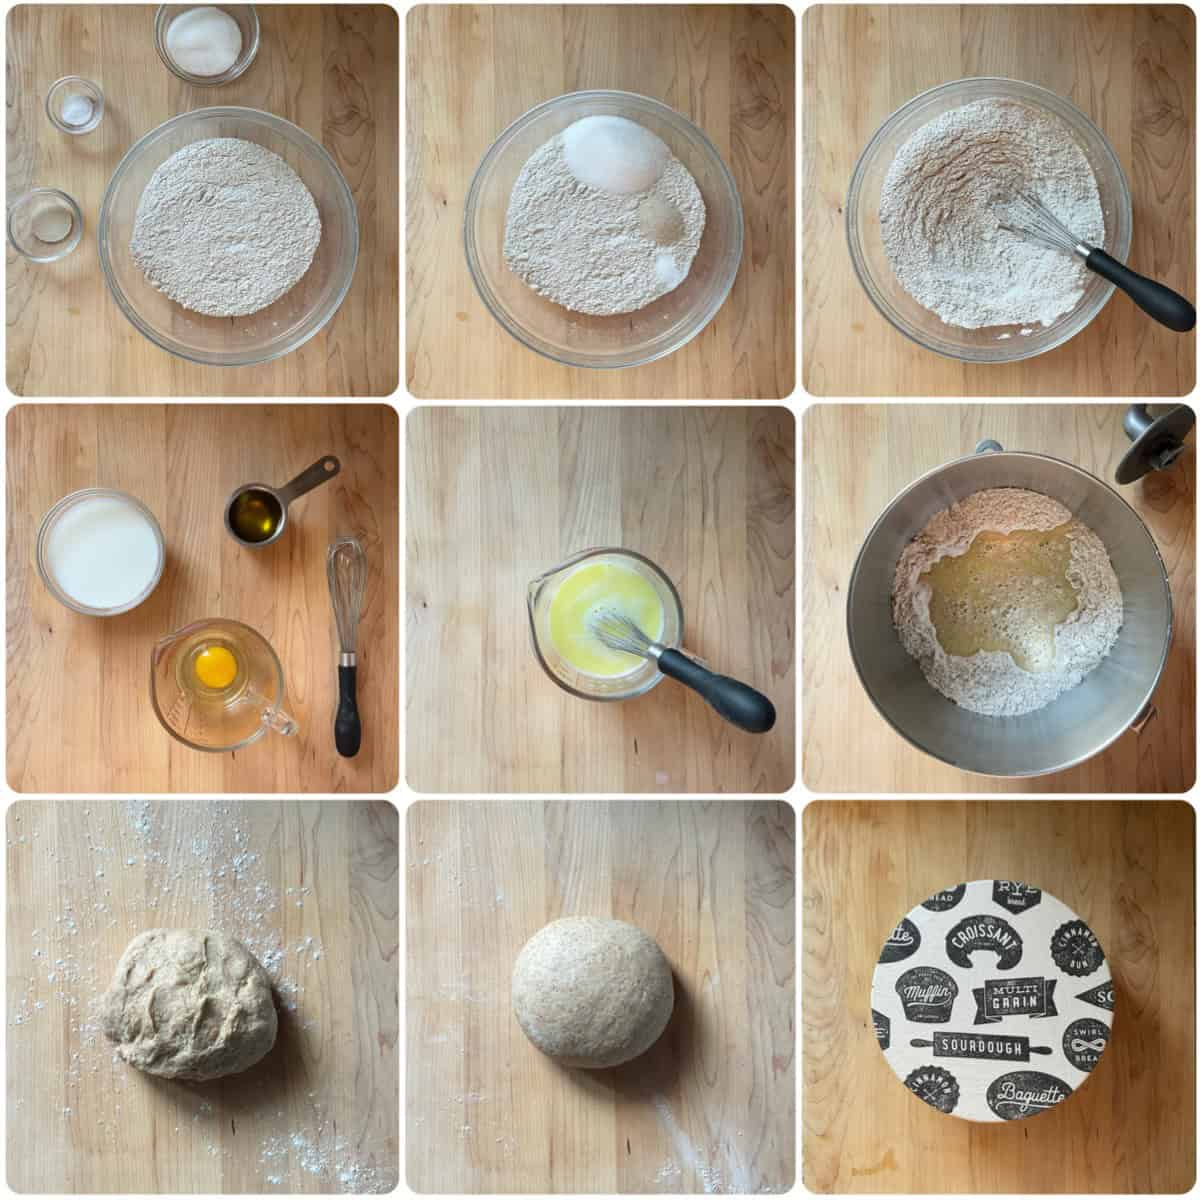
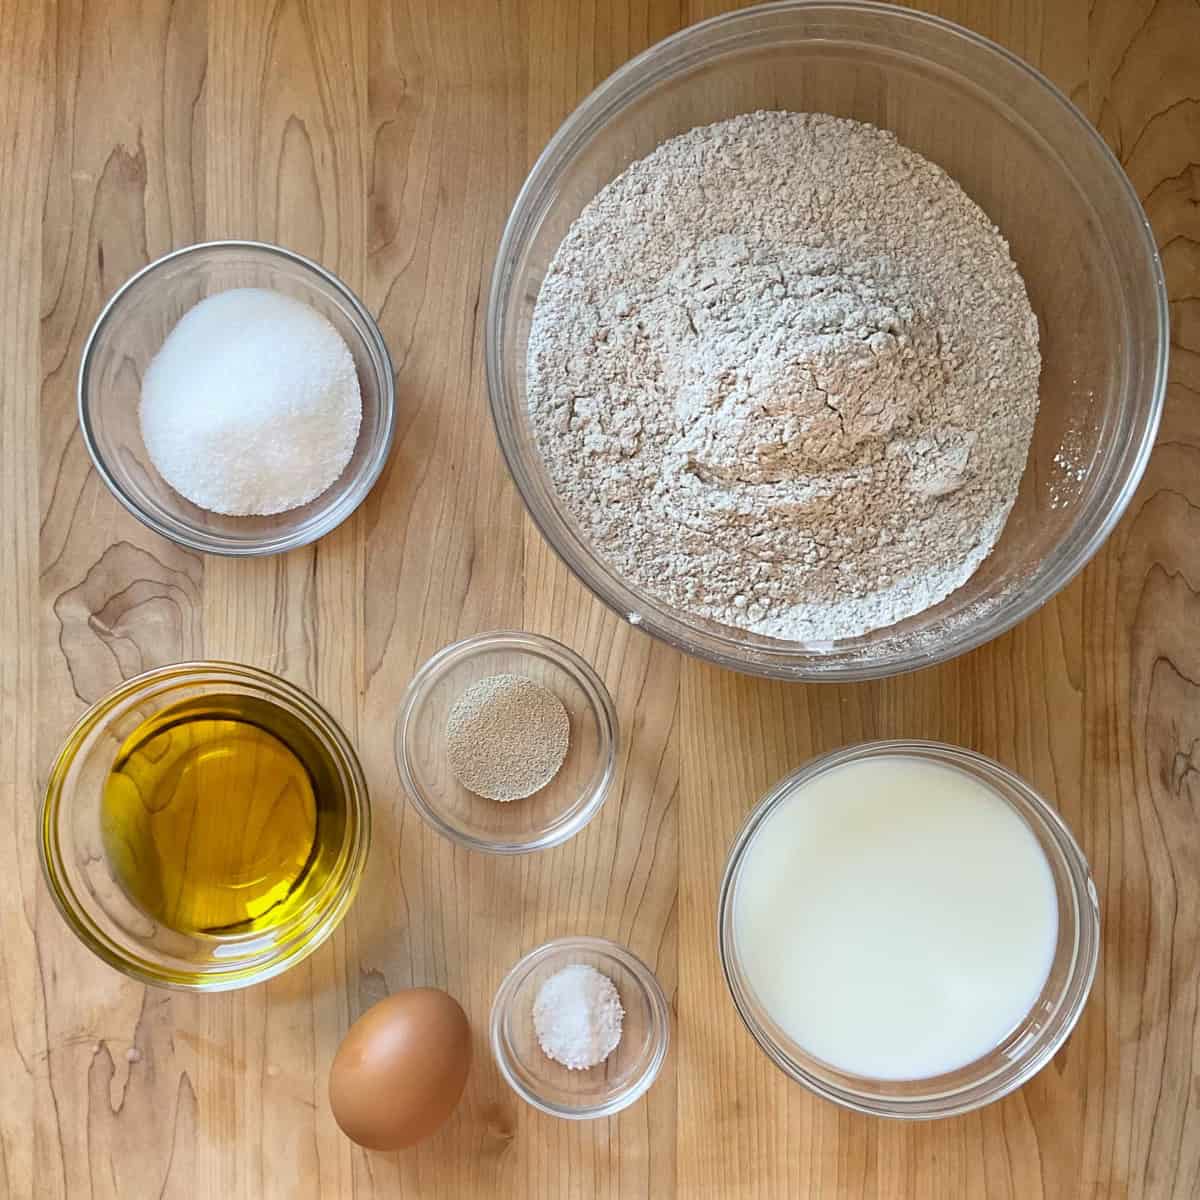
- Start by whisking together the dry ingredients in a large bowl: 400 g (3 ⅓ cups) whole wheat flour, 50 g (¼ cup) sugar, 3.5 g (1 teaspoon) active dry yeast and 3 g (½ teaspoon) salt.
- In a separate bowl or large measuring cup, whisk 200 g (¾ cup) lukewarm milk, 1 large egg (room temperature), and 48 g (¼ cup) extra virgin olive oil until well combined.
- Pour the wet mixture into the dry, then let your stand mixer (fitted with the dough hook) run for about 6-8 minutes. The dough should start coming together into a ball. If it looks a little rough at the end, just turn it out and give it a quick knead on the counter with a light dusting of flour until it feels smooth and elastic - slightly tacky, but not sticky. (And if you don't have a mixer, no problem - you can knead entirely by hand, about 8-10 minutes.)
- Place the ball of dough in a lightly floured bowl, cover, and let rest in a warm spot for about 15 minutes. (If your kitchen is cool, the oven with the light on or proof mode is perfect.) This short rest lets the flour hydrate and makes rolling easier later.
Shaping the Dough
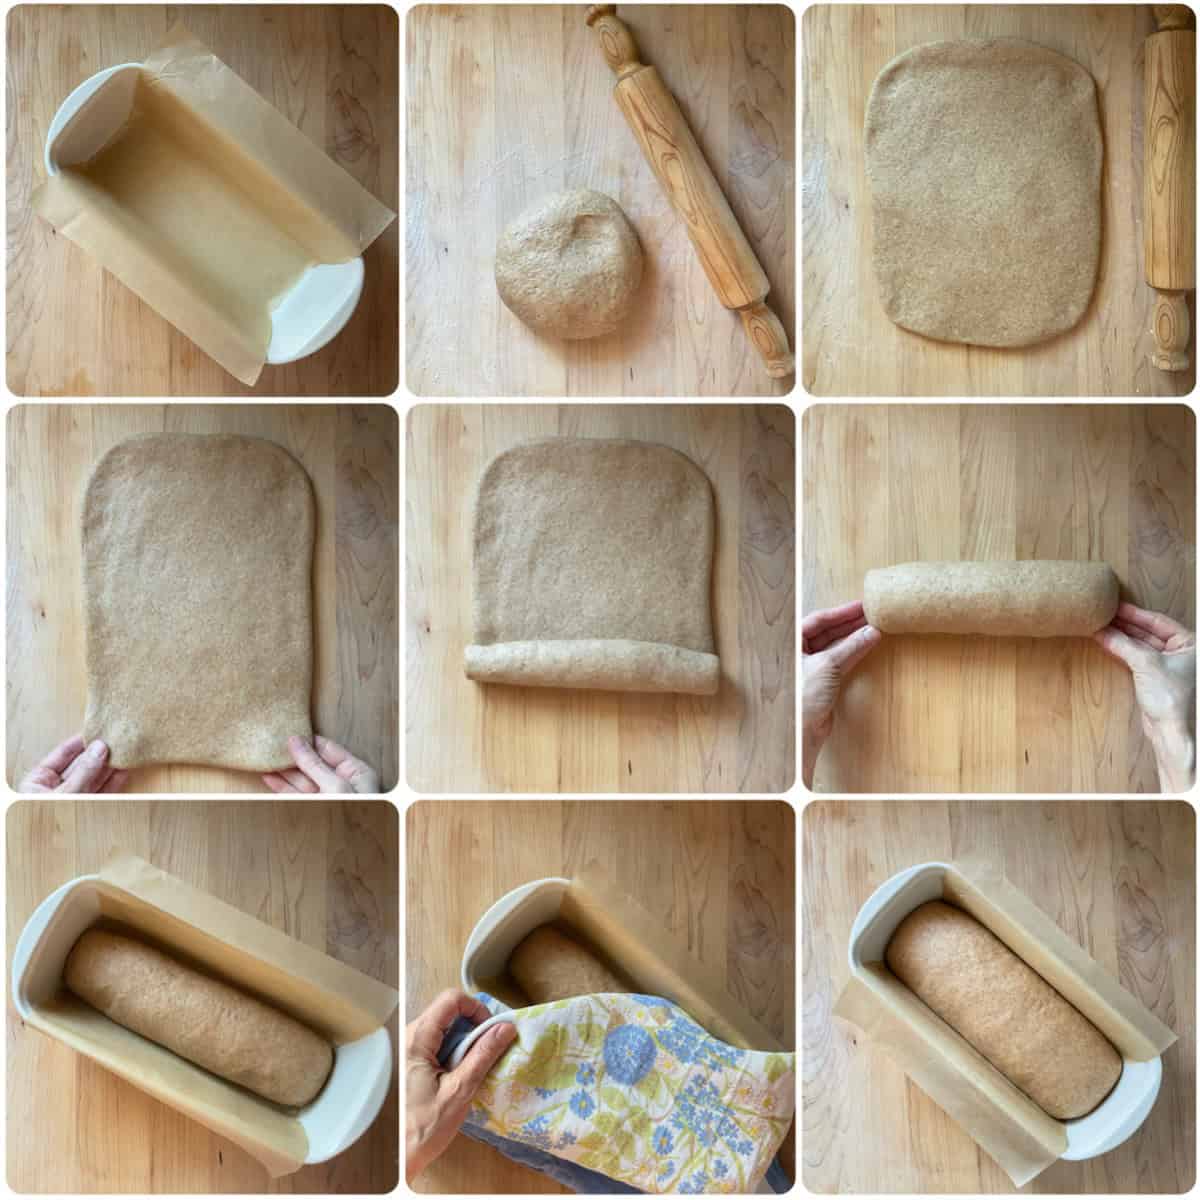
- First, get your loaf pan ready - I'm using a 12 x 5-inch (30 x 13 cm) Emile Henry pan. Line it with parchment paper and lightly grease it so the dough won't stick later.
- On a lightly floured surface, roll the dough into a rectangle about 12 x 9 inches (30 x 23 cm), roughly ¼ inch (0.6 cm) thick. Use your rolling pin and hands to gently guide the dough into shape.
- Starting from one of the short ends, roll it up tightly but gently, just like a jelly roll. As you go, keep the log even and straight. Once it's rolled, pinch the seam to seal, then pinch the ends closed so it holds together.
- Carefully transfer the dough seam side down into your prepared pan. It should fit snugly, ready for its final rise.
- Cover the pan loosely with a clean kitchen towel or plastic wrap. Place it in a warm, draft-free spot - the oven with the light on or proof mode works perfectly.
- Let the dough rise until it's doubled in size, about 1 hour. When it's ready, the dough will look puffy.
Bake the Bread
- About 15 minutes before the dough is done proofing, preheat your oven to 375°F (190°C).
- Once the dough has doubled in size, give it a gentle check by pressing a fingertip into the top. If the indentation springs back slowly, it's ready.
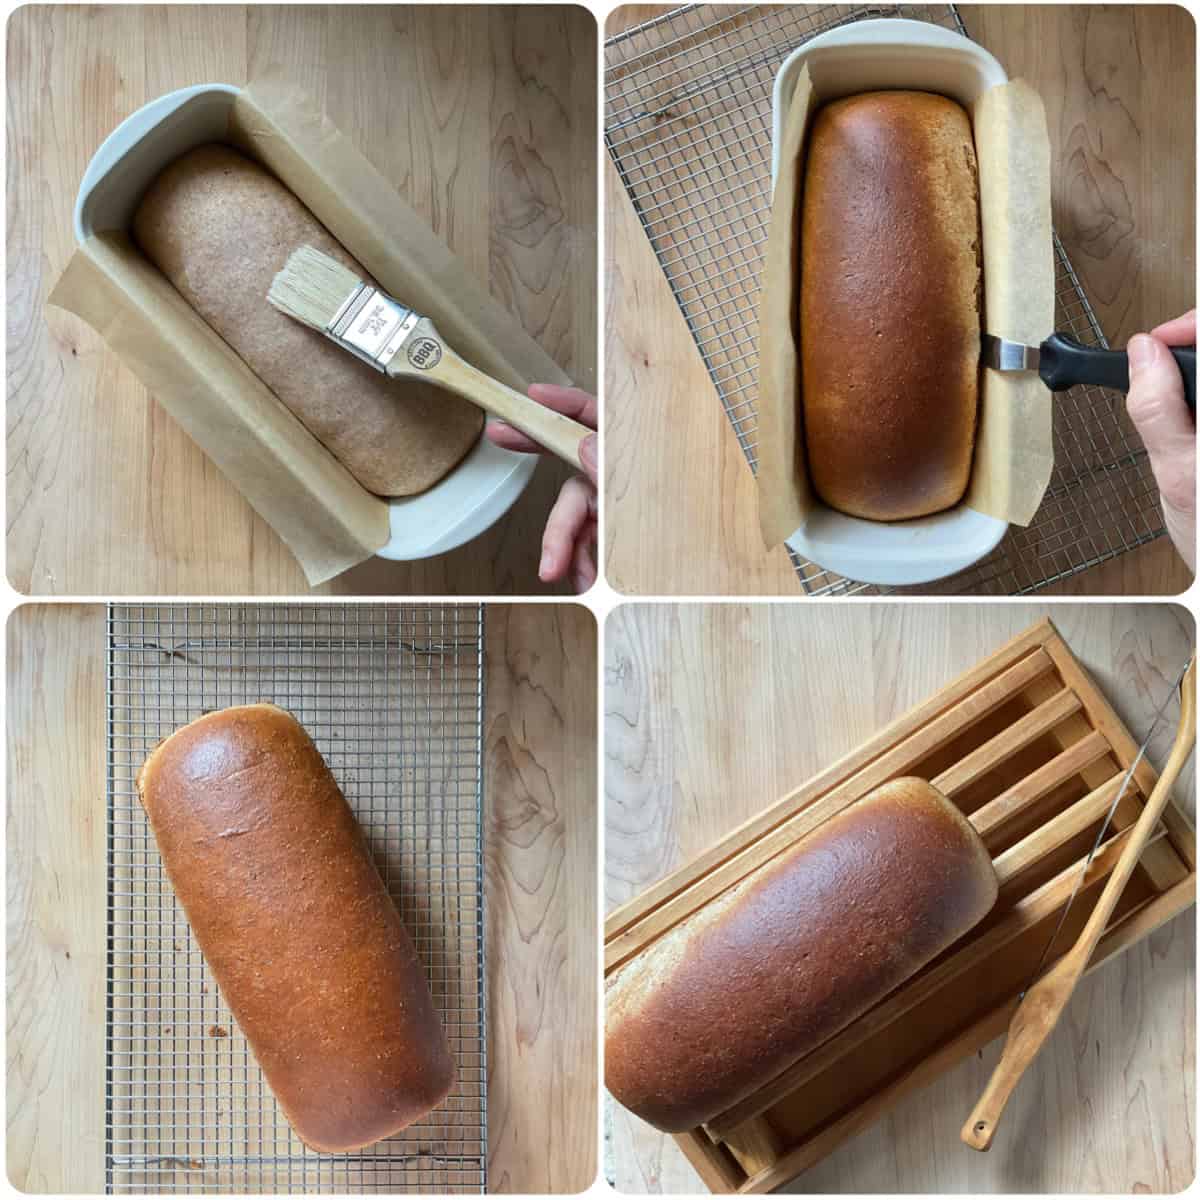
- Lightly brush the top with a bit of milk-this helps the crust turn golden brown and slightly shiny.
- Slide the pan onto the middle rack and bake for 30-35 minutes, or until golden brown and the loaf sounds hollow when tapped on the bottom. For the most accuracy, check with a kitchen thermometer - the internal temperature should reach 190-195°F (88-90°C). If needed, tent loosely with foil during the last 10 minutes to prevent over-browning.
- As soon as it's baked, run a thin knife along the edges of the pan to loosen the loaf.
- Carefully lift the bread out (the parchment makes this easier).
- Place the loaf on a wire rack and let it cool completely before slicing.
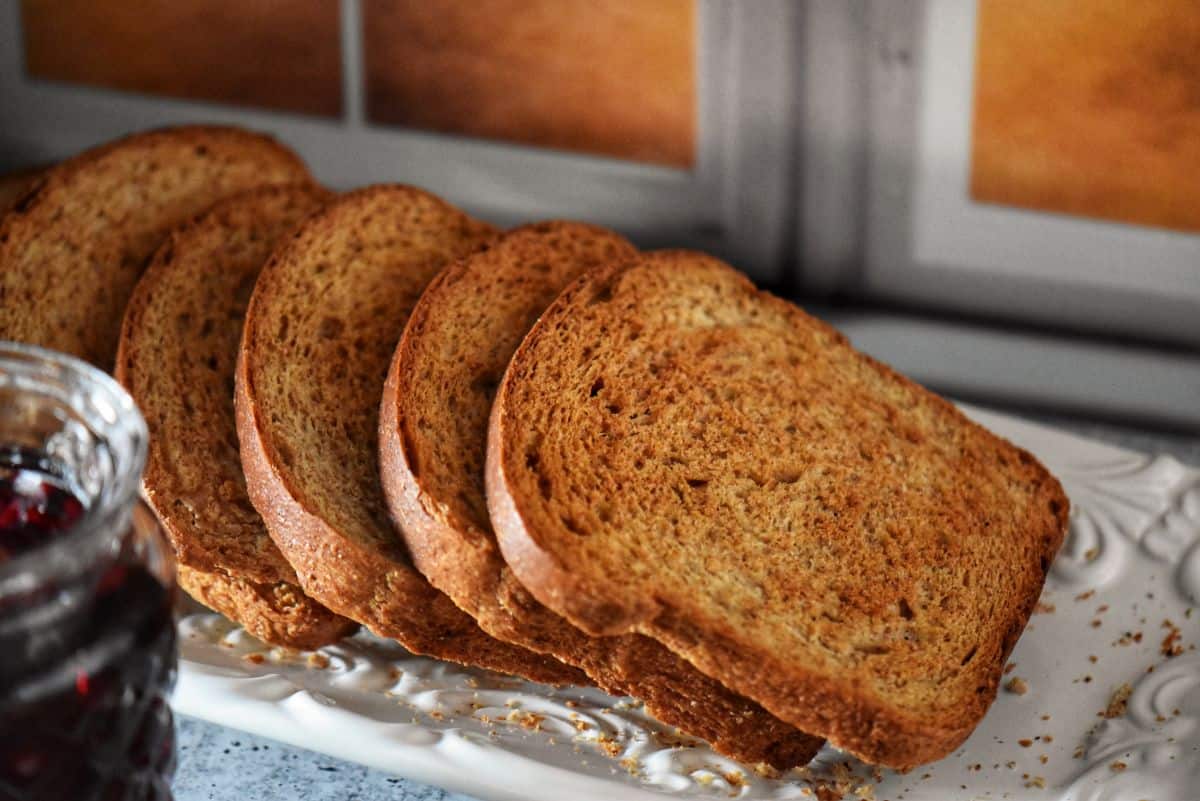
Slicing and Toasting into Fette Biscottate
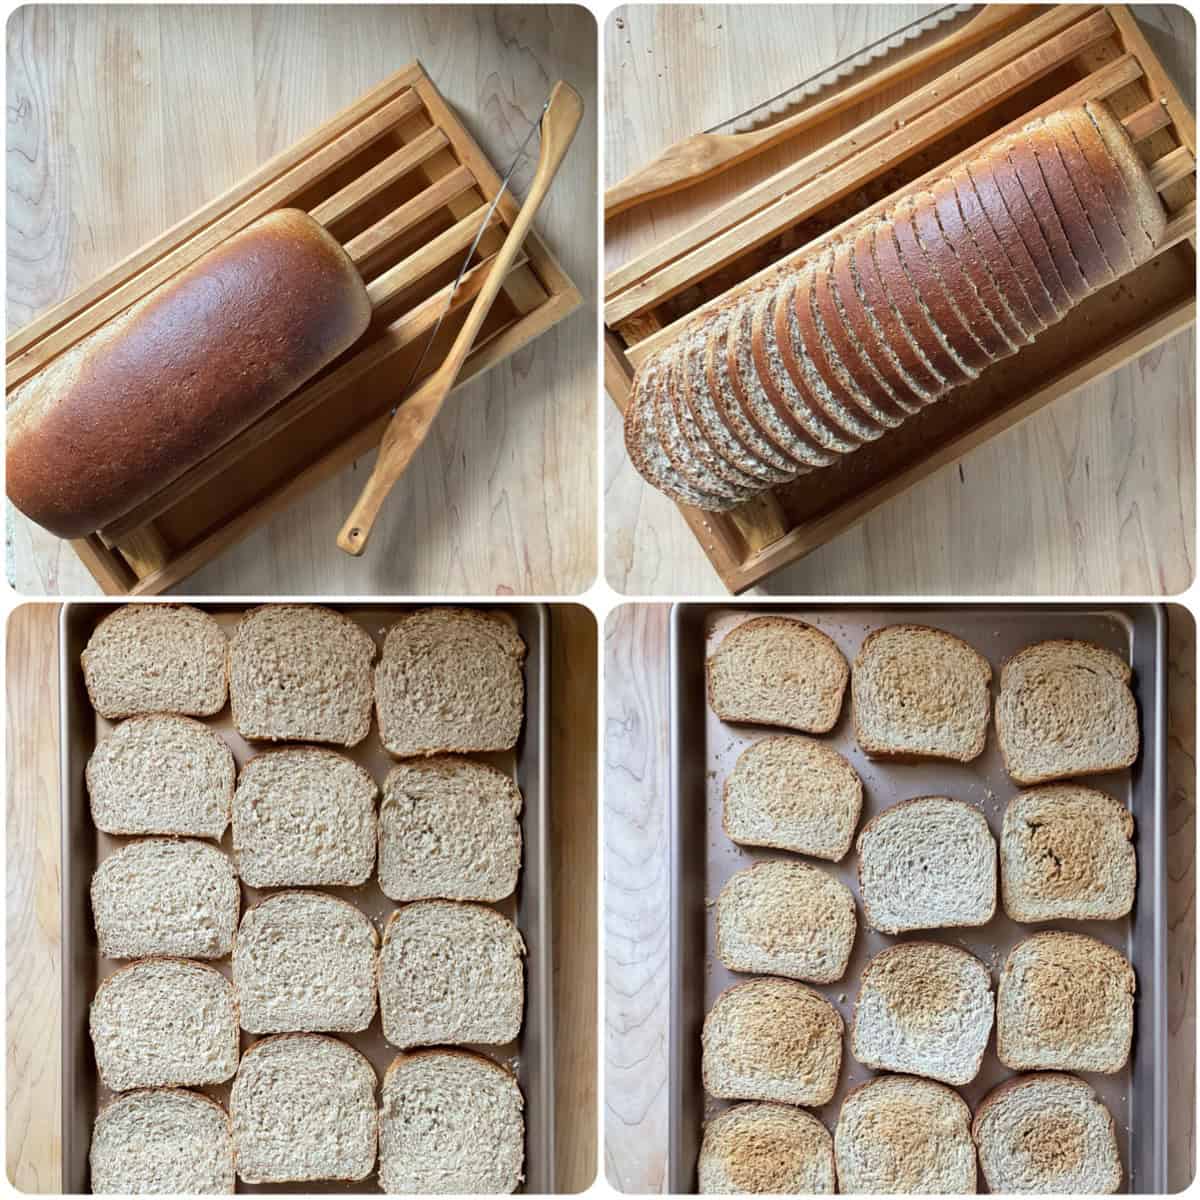
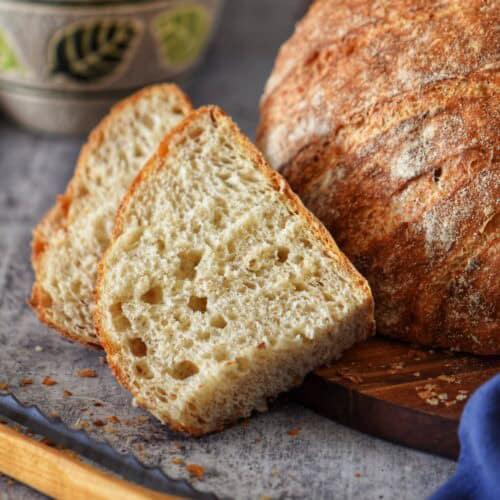
- Once the bread has cooled completely, place it on a cutting board.
- Using a serrated knife, slice the loaf evenly into pieces about ¼ to just under ⅜ inch thick (0.6-0.9 cm). Keeping the slices even helps them toast at the same rate.
- Preheat your oven to 300°F (150°C).
- Arrange the slices in a single layer on a baking sheet-no need to line with parchment paper.
- Bake for 25-35 minutes, flipping them halfway through. The goal is a crisp, dry texture all the way through with a light golden color.
- Transfer the slices to a wire rack to cool.
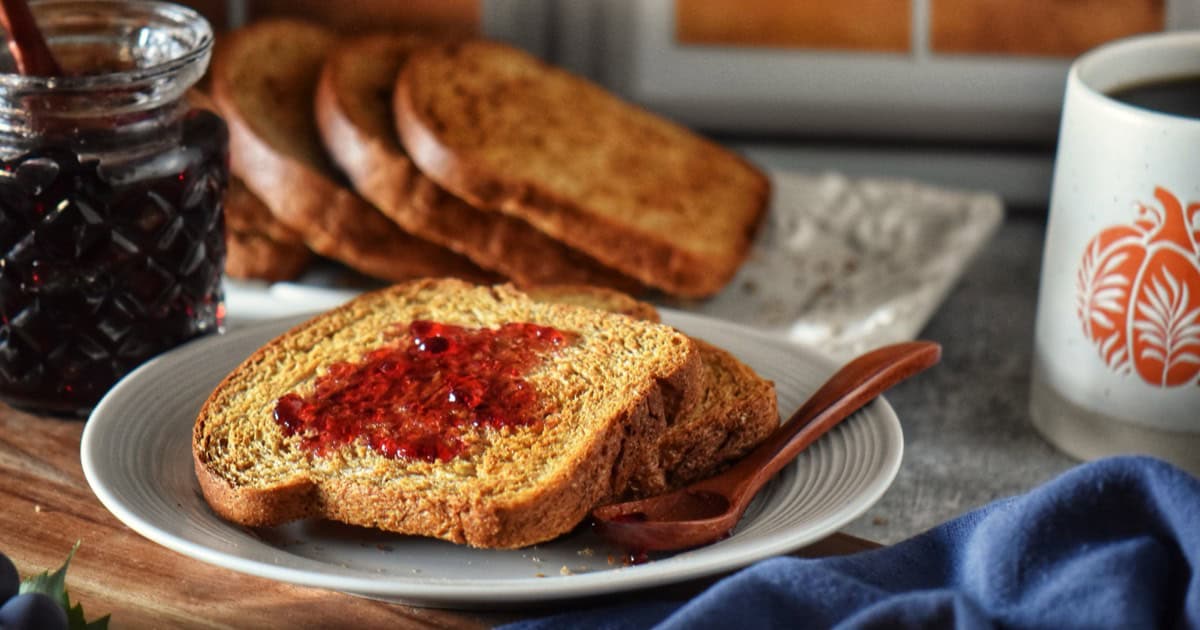
As they cool, they'll firm up even more, ready for dipping, spreading, or just snacking.
Tips
- Use lukewarm milk (38-40°C / 100-105°F): This is the ideal range to activate the yeast.
- Adjust flour if needed: If the dough feels sticky, dust your hands or work surface with a little whole wheat flour. Avoid adding too much, or the toasts may turn dense.
- Don't rush the rise: Let the dough double in size before baking. A slow rise gives the toast its light texture.
- Cool before slicing: For neat, even slices, let the baked loaf cool completely - even overnight, if possible. Warm bread will squash or tear when cut, making it harder to get clean slices for toasting.
- Use a serrated bread knife: Gentle sawing motions give you clean slices without pressing the bread flat.
- Slice evenly: Aim for slices between ¼ inch (0.6 cm) and just under ⅜ inch (about 0.9 cm). This range gives the best results. Thinner slices will toast too quickly, while thicker ones may stay soft in the middle.
- Toast low and slow: Keep the oven temperature gentle during the second bake (300°F/150°C). This ensures the slices dry out without burning. Bake until the slices feel dry - they'll crisp up even more as they cool.
- Experiment with flours: Using whole wheat bread flour instead of regular whole wheat gives the dough a sturdier structure, which makes the slices a little easier to cut and keeps them crisp after baking. Mixing the two works beautifully.
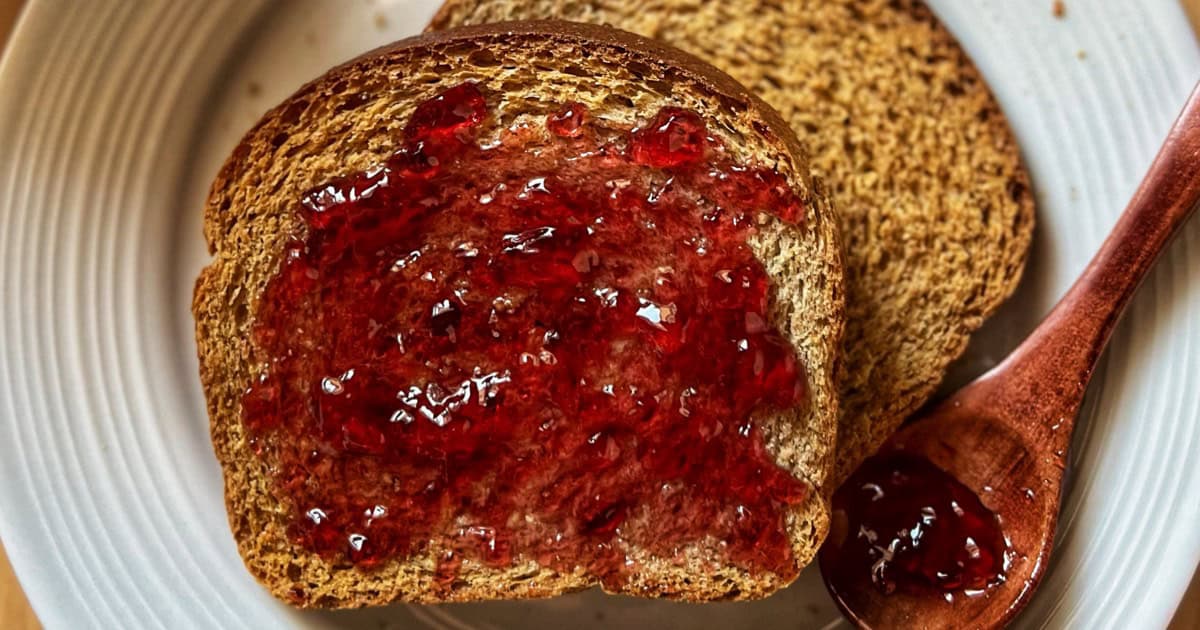
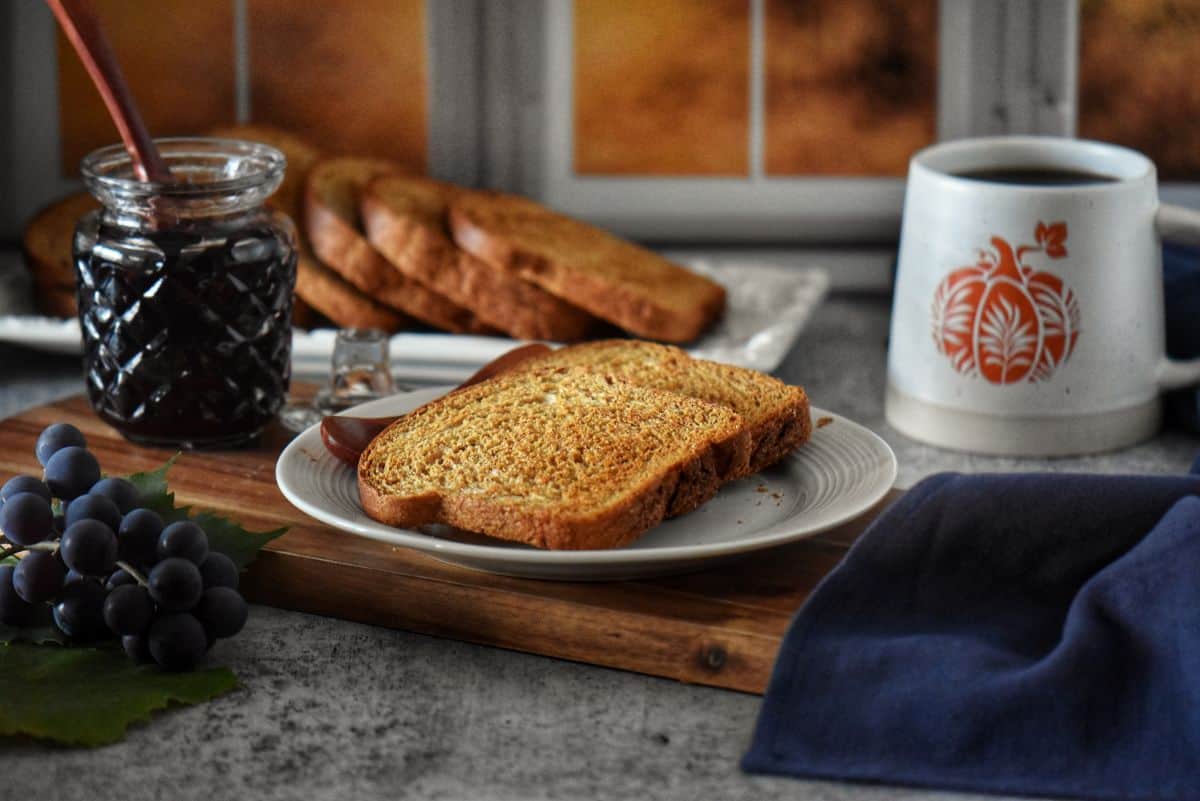
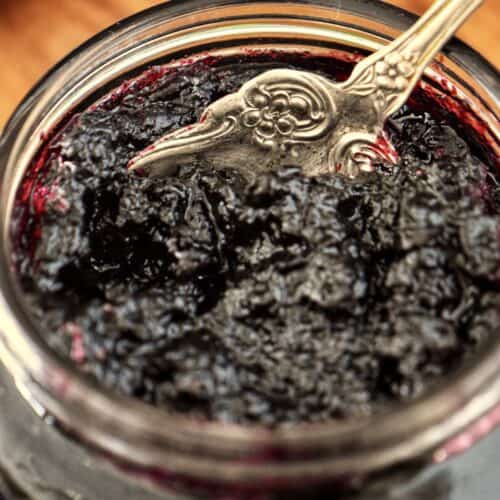
Serving Suggestions
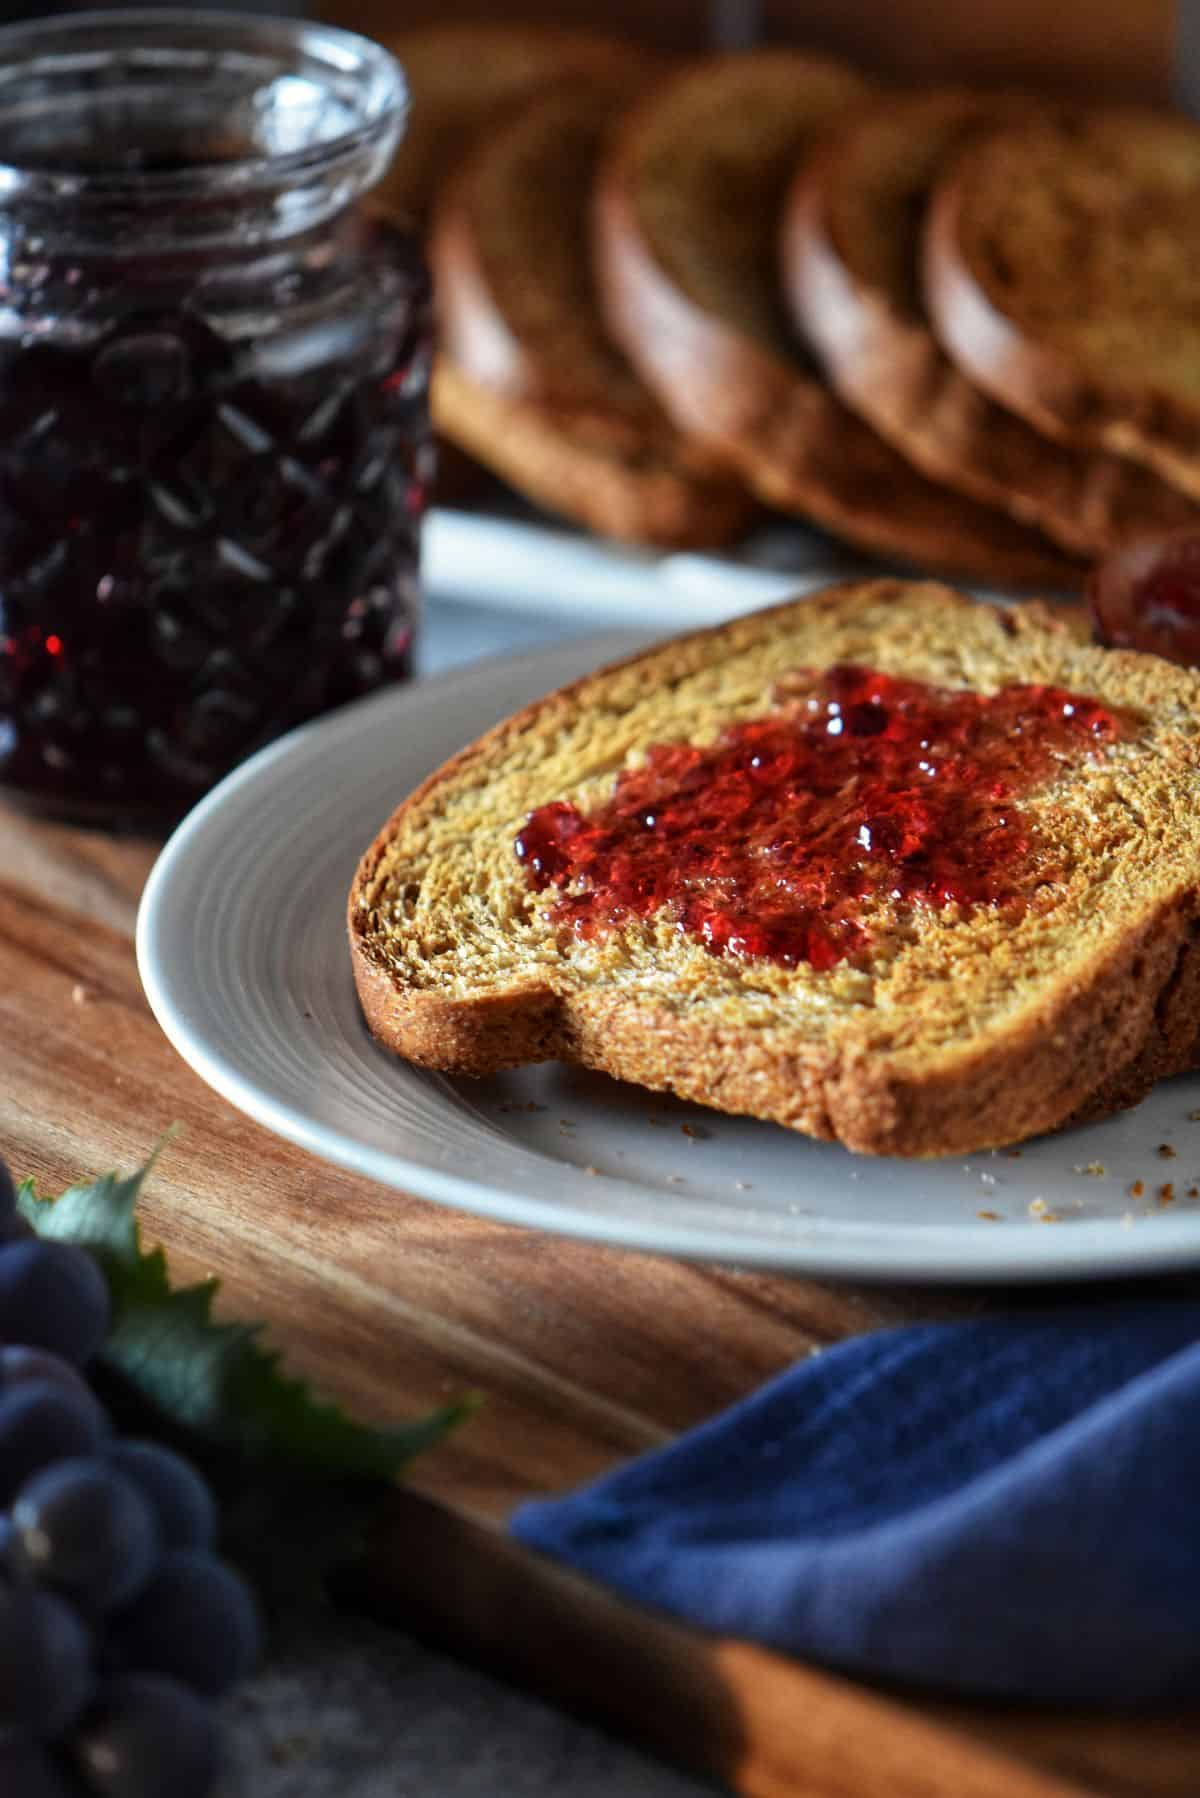
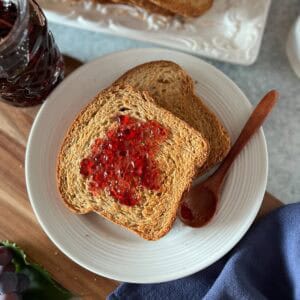
Fette biscottate are delicious on their own, but they really shine with a spread or two. Homemade jam, jelly, fruit butter, or even a spoonful of compote all work beautifully - I've shared a few of my favorite recipes below if you'd like some inspiration. Pictured above is with concord grape jelly.


FAQ
Fette biscottate are crisp, twice-baked slices of bread that Italians often enjoy for breakfast. They're sometimes called Italian breakfast toast or Italian rusks. Think of them as light, airy toasts - perfect with jam, jelly, or butter. Many people dunk them straight into their coffee - the crisp texture holds up beautifully.
Not quite. In Italy, "fette biscottate" refers to these crisp, packaged toasts. Bruschetta is fresh bread that's toasted once and topped with savory ingredients like tomatoes and olive oil. Fette biscottate are more of a breakfast staple, similar to rusks.
They're similar, but not the same. Melba toast is usually very thin and brittle, while fette biscottate are a bit sturdier. The difference comes from the baking method - fette biscottate are baked twice, like biscotti, which gives them their signature crisp-but-light texture.
That usually happens if the bread wasn't fully cooled before slicing or if the second bake wasn't long enough. Make sure the loaf is completely cool before cutting, and bake the slices until they feel dry to the touch. They'll crisp up even more as they cool.
A good serrated bread knife is your best friend here. Let the loaf cool completely, then use gentle sawing motions instead of pressing down. That way, you'll get neat slices without squashing the bread.
That's normal with bread dough. Just sprinkle a little whole wheat flour on your hands or work surface to make it easier to handle. Be careful not to add too much, or your toasts may turn out heavy instead of light and crisp.
Keep them in an airtight container or a well-sealed tin once they're completely cool. They'll stay crisp for up to 10 days. If they soften over time, just pop them back in a low oven for a few minutes and they'll crisp right back up.
More Italian Breakfast Recipes to Try


Recipe Origins
When I first set out to make fette biscottate at home, I thought it would be simple - bake a loaf, slice it, toast it again. But as with most breads, the details make all the difference.
My first inspiration was actually this recipe that used a sourdough starter. Since I'm still perfecting my sourdough skills, I decided to adapt it into a yeasted version instead - something approachable but still authentic.
From there, I spent a few weeks experimenting: trying whole wheat flour versus bread flour, playing with when to add the salt, and testing both the stretch-and-fold method and a good old-fashioned bulk rise. I even treated myself to an Emile Henry loaf pan along the way!
After all that tinkering, I'm so happy with the results - a crisp, golden slice that reminds me of mornings in Italy. I hope you'll give it a try in your own kitchen and make it part of your breakfast routine too.
THANKS SO MUCH for following and being part of the She Loves Biscotti community, where you will find Simple & Tasty Family-Friendly Recipes with an Italian Twist.
Ciao for now,
Maria
★★★★★ If you have made this Italian breakfast toast recipe, I would love to hear about it in the comments below and be sure to rate the recipe!
Recipe
Fette Biscottate: Italian Breakfast Toast
WANT TO SAVE THIS RECIPE?
Ingredients
- 400 grams whole wheat flour approx. 3⅓ cups
- 50 grams sugar ¼ cup, granulated
- 3.5 grams active dry yeast 1 teaspoon
- 3 grams salt ½ teaspoon
- 200 grams milk ¾ cup, lukewarm
- 1 egg room temperature
- 48 grams olive oil ¼ cup, extra virgin
- additional flour to dust wooden board for kneading and rolling
- additional milk for brushing the loaf
Instructions
- Mix the dry ingredients: In a large bowl, whisk together the flour, sugar, yeast and salt.
- Whisk the wet ingredients. In a measuring cup, whisk the lukewarm milk, egg, and olive oil until well combined.
- Knead the dough: Pour the wet mixture into the dry ingredients. Using a stand mixer fitted with the dough hook, knead on medium speed for 6-8 minutes, until the dough comes together in a ball. It should be smooth and elastic, slightly tacky but not sticky. If needed, turn the dough out and knead briefly by hand with a light dusting of flour to finish. (Alternatively, knead entirely by hand for 8-10 minutes.)
- Rest the dough: Shape the dough into a ball, place it in a lightly floured bowl, cover, and let it rest in a warm spot for 15 minutes. (Oven with light on or proof mode in the oven works well.)
- Prep the pan: Line a 12 x 5-inch (30 x 13 cm) loaf pan with parchment paper and lightly grease it.
- Shape the loaf: On a lightly floured surface, roll the dough into a rectangle about 12 x 9 inches (30 x 23 cm), roughly ¼ inch (0.6 cm) thick. Use your hands to gently square the edges. Starting from one short side, roll the dough up tightly like a jelly roll. Pinch the seam and the ends to seal.
- Transfer and proof: Place the dough seam side down into the prepared loaf pan. Cover the pan with a clean kitchen towel or plastic wrap.Let rise in a warm place until doubled in size, about 1 hour. The dough should puff up.
- Time to bake: Preheat the oven to 375°F (190°C).Brush the top of the dough with a little milk.Bake for 35 minutes, or until golden brown and the loaf reaches an internal temperature of 190-195°F (88-90°C).
- Cool: Remove the bread from the oven, run a knife around the edges, and lift it out using the parchment.Transfer to a wire rack to cool completely - at least 1½-2 hours - before slicing.
- Second Bake (Toast the Bread):Once the loaf is completely cool, use a serrated knife to slice evenly into pieces about ¼-⅜ inch (0.6-0.9 cm) thick.Arrange the slices in a single layer on a baking sheet.Bake at 300°F (150°C) for 15-20 minutes. Flip the slices and bake for another 10-15 minutes, until crisp and golden.Transfer to a wire rack to cool. The slices will firm up even more as they cool.
- For all the details - including step-by-step photos, tips, and troubleshooting - be sure to check out the full post above.You can also watch the video on the recipe card.
Video
Notes
- Use lukewarm milk (38-40°C / 100-105°F): This is the ideal range to activate the yeast.
- Adjust flour if needed: If the dough feels sticky, dust your hands or work surface with a little whole wheat flour. Avoid adding too much, or the toasts may turn dense.
- Don't rush the rise: Let the dough double in size before baking. A slow rise gives the toast its light texture.
- Cool before slicing: For neat, even slices, let the baked loaf cool completely - even overnight, if possible. Warm bread will squash or tear when cut, making it harder to get clean slices for toasting.
- Use a serrated bread knife: Gentle sawing motions give you clean slices without pressing the bread flat.
- Slice evenly: Aim for slices between ¼ inch (0.6 cm) and just under ⅜ inch (about 0.9 cm). This range gives the best results. Thinner slices will toast too quickly, while thicker ones may stay soft in the middle.
- Toast low and slow: Keep the oven temperature gentle during the second bake (300°F/150°C). This ensures the slices dry out without burning. Bake until the slices feel dry - they'll crisp up even more as they cool.
- Experiment with flours: Using whole wheat bread flour instead of regular whole wheat gives the dough a sturdier structure, which makes the slices a little easier to cut and keeps them crisp after baking. Mixing the two works beautifully.
Weeta Heath
Thank you for this great recipe. My friend in Baie d’Urfe suggested I follow you knowing how much I love biscotti. My favorite so far is the Italian Cherry. The texture is perfect! Now I’m looking for a pumpkin biscotti recipe. I bet yours would be great. I think the right texture is hard to achieve. Happy fall! You know what comes shortly after. Maybe that’s why I’m in North Carolina. 😎🍁❄️❄️❄️❄️
Maria
My pleasure Weeta! Thanks so much for sharing. So happy to read you are enjoying my biscotti recipes as well ♥
Happy fall to you as well!
Leslie B.
I only have 9”x5” metal loaf pans and Pyrex loaf pans. Not planning to buy a new pan, What do you suggest?
Maria
Great question Leslie! A 9×5-inch metal or Pyrex loaf pan will work just fine—you don’t need to buy a new one. When you roll out your dough, simply shape it into a rectangle that will fit comfortably in your pan (a little shorter and narrower than the pan size). The dough should sit seam-side down and have a bit of room to rise without overflowing.
Since metal and glass conduct heat differently, just keep an eye toward the end of baking: metal pans tend to brown faster, while glass may take a couple extra minutes. Hope this helps.
Mary
Wow! My mom use to make this for us when I was a child. Brings back great memories. I never thought I would find the recipe. Thank you for posting!!
Maria
My pleasure Mary! Thanks so much for sharing ♥