

Italian Lupini Beans are truly a unique, healthy and delicious snack that can be eaten throughout the year. Lupini are also great for your appetizer or cheese boards. Whether you refer to them as lupini or lupins, come and see for yourself how easily they can be prepared at home.

Italian Lupini Beans
Traditions are wonderful, aren’t they?
Growing up Italian in Montreal meant that I was privileged to experience and participate in some wonderful Christmas traditions. Naturally, there was all the baking and the cooking, but there were also so many other foods that were prepared.
Tradition would dictate that these lupini beans were brined and enjoyed throughout the year -but especially at Christmas.
If you are of Mediterranean origin, chances are you are familiar with lupini beans.
If you are not familiar with this food, I will try to define them and then share how lupini are prepared, brined and eaten in an attempt to demystify this highly addictive food for you.
What are Lupini beans?
Lupini (loo-pee-nee) beans are classified as legumes.
According to Wikipedia, Lupini (or lupin) beans are the yellow seeds of the lupinus plant.
Lupini are grown in Australia and southwestern Europe and are extremely popular as street food throughout the Mediterranean and Middle Eastern countries, as well as in Latin America. In Portugal, this popular bar food is referred to as tremoços and in Arabic, they are referred to as termos.
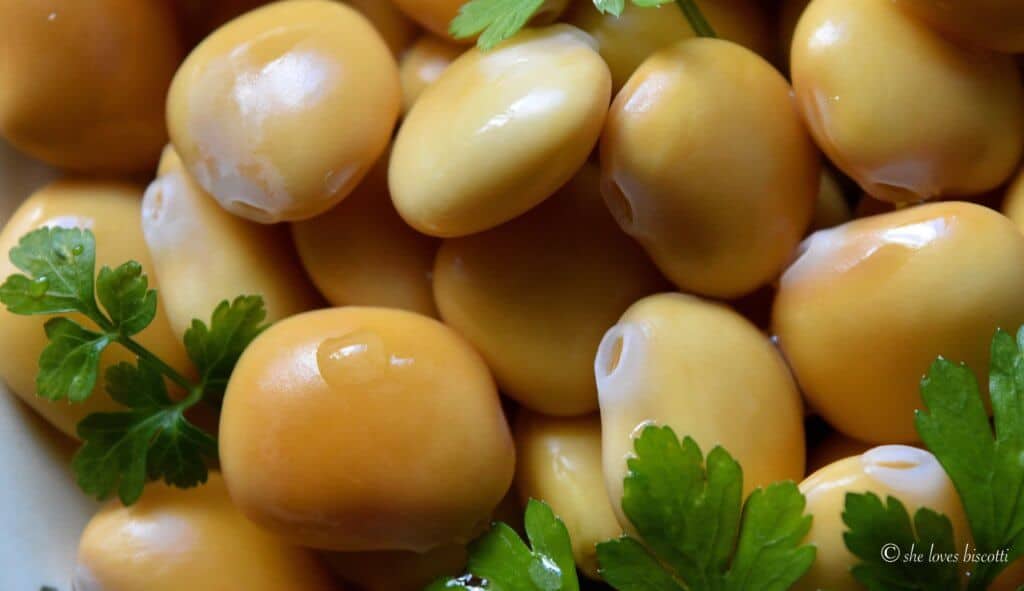
Up close and personal with Lupini (Lupin) Beans
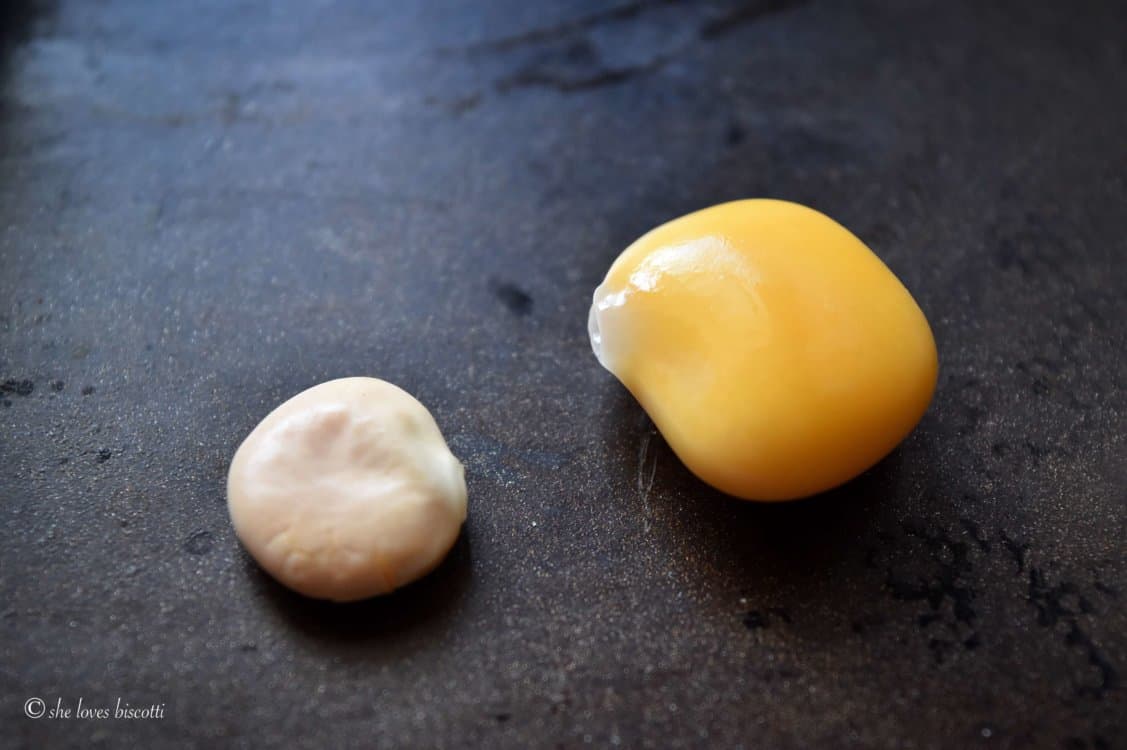
As you can see, in their dry form (left), the seeds are very pale in color, are circular, and are quite flat. Once the lupini have been reconstituted (right), they become plump with a yellowish hue.
Notice the transparent outer skin which becomes visible once the lupini have been soaked.
Please note that consumption of these Italian Lupini Beans is not recommended for individuals who have nut allergies.
Nutrition Facts
Lupin beans are a fantastic source of protein. In fact, as far as legumes go, only soybeans have more protein than they do. They are also high in fiber and a rich source of Vitamin K, Vitamin C, potassium and manganese (among others).
As an example, just 1 cup of these lupini beans will provide you with 26 grams of protein and 4.6 grams of fiber. Lupini beans are truly nutritional powerhouses.
It’s important to know that these innocent-looking seeds contain high levels of alkaloids, which are actually very toxic. In fact, it is these alkaloids that produce an extremely bitter taste.
The good news is that the simple daily repetitive action of soaking and rinsing (for a few weeks) will cause these molecules to leach into the water, transforming the lupini beans into a fabulous healthy appetizer or snack.
So to be extra clear: that means lupini beans are poisonous prior to soaking!! So don’t eat them before the soaking process is complete.
How to Prepare
As with most traditional Italian recipes, the process is super easy but lengthy. It is possible for you to purchase ready-to-eat lupini beans in a brine solution. But I wanted to show you how easy it is to make your own lupini beans from scratch – gives you a greater feeling of accomplishment, and helps you avoid preservatives, to boot.
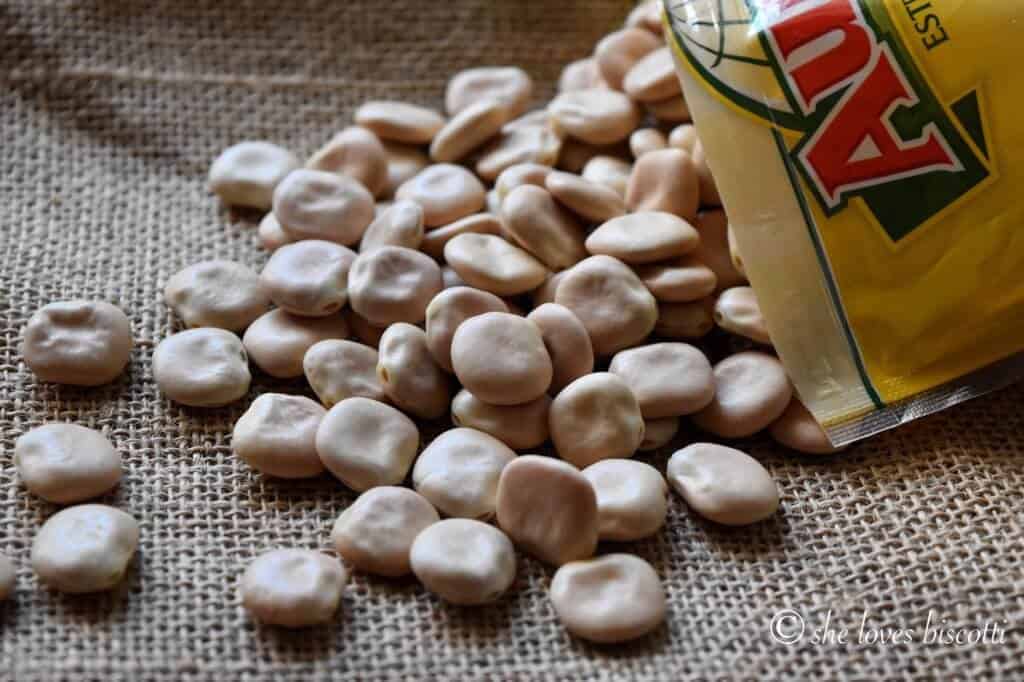
Dry lupini beans are easily accessible in local ethnic bulk or grocery stores. I will usually purchase a 14 ounce (400 grams) bag from an Italian grocery store.
Since we are brining our very own lupini, you need to be available every day, for just a couple of minutes, for a couple of weeks before you can enjoy the mild and nutty flavor of this legume.
Be warned: it does get a bit repetitive, but the rewards are well worth it.
So, let me show you how easy this is:
How to make Lupini Beans edible
Day 1: Soaking the lupini
- Sort and rinse your lupini beans. You need to get rid of any blemished or discolored beans.
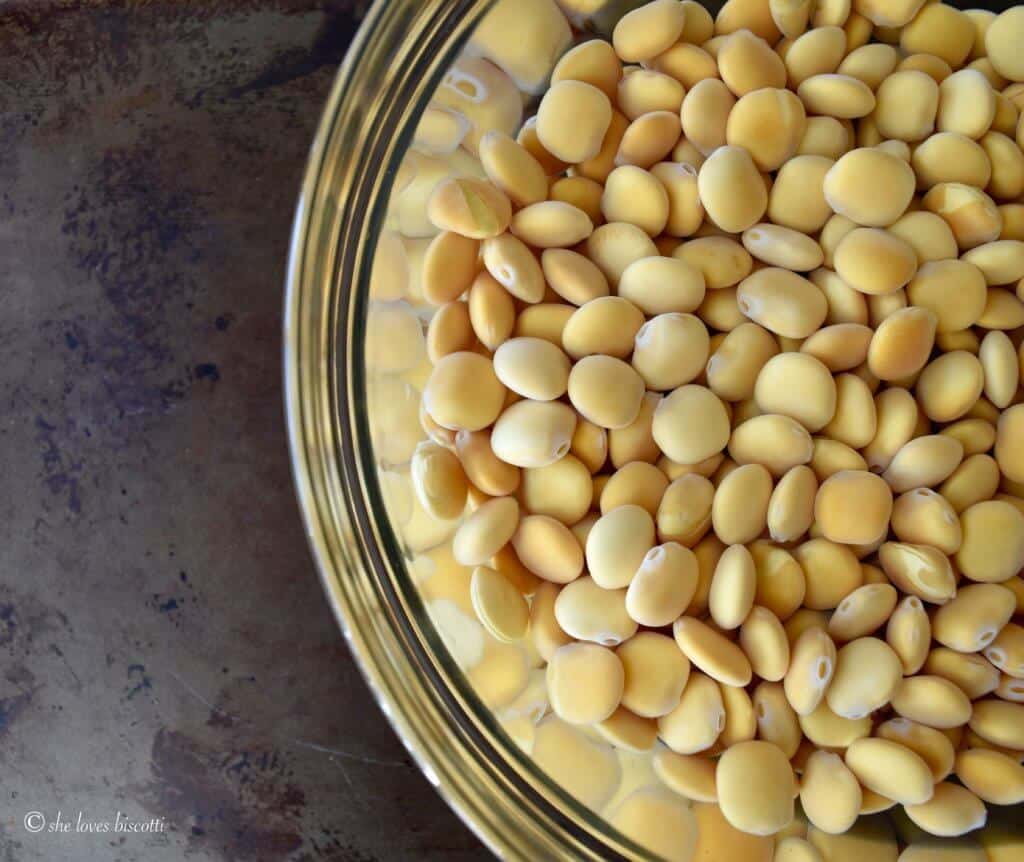
- Soak the lupini beans for 24 hours in cold water, so that they may become reconstituted. Place them in a glass bowl, ensuring that they are submerged by a few inches of water. Lupini can be kept on the kitchen counter at room temperature. I will usually place my bowl in my cantina.
Day 2: Boiling the lupini
- Drain and rinse the lupini beans. Notice how the lupini beans have become plump after the 24-hour soak. They have also picked up a little bit of color.
- Place the lupini in a large heavy-bottomed pot with cold water.
- Cover your pot and bring to a vigorous simmer for about 20 minutes. If necessary, keep adding water to keep the beans completely submerged.
- Skim the foam off the top as the lupini beans simmer.
- Drain and rinse the beans with cold water.
- Place the cooked (cooled) lupini beans in a large glass bowl and fill with fresh tap water.
- Refrigerate.

Days 3-17: Rinsing and soaking the lupini
- Drain, rinse and refill with fresh tap water a couple of times a day. If possible aim for at least twice a day. The lupini beans are ready when they no longer have that bitter aftertaste; you can start to taste them after 5-7 days of changing the water. Sometimes, this can take up to 2 weeks. What we are looking for is a sweet and tender lupini.
- During the rinsing and soaking stage, the lupini can be kept refrigerated.
Storing the Italian Lupini Beans
Once all trace of bitterness has been removed, place the lupini beans in a large glass bowl and fill with cold tap water, add salt and refrigerate, until ready to be eaten. I will usually add 1 tablespoon of Kosher salt to 4 cups of water.
The 2 ½ cups (14 ounces) of dry lupini beans made about 6 ½ cups of lupini beans. I added 8 cups of water and 2 tablespoons of Kosher salt.
Once brined, these Italian Lupini Beans can be kept in an airtight container (mason jars) in the fridge for about 2 weeks. It is no longer necessary to rinse the lupini beans.
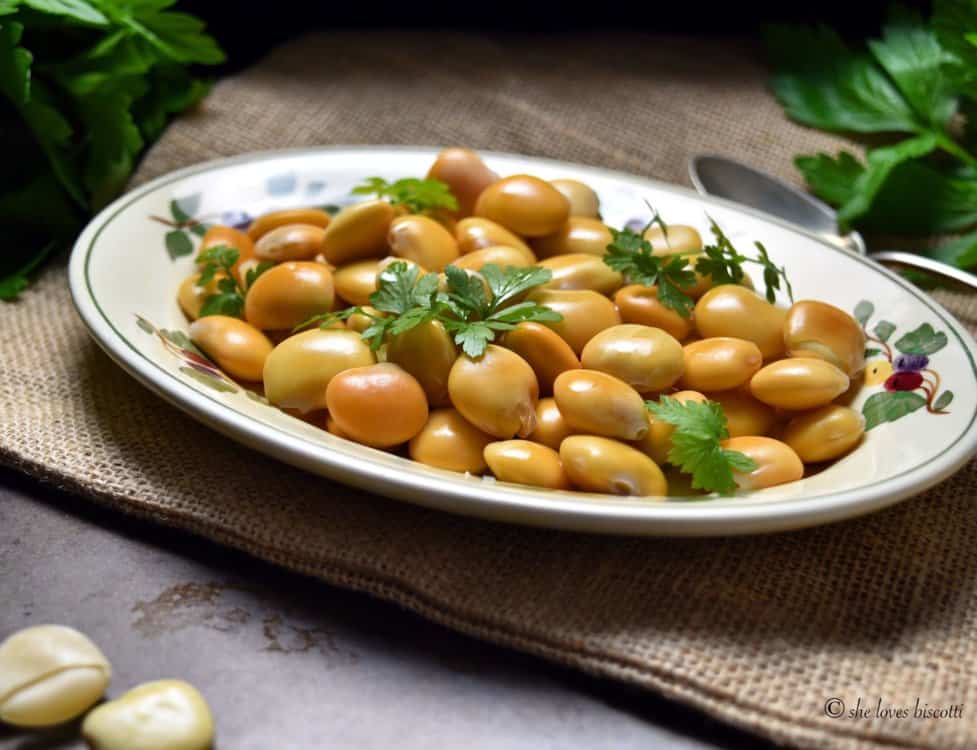
How to eat
You will notice that lupini have an outer skin, much like chickpeas, but slightly thicker. Personally, I like to remove this outer shell, despite the fact that it is totally edible.
Pick up an individual lupini and take a tiny bite at one end of the bean (in essence you are making a tiny incision) while squeezing the other end.
The lupini will then “pop” out of its’ shell and into your mouth. Years of practice 😉
The true lupini experts can flip the beans in their mouth with just a flip created with their thumb and index finger.
Once again, the consumption of lupini beans is not recommended for those individuals who have nut allergies.
Recipes with Lupini
As was mentioned, lupini make a great addition to any appetizer or cheese board. In fact, they are great with marinated olives.
Lupini are also a great healthy addition to any salad. This Lupini Beans and Baby Kale Salad truly makes the perfect summer salad.

Recipe source
These Italian Lupini Beans would be prepared from October to April in my Italian-Canadian upbringing. This would usually coincide with big family reunions.
I fondly remember my grandmother curing her very own lupini – rinsing the beans several times a day for weeks on end in order to eliminate the bitterness. There was always a batch of lupini in the preparation phase and a batch ready to be enjoyed.
I can remember not heeding to my grandmother's warnings to wait for the curing process to be complete. I can attest to the fact that lupini are indeed very bitter. But in my defense, they were so easily accessible; it was hard not to be tempted to try them! After all, that's what kids do best - the opposite of what they are told!
The lupini beans were kept in the cantina, where all the other goodies could be found - you know, the hundreds of jars of homemade tomato sauce, the pickled eggplants, the peppers, the prune marmalade… and of course, no cantina would be complete without the strung sausages and hung prosciutto in the process of being cured. My dad was a butcher by trade and he just loved his homemade salumi.
All of these homemade foods, including these Italian Lupini Beans, would inevitably become part of the lineup of appetizers served at large family gatherings. They were served simply on their own.
So the next time you are getting together with friends and family, make sure to include these Italian Lupini Beans… a great vegetarian appetizer (or snack) and a guaranteed conversation starter.
THANKS SO MUCH for following and being part of the She Loves Biscotti community where you will find Simple & Tasty Family-Friendly Recipes with an Italian Twist.
Ciao for now,
Maria
And if you are new here, welcome! You may want to sign up for my weekly e-mail newsletter. You can unsubscribe any time you want.

Recipe
Italian Lupini Beans
WANT TO SAVE THIS RECIPE?
Ingredients
- 14 ounces 400 grams of dry Lupini Beans
- lots of water
- 2 tablespoons Kosher salt
- parsley optional for garnish
Instructions
- Soak the dry Lupini Beans for 24 hours in water; ensure beans are completely submerged.
- Rinse and place in a large pot with cold tap water.
- Bring to a vigorous simmer and boil for 20 minutes. If necessary, keep adding water to keep the beans completely submerged.
- Drain and rinse with cold water.
- Place par-boiled beans in a bowl or a large mason jar and fill with fresh water; ensure beans are completely submerged.
- For the next couple of days, drain, rinse and refill with fresh tap water a couple of times a day. If possible aim for at least twice a day. The lupini beans are ready when they no longer have that bitter aftertaste; you can start to taste them after 5-7 days of changing the water. Sometimes, this can take up to 2 weeks. What we are looking for is a sweet and tender lupini.
- During the rinsing and soaking stage, the lupini can be kept refrigerated.
- Once the lupini are sweet and tender, place in a large airtight container (mason jar) with salt-water brine (see note).
- To serve: Simply remove the amount of lupini beans required, drain brine water and place lupini in a bowl. Serve them plain. Garnish with parsley sprigs.
- To store: Brined lupini can be kept refrigerated in airtight container for up to 2 weeks.
Notes
You need to be available every day, for just a couple of minutes, for a couple of weeks before you can enjoy the mild and nutty flavor of this legume.
For the brine solution: add 2 tablespoons of Kosher salt to 8 cups of water. One serving is calculated as ½ cup of lupini beans. Please keep in mind that the nutritional information provided below is just a rough estimate and variations can occur depending on the specific ingredients used.
Vince
It’s been a few years since I ran through this process, and I’ve just started a batch, having used your recipe the first time, too. My mother would sometimes start with dried beans when we couldn’t find the jars of ready-to-eat beans.
Our family serving tradition was to mix in some oregano.
Maria
Thanks for sharing Vince!
Claire Montie
Maria,
I had a hard time finding the dried beans this year. I got them today, but with 8 days until Christmas, is there anything I can do to speed up the curing process?
I was wondering if I could boil them a second time after a few days.
We have grown up with these at the table every Christmas! My grandma always made them and she has passed away.
I have followed your recipe for the last 3 years and I truly appreciate your sharing your recipe!!
Maria
My pleasure Claire! I have never tried boiling them a second time. I feel like it is a very specific curing process… not sure if it would work.
Hopefully they will be ready and it won’t take the full two weeks. Buon Natale!
Deborah L Karlsson
I LOVE this recipe! Thanks for doing the research on preparing such a unique and hard to buy raw lupin. Prepared Lupinis are so hard to find!
Maria
My pleasure Deborah! Thanks for stopping by!
Michel
I have been making these for years, but last year it seemed like alot of the beans turned black under the skin in small areas of the bean. I dumped them all. Do you think they were spoiled?
Maria
Thanks for reaching out Michel. Yes, I do. Unfortunately, it sounds like you had a bad batch. Did you buy them in bulk?
I would have done the same thing -better to be safe than sorry.
Kathy Nicklas-Varraso
Thank you for your recipe for Lupini Beans. I didn’t grow up on them, and they aren’t for me, but my husband loves them. I love him, so I made the Lupini for him.He was thrilled, and gorged himself on Lupini, which had only previously been available to him in those little, expensive jars, as part of a holiday antipasto.
After that, he said that he would tell me when to make the beans. I have asked for a month’s lead time. If it’s earlier, it’s a bonus. I have another batch starting up right now, and wanted to thank you. I may not be Italian, but I cook like someone’s Nonna.
Maria
How wonderful Kathy! Such a delicious and healthy snack!
Linda
I have boiled them with 3 cloves of garlic, 1 tsp of basil and thyme. Rinsed them and used the water from the boil to a white wine sauce for a delicious penne chicken dinner. Added more garlic and onion to the sauce that I cooked the chicken in grape seed oil.
Maria
This is such an amazing idea Linda! Thank you so much for sharing!
Tracy Abernathy
We’ve always eaten these at the annual Italian street fair & loved them. Now I make them at home all the time. Love this recipe! Thank you for sharing!
Maria
My pleasure Tracy! Thanks so much for sharing!