

A scalloped circle cookie cutter creates the best-looking mini crepe cakes just begging to be filled with creamy ricotta and garnished with chopped pistachios and icing sugar. This impressive and elegant dessert is perfect for special occasions and brunch parties.

What is a crêpe cake?
It might look and sound very fancy, but a crepe cake is simply made by stacking alternating layers of paper-thin crepes, laid flat without folding, and a spread. This process forms a cake which is then sliced into wedges and served.
There are endless possibilities for filling crepes, from chocolate spreads, to lemon curd, to whipped cream and strawberry jam, to list just a few examples.
Today, I am using lightly sweetened ricotta filling between the layers of crepes.
Instead of assembling one large crepe cake, individual mini crepes were created. Although they are simple to make, there is a small investment of time. I think the effort is well worth it as you will be rewarded with the best tasting and prettiest crepe layer cake!
Here’s how to make a no-bake layered crepe cake with a whipped ricotta filling perfect for festive occasions like Mother’s Day, Easter and Valentine's Day.

Crepe recipe
Once again, I am using the crepe batter recipe I recently shared with you. The only difference is the addition of 1 teaspoon of finely grated lemon zest. Feel free to use your favorite crepe recipe if you have one.
Please refer to the full recipe for a step-by-step photo tutorial as well as all my tips to make the best recipe for easy homemade crepes. The recipe is located on the recipe card found at the bottom of this post.
To make ahead: Cool completely before stacking; wrap and refrigerate for up to 5 days.
Ricotta filling
This ricotta filling used to layer these crepes is so delightful that you will want to double the recipe. Once again, please refer to the full recipe for a step-by-step photo tutorial as well as my tips and variations.
To make ahead: Once it is made, transfer this sweet crepe filling to an airtight container and store it in the refrigerator for up to 3 days. Be sure to verify the expiry date if using commercial ricotta or your milk if making your own homemade ricotta.
Let’s assemble
Before assembling our cake, we need to cut out our crepes.
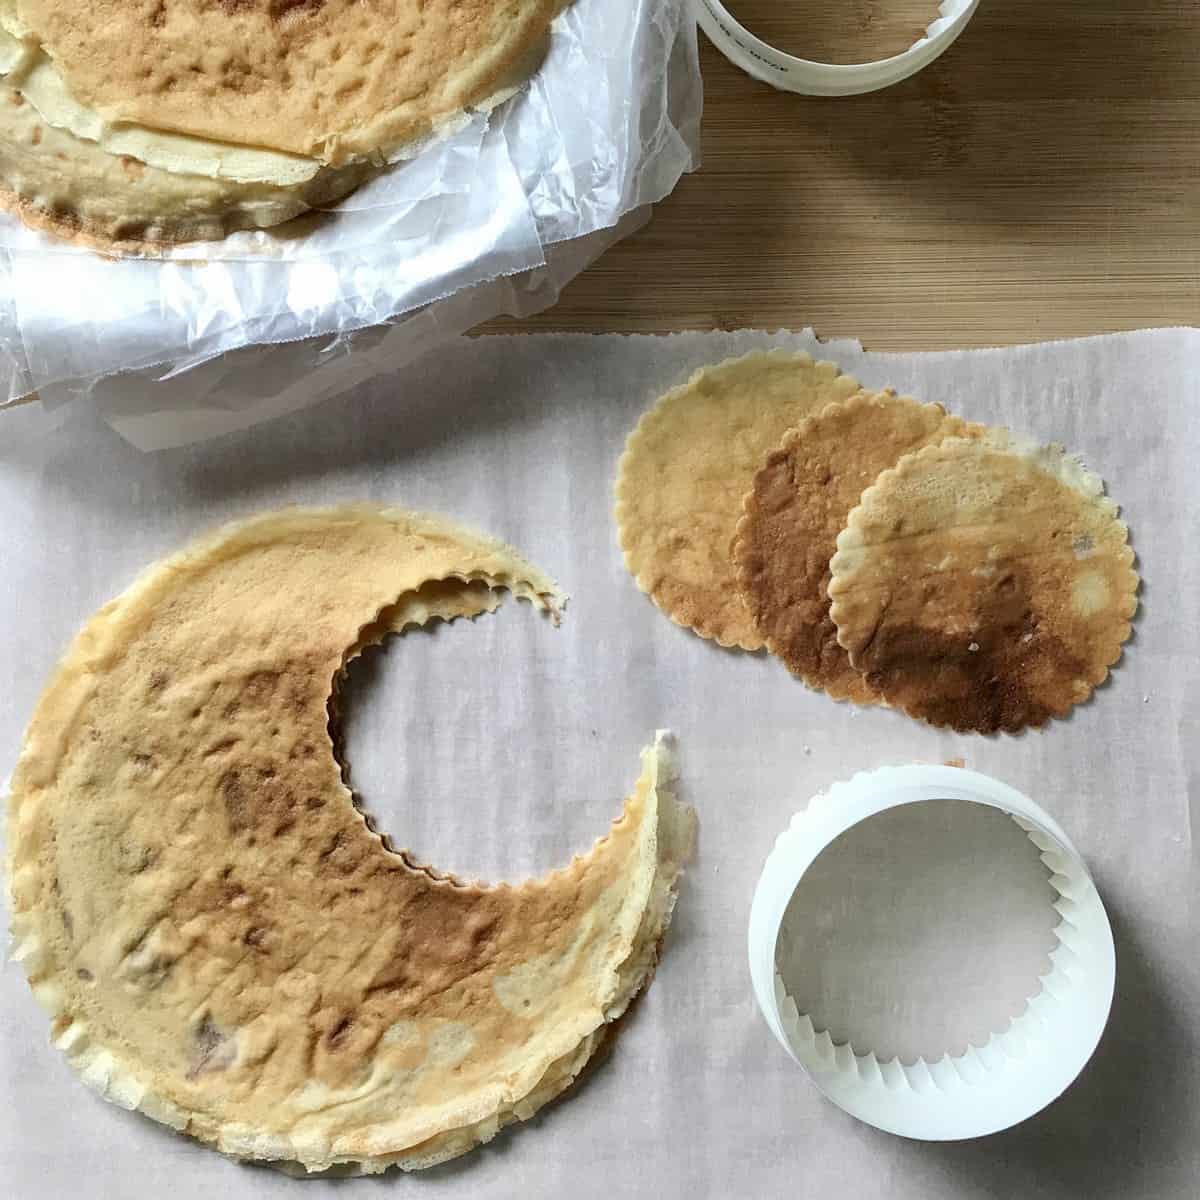
To do so, stack 3 crepes and with a cookie cutter, press down in order to obtain mini-shaped crepes. I used a 3⅞ and a 3½ inch cookie cutter.
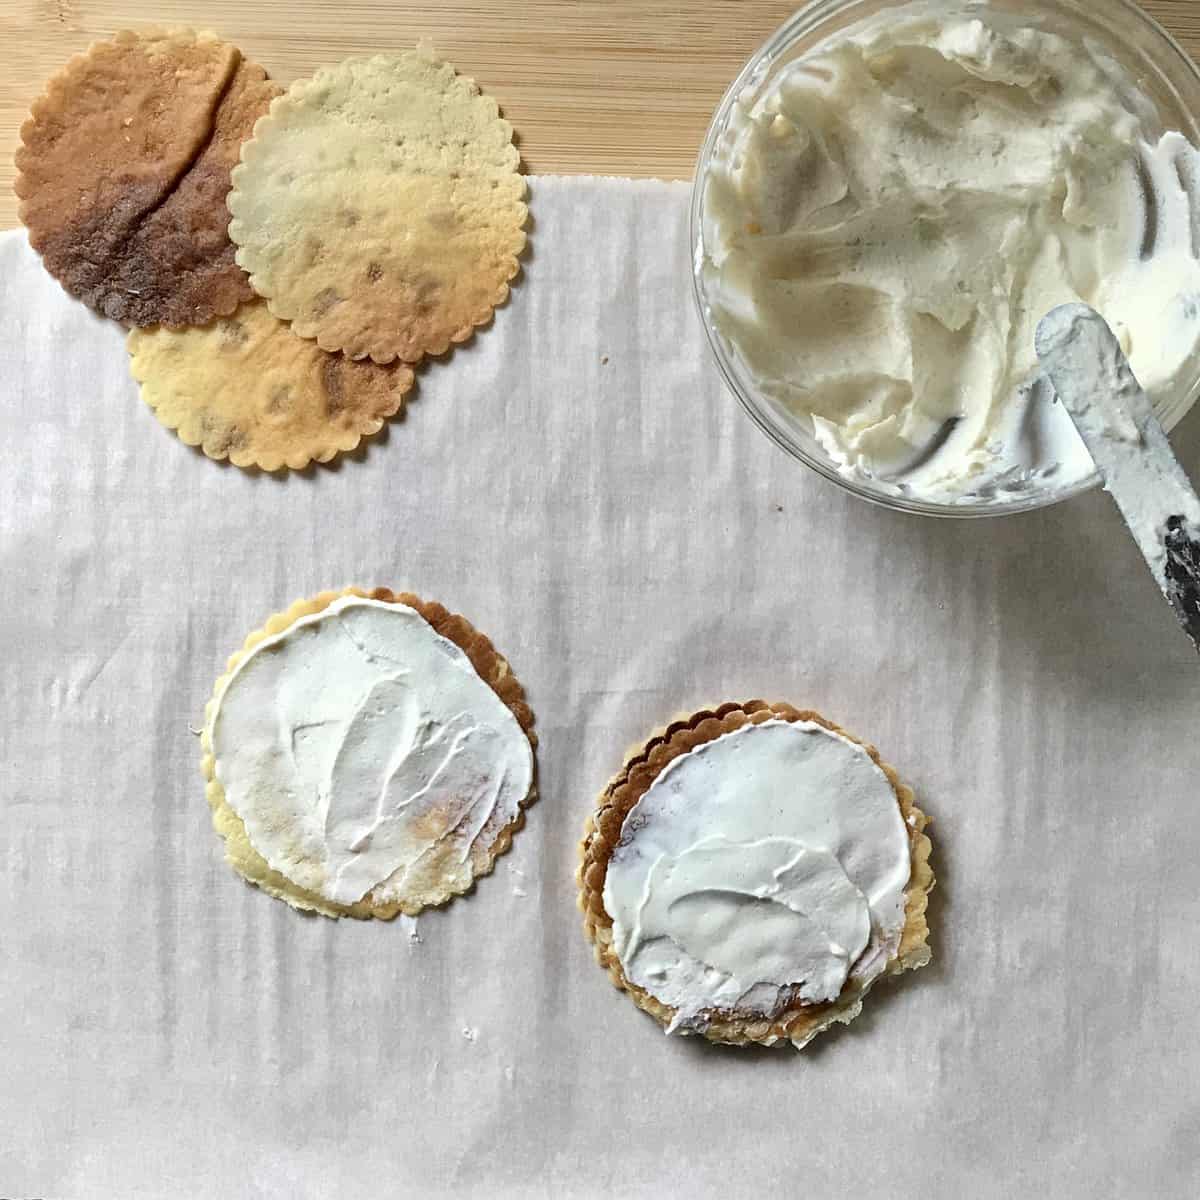
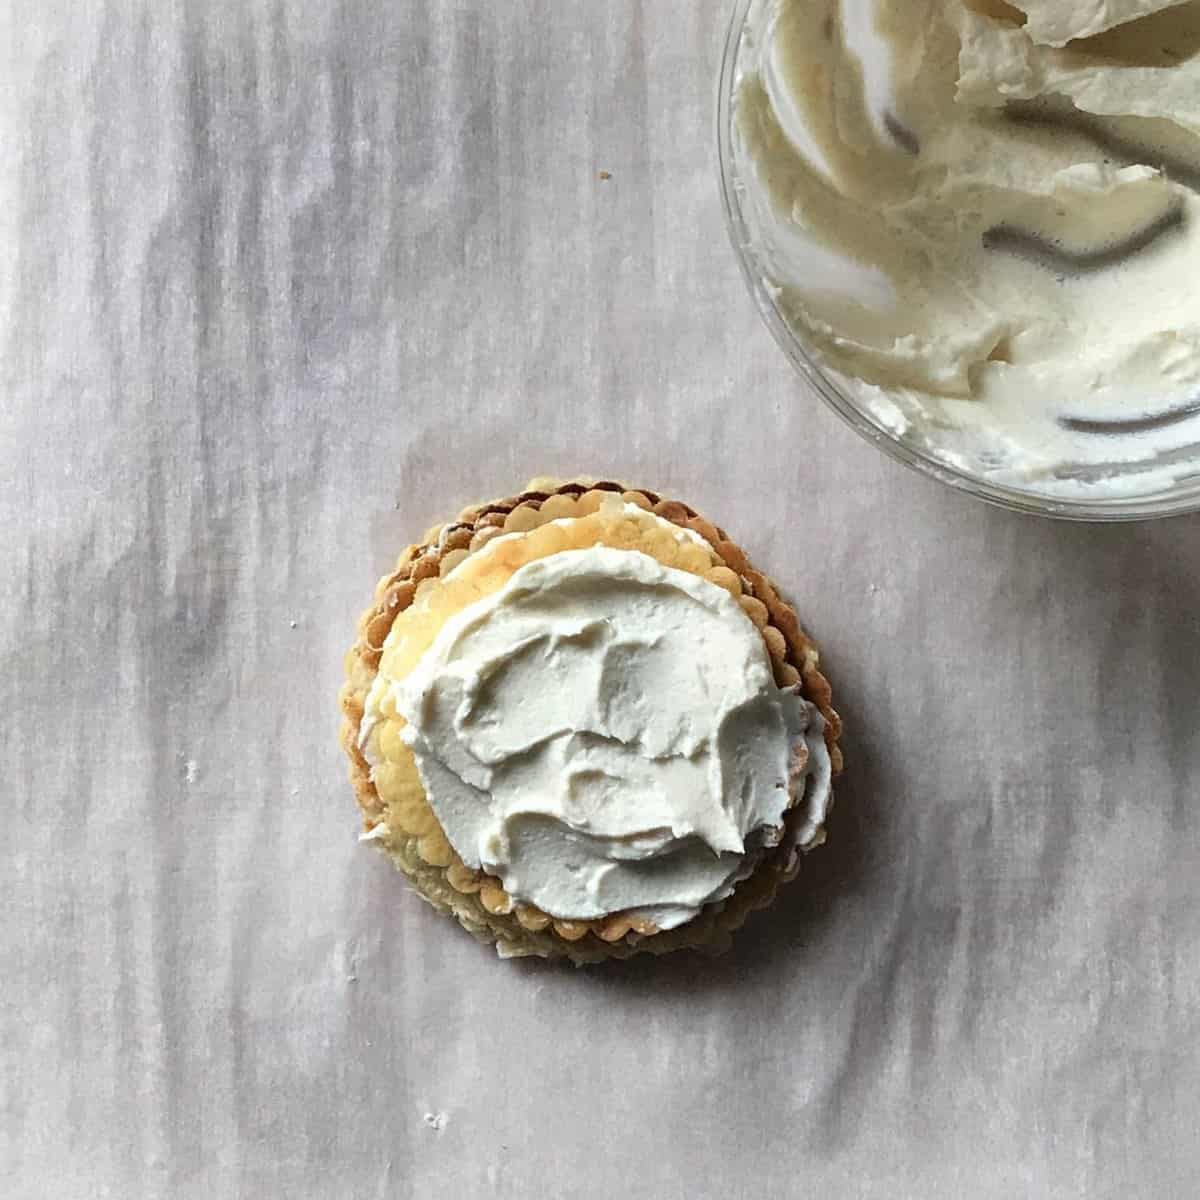
Place one crepe flat on your working surface. With an offset spatula, spread a heaping tablespoon or so of the sweet ricotta filling evenly on the crepe. Top with another crepe and repeat this procedure until you have reached your desired height. I used 8 mini crepes.
I rolled up one mini crepe spread with ricotta that I will use to garnish the cake.
Repeat this procedure with the rest of the crepes to form 4 mini crepe cakes.
Since it’s best to garnish your mini cakes right before serving, do not spread any ricotta on the top crepe since we will wrap them up in some plastic wrap and refrigerate for at least 2 hours or overnight.
Garnishings and toppings
Remove the mini cakes from the refrigerator and transfer them to the serving plate when ready to serve.
Spread a few tablespoons of sweet ricotta cheese over the top of the cake.
Garnish with a mini ricotta-filled crepe roll up (cut in half), a sprinkle of toasted chopped pistachios, a mint leaf, a few fresh raspberries and a dusting of icing sugar to create a perfect dessert to help you celebrate special occasions.

Tips
- The crepe batter can be made in a food processor, a blender, a thermomix or even whisked by hand.
- If making the crepes ahead of time, once they are at room temperature, wrap them really well in plastic wrap to prevent them from drying out in the refrigerator. Never stack warm crepes as they will stick together.
- If you do not have an offset spatula, use the back of a spoon to spread a thin layer of filling in between the crepe layers.
- For best results, refrigerate the cake for at least 2 hours. This allows it to become firm and set.
- For the best presentation, garnish your crepe cake right before serving.
Variations
- Garnish your cake with any seasonal fruit available to you. Fresh strawberries are a great alternative.
- For a richer-tasting cake, use this cannoli dip recipe,
- Replace the icing sugar with a dusting of cocoa powder and a drizzle of chocolate ganache.
Why make a mini crepe cake
These cakes can easily be individualized, which is great if any guests have intolerances or allergies.

Recipe Inspiration
Today’s recipe was inspired by one idea.
Recently, I’ve been thinking of both sweet and savory crepe recipes to share with all of you.
As I was making these ricotta-filled crepes, I suddenly had a vision of a mini crepe cake with scalloped edges.
Since the recipes for both the homemade crepes and the ricotta filling were already made, it was only a matter of finding my cookie cutter in my junk drawer and running to the grocery store to get some fresh fruit.
I created some mini crepes as a garnish and I was very pleased with the overall appearance of the cake. The taste was also amazing!
I would love to hear about how you plan on garnishing your mini crepe cake!
THANKS SO MUCH for following and being part of the She Loves Biscotti community where you will find Simple & Tasty Family-Friendly Recipes with an Italian Twist.
If you are new here, welcome! Sign up to receive my weekly e-mail newsletter as well as a free download of my top 10 tips on How to Cook Pasta.
Ciao for now,
Maria
★★★★★ If you have made this crepe with ricotta filling, I would love to hear about it in the comments below and be sure to rate the recipe!
Recipe

Mini Crepe Cakes with Ricotta
WANT TO SAVE THIS RECIPE?
Ingredients
Crepes:
- 1½ cups milk room temperature
- 3 eggs room temperature, large
- 2 tablespoons granulated sugar
- ½ teaspoon salt
- 3 tablespoons butter unsalted, melted and cooled
- ½ cup brandy
- 1 teaspoon vanilla extract
- 1 teaspoon lemon zest organic, grated
- 1 cup flour all-purpose, 142 grams
- melted butter for cooking
- 2 sweet ricotta recipe
- ½ cup pistachios toasted, chopped
- icing sugar optional to garnish
- fresh mint leaves optional to garnish
- 1 cup fresh raspberries to garnish
Instructions
- Combine the milk and eggs in a blender or food processor.
- At medium-high speed, blend until light and airy, about 15 seconds.
- Reduce the speed to low, remove the top feed, and add the sugar and salt with the blender running. Blend for 15 seconds.
- Then add the melted and cooled butter, brandy, pure vanilla extract and lemon zest through the top feed and blend for 15-30 seconds.
- Turn the blender off, add the flour and blend until smooth. If necessary, scrape down the sides.
- Chill the batter for 30 minutes.
Let's make crepes!
- Heat a large nonstick pan or an 8-inch skillet over medium-high heat. To test if the pan is hot enough, sprinkle a few drops of water over the surface; if they sizzle and evaporate, the pan is hot enough.
- Brush lightly with melted butter or spray with nonstick cooking spray.
- Pour ¼ cup batter in the center of the pan; quickly lift the pan off the heat, tilting and swirling it in a circular motion, until there is a thin layer covering the entire bottom of the pan evenly. Return the pan to heat and continue to cook for another minute or so.
- Once the batter is thinly spread out in your pan, wait approximately 1 minute before flipping it. Physical cues that your thin crepe is ready to be turned include edges that begin to pull away from the side, crisp up and start to look lacy. The disappearance of a shiny gleam on the surface of the batter is another sign.
- Crepes are done when slightly browned. You may have to play with the heat if they brown too quickly.
- Before flipping the crepe, gently lift one edge of the crepe and look for light golden spots. That's another cue to flip. Cook for another 30 seconds or so until the underneath is golden and lightly browned.
- Transfer to your plate. Repeat this process for the rest of the crepe batter.
- Give the batter a quick whisk and repeat this process for the rest of the crepe batter.
To assemble
- Stack 3 crepes and with a cookie cutter, press down in order to obtain mini-shaped crepes. Refer to photo details inside the post.
- Place one crepe flat on your working surface. With an offset spatula, spread a heaping tablespoon or so of the sweet ricotta filling evenly on the crepe. Top with another crepe and repeat this procedure until you have reached your desired height.
- Repeat this procedure with the rest of the crepes to form 4 mini crepe cakes.
- Since it’s best to garnish your mini cakes right before serving, do not spread any ricotta on the top crepe since we are going to wrap them up in some plastic wrap and refrigerate for at least 2 hours or overnight.
- When ready to serve, remove the mini cakes from the refrigerator and transfer them to the serving plate.
- Spead a few tablespoons of sweet ricotta cheese over the top of the cake.
- Garnish with a mini ricotta-filled crepe roll up (cut in half), a sprinkle of toasted chopped pistachios, a mint leaf, a few fresh raspberries and a dusting of icing sugar to create a perfect dessert to help you celebrate special occasions.
Notes
- The crepe batter can be made in a food processor, a blender, a thermomix or even whisked by hand.
- If making the crepes ahead of time, once they are at room temperature, wrap them really well in plastic wrap to prevent them from drying out in the refrigerator. Never stack warm crepes as they will stick together.
- If you do not have an offset spatula, use the back of a spoon to spread a thin layer of filling in between the crepe layers.
- Refrigerating the cake for at least 2 hours allows it to become firm and set.
- For the best presentation, it’s best to garnish your crepe cake right before serving.
Nutrition
Val
This is such a pretty cake! Can’t wait to make it!
Maria
Thanks Val! Enjoy!