

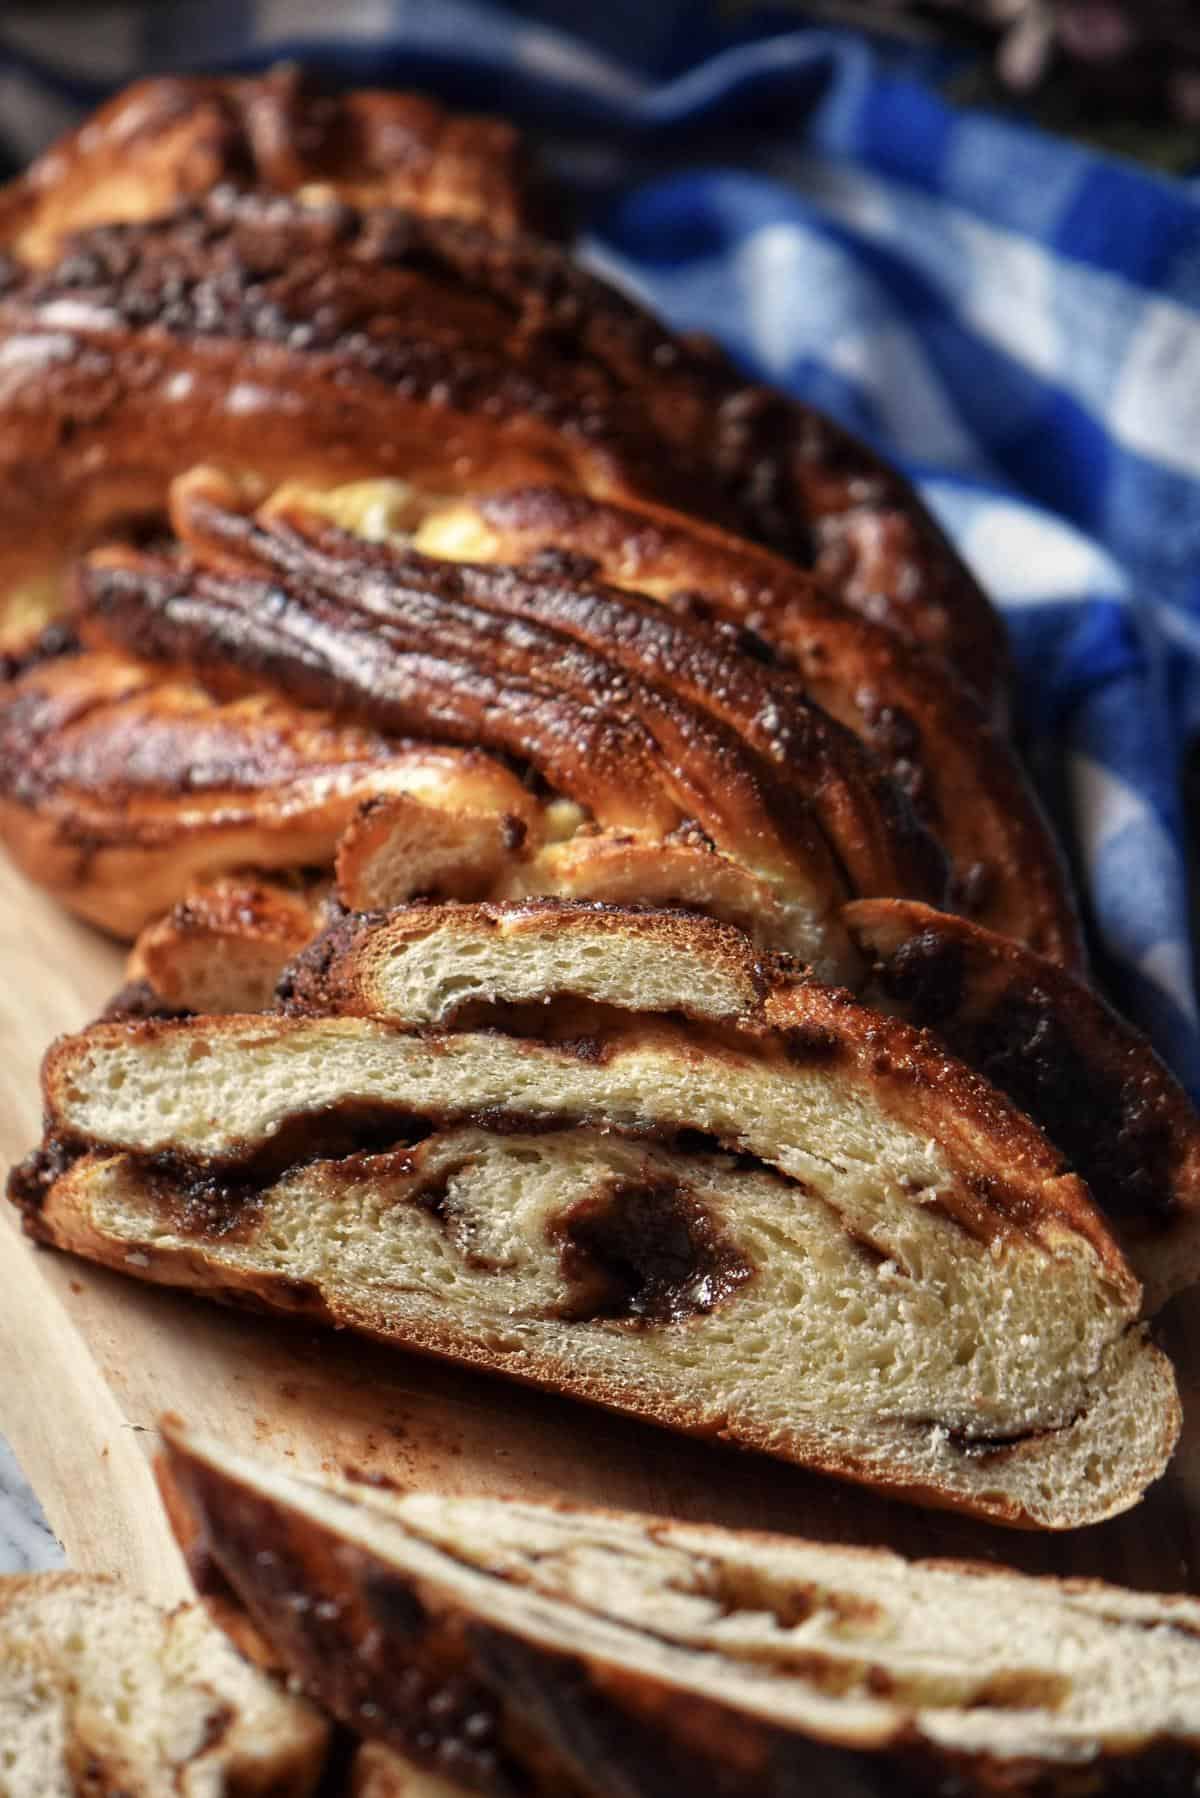
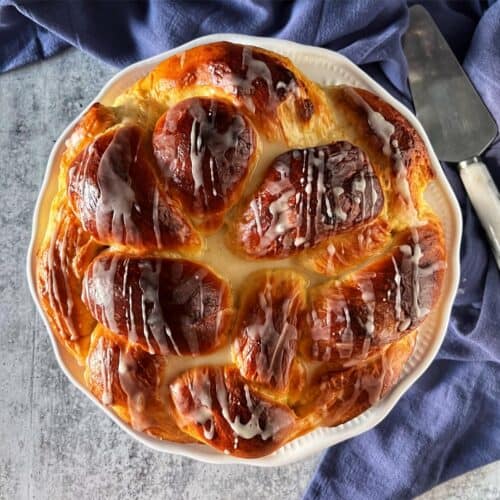
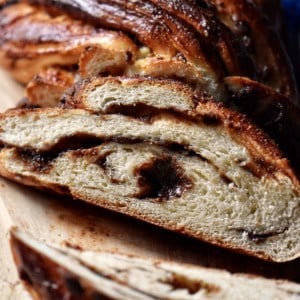
Enjoy this Braided Sweet Bread recipe filled with chocolate nut butter warm from the oven. It’s such a delicious treat to have for breakfast or brunch. This easy recipe makes two loaves -freeze one for later.
Did you know a sweet bread recipe may be created with almost any filling?
You can produce endless variations of yeast cakes filled with chocolate, jam, cream cheese, and fruit, to name but a few.
I recently used a chestnut puree as the base for a filling in this star bread recipe. It was such a hit with my family that I experimented with hazelnuts.
You will be pleasantly surprised to learn that nothing could be easier.
Chocolate hazelnut butter and a brown sugar mixture combine to make this baked good rich and delicious filling. This sweet braided dough recipe uses yeast, ensuring a breadlike texture that is soft and fluffy.
Jump to:

Mise en place
There are three parts to this homemade dessert bread: the sweet yeast dough, the filling and the egg wash.
The sweet yeast dough
The yeast bread recipe I am using today is the one I use to make the best cinnamon rolls. It is a lightly sweetened potato yeast dough with an incredibly soft texture.
If you already have a favorite sweet yeast dough you like to work with, go ahead and use it. If not, I humbly suggest following the step-by-step photo and video tutorial for this cinnamon roll recipe.
Once you have your ball of dough, please place it in a lightly greased bowl, turning it over once to grease the top. This prevents it from drying out.
Cover with plastic wrap and let rise for about 45- 60 minutes or until double in size.
The filling
While the dough is rising, prepare the chocolate hazelnut butter. We need about ½- ⅔ cups of this nut butter that will be used as a spread for our yeast bread. In a pinch, you can always use a commercial chocolate spread like Nutella.
We also need a brown sugar filling. In a small bowl, whisk together ½ cup brown sugar, 1½ teaspoons of ground cinnamon and 2 tablespoons of flour. Set aside for now.
The egg wash
Whisk together 1 egg with 1 tablespoon of milk. Set aside.
Instructions
Once the dough has doubled in size, punch it down.

Transfer to a lightly floured surface and divide it in half since we are making two loaves. Cover and allow it to rest for 10 minutes. This will make it easier to roll out.
Lightly flour your working surface, working with one ball of dough at a time, and roll into a 12 x 9-inch rectangle.
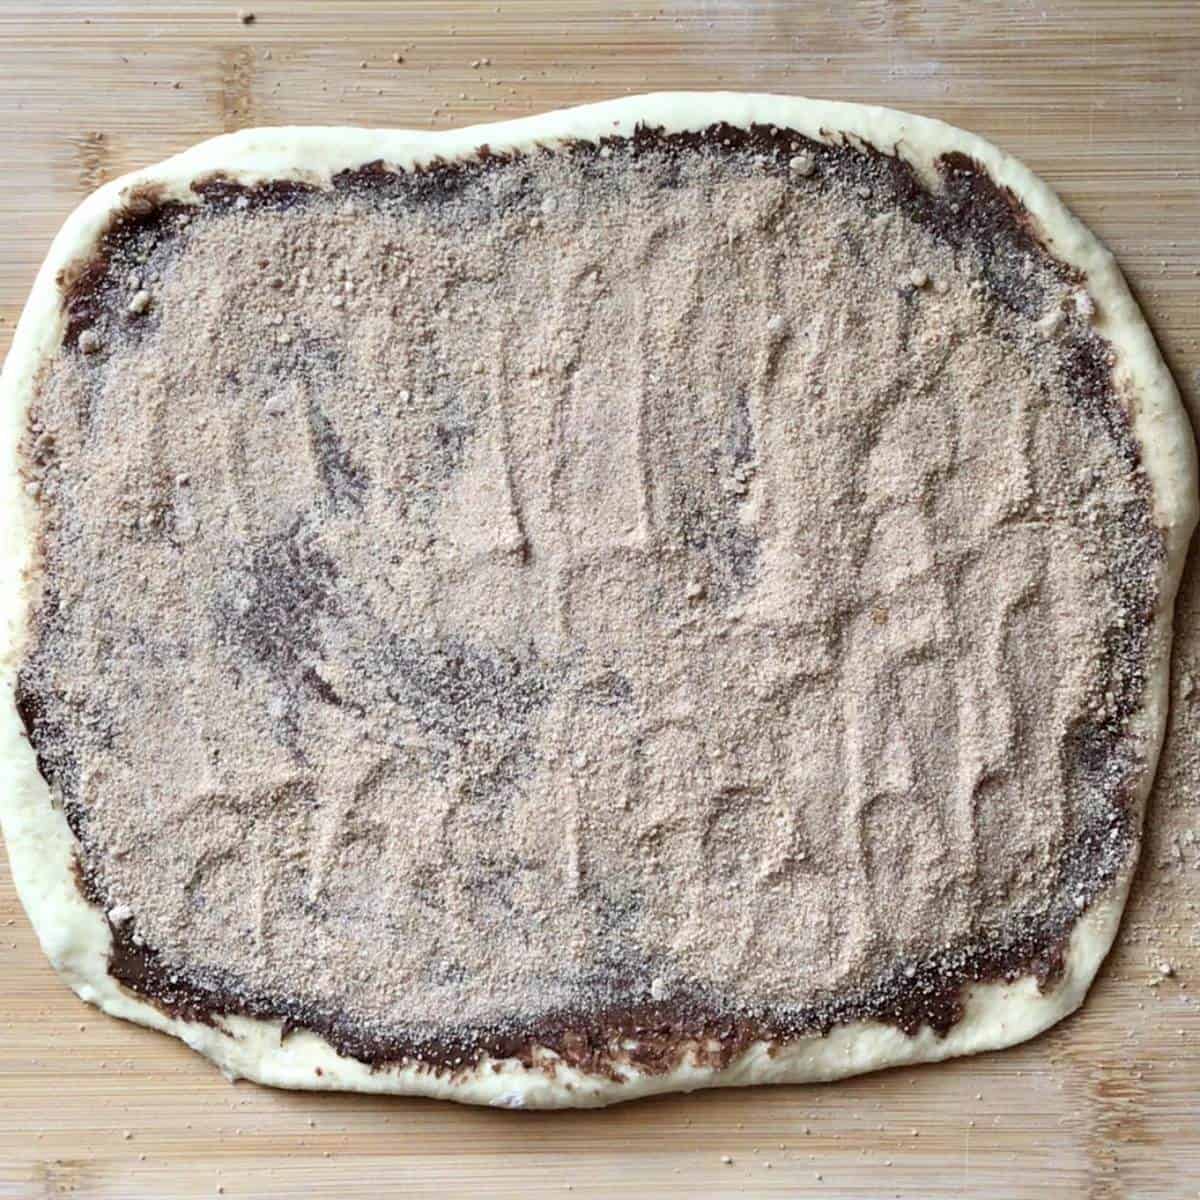
Spread half of the chocolate hazelnut butter within ½-1 inch of the edges. Sprinkle half of the brown sugar mixture over the top of the nut butter. Press it down lightly.
Starting with the long side, tightly roll up the dough jelly-style.
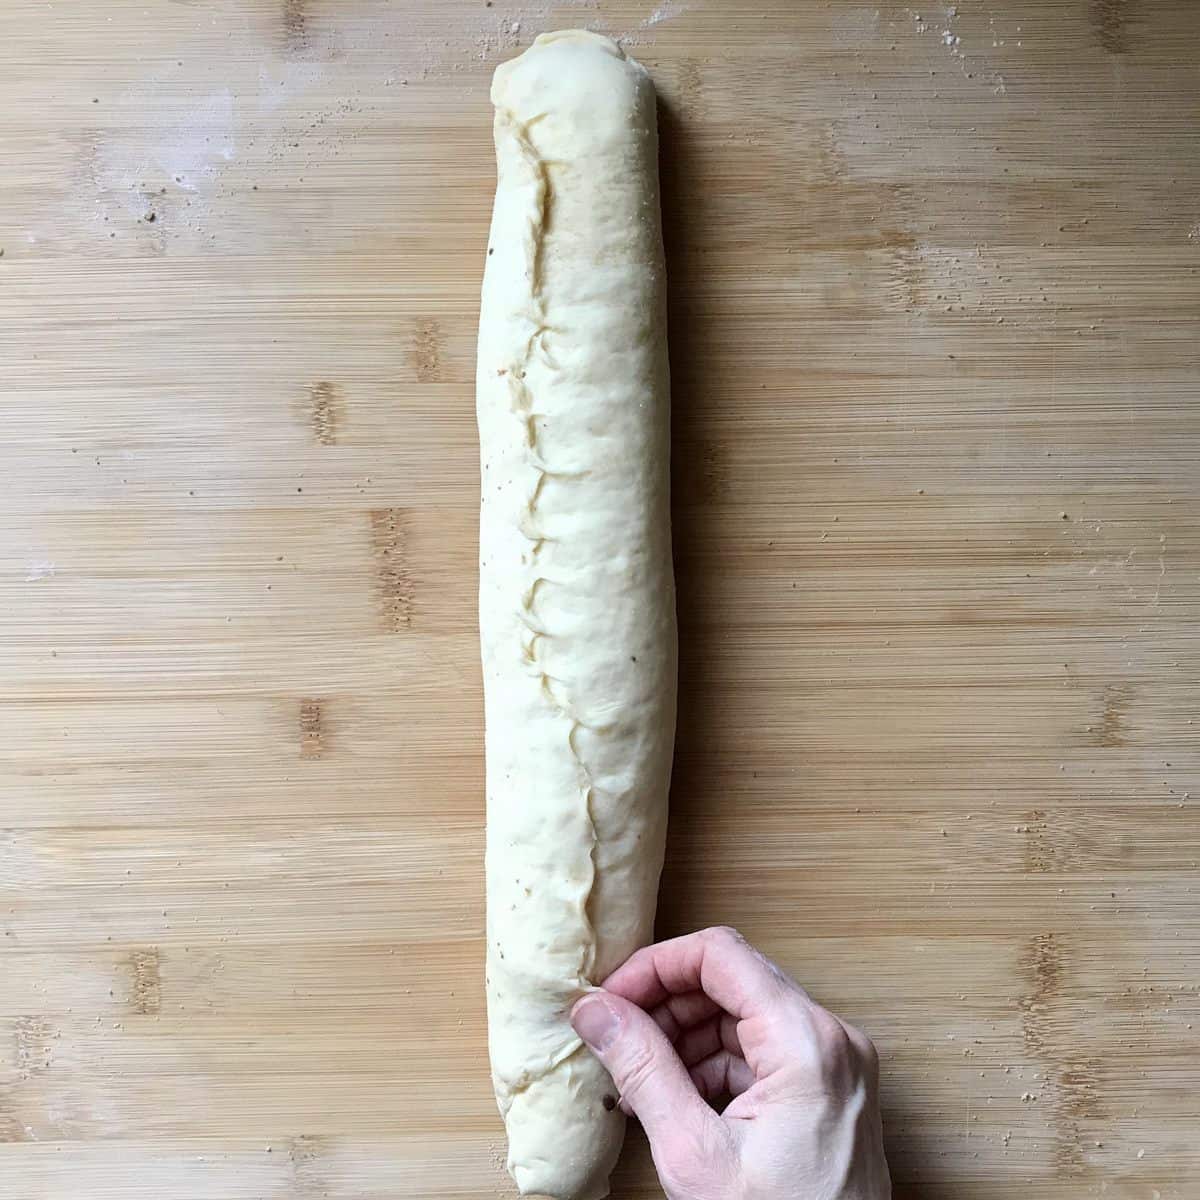
Pinch the seams and ends to seal correctly. At this point, you can transfer the log to a parchment-lined baking sheet.
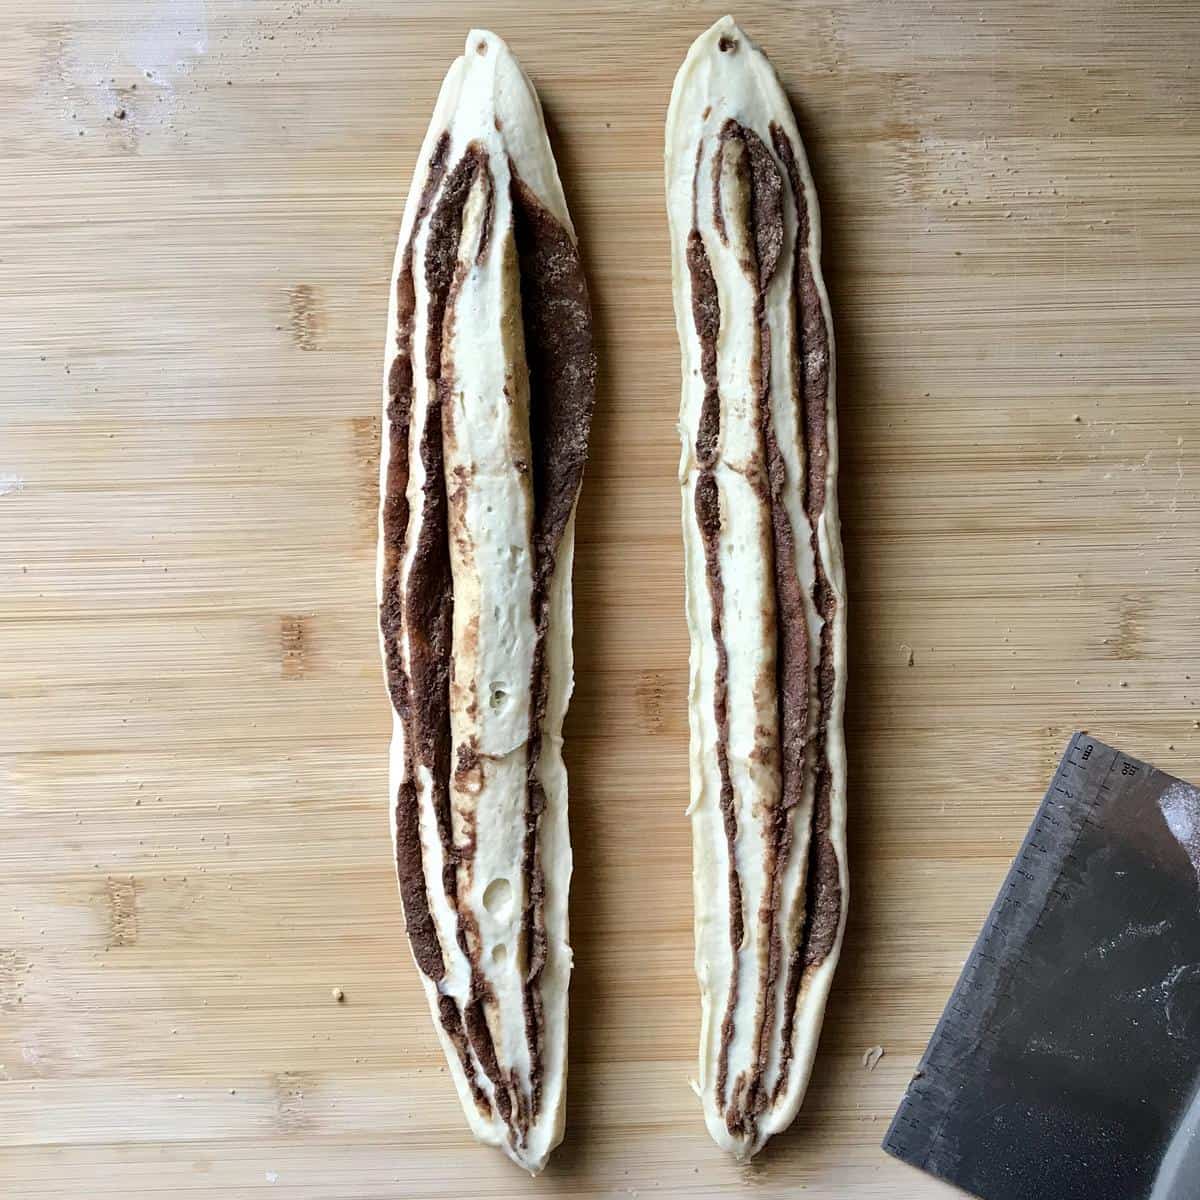
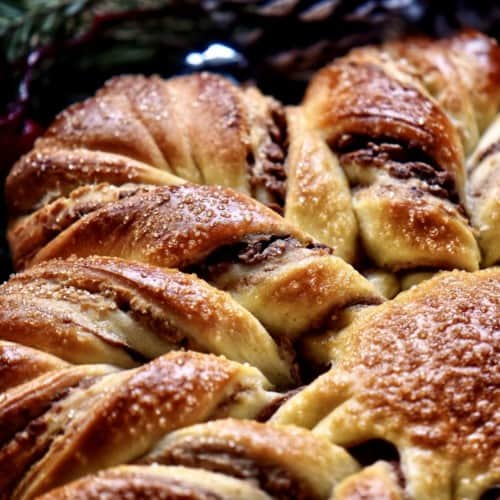
Place the seam side down. With a pastry cutter or sharp knife, split the entire length of the roll in half.
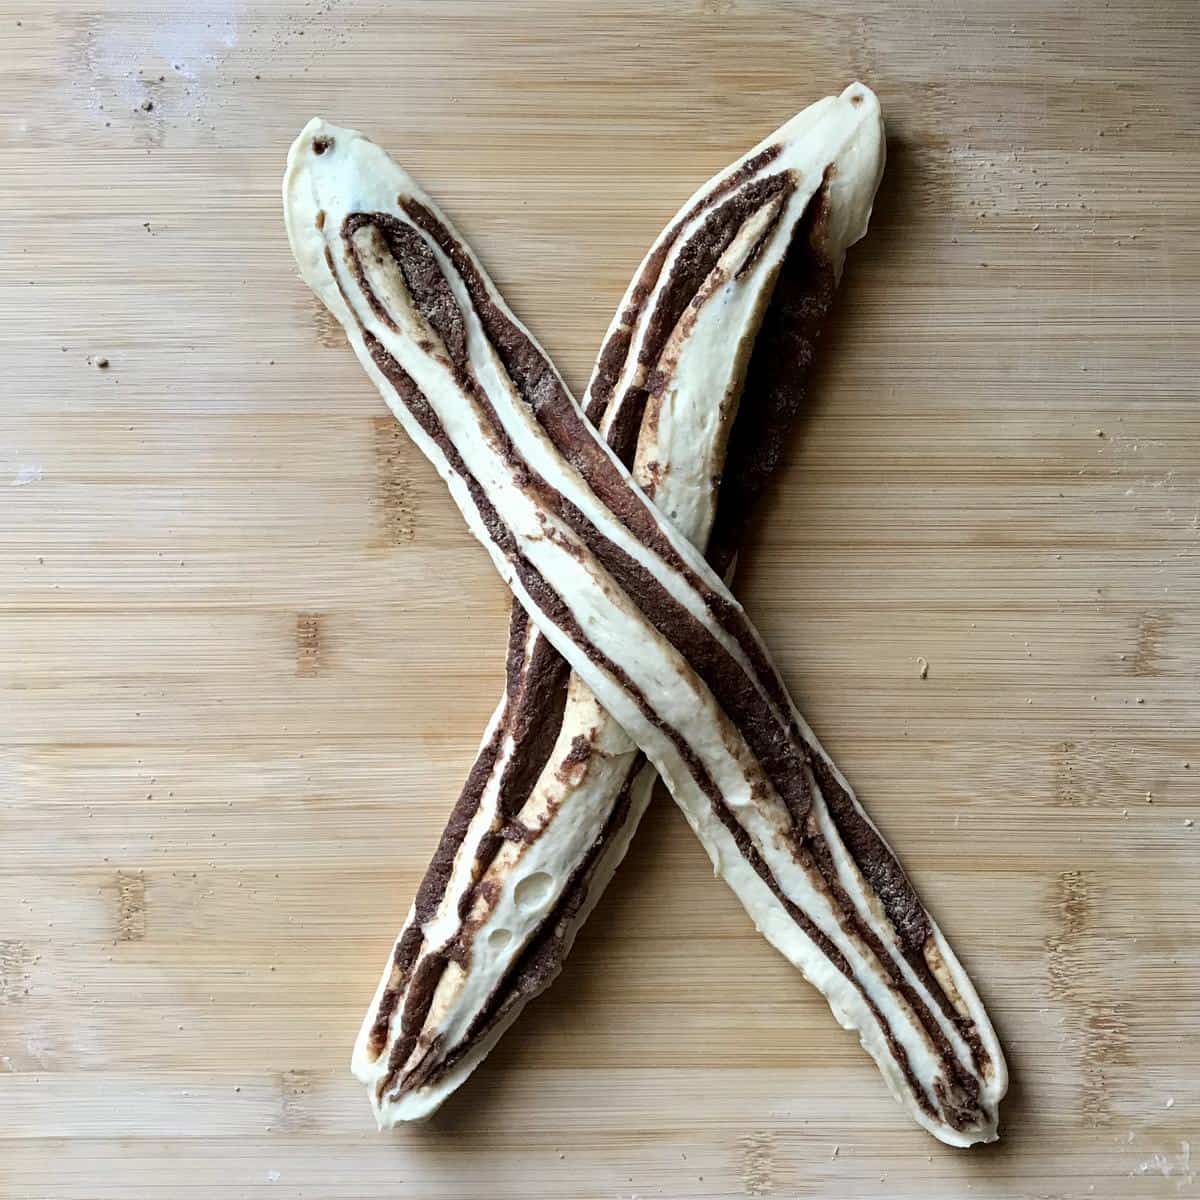
Carefully form an “X,” leaving the cut side up.
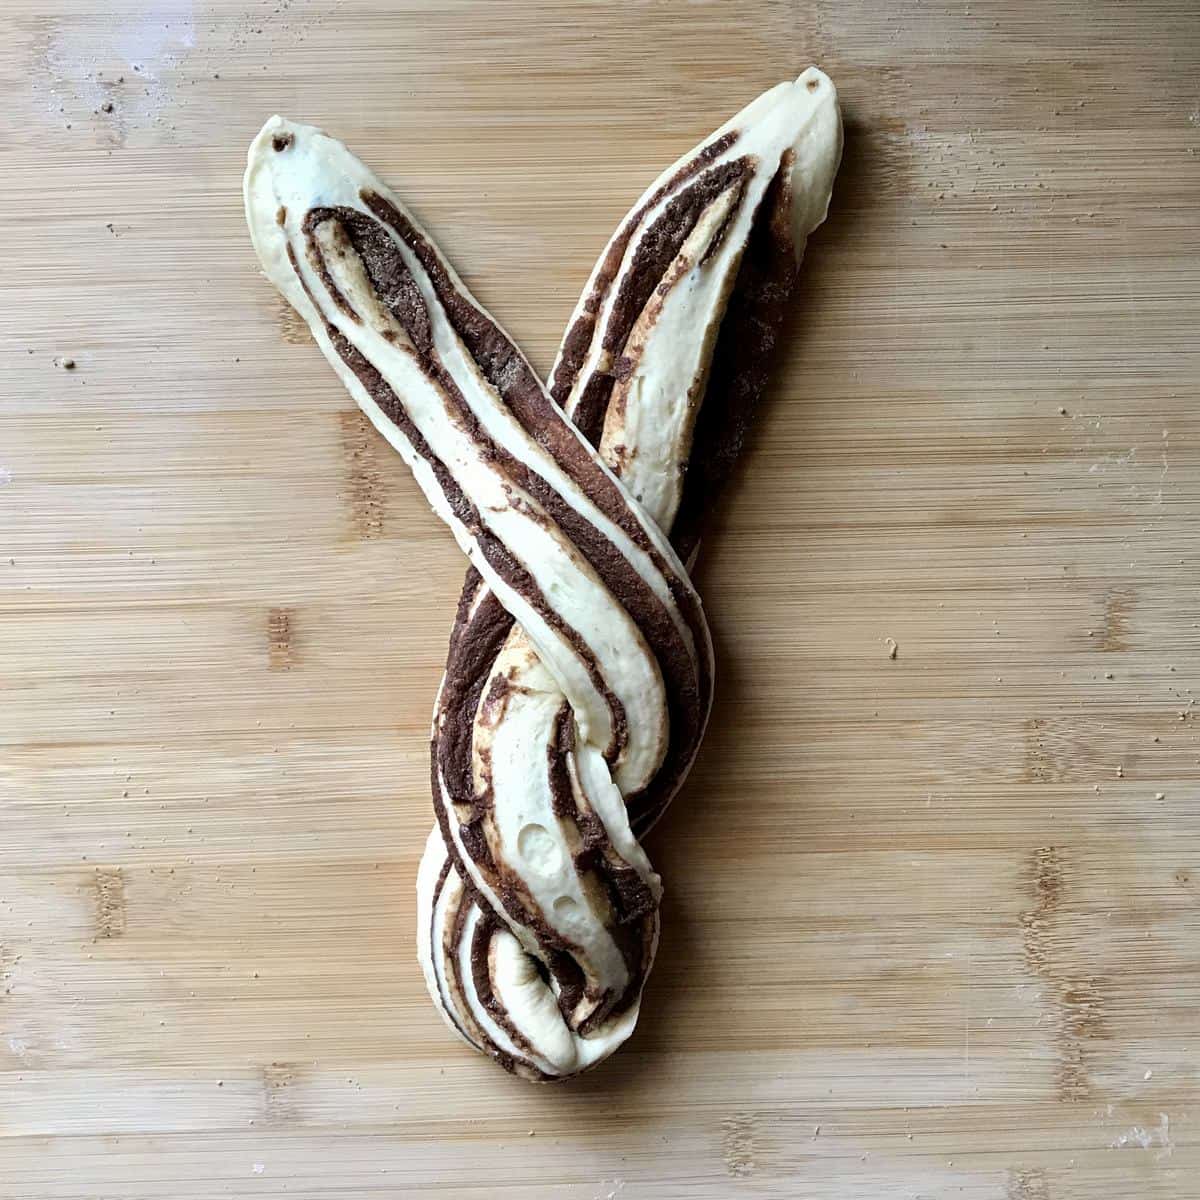
Loosley braid each half, keeping the cut sides up.
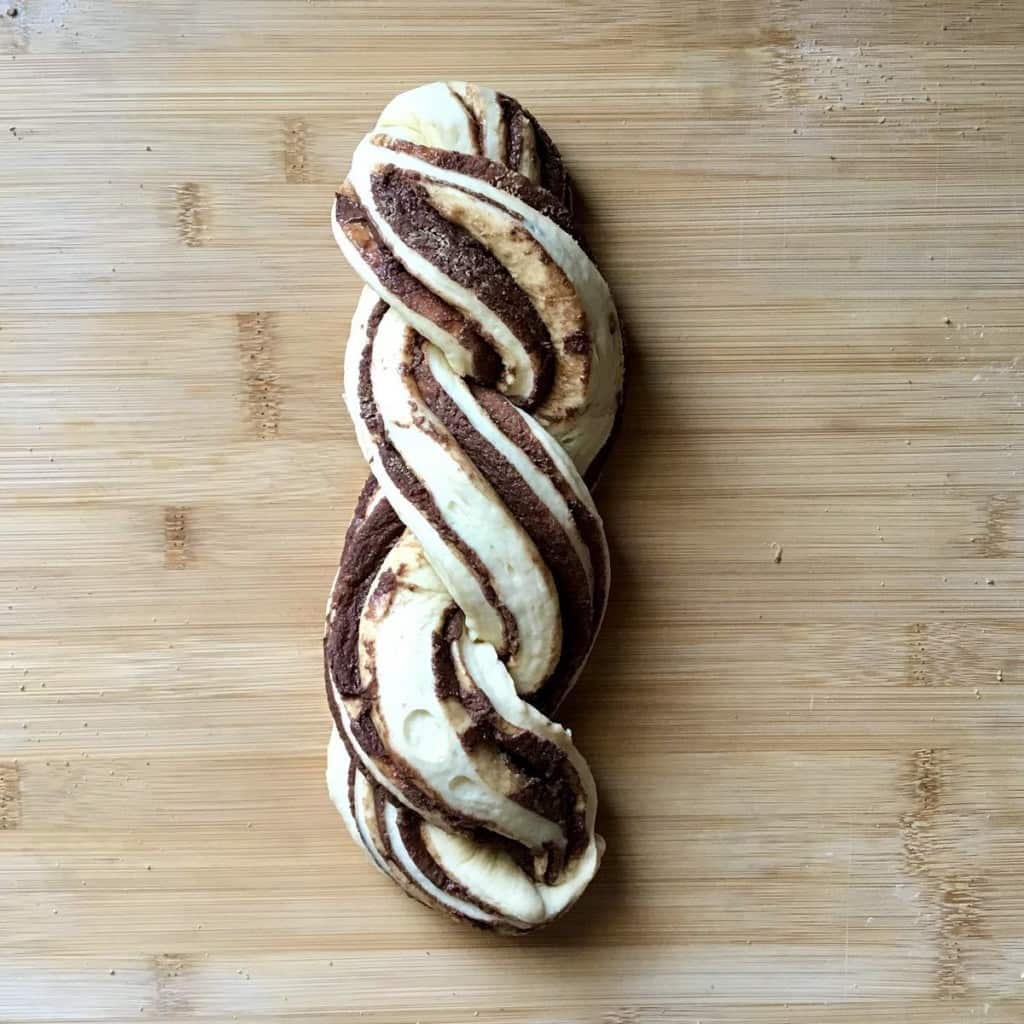
Cover and let rise for about 45 minutes or until double in size. Repeat for the same steps for the other ball of dough. Please watch the video to see how easy this is to do.
Preheat oven to 375°F (190°C).
Baking the bread
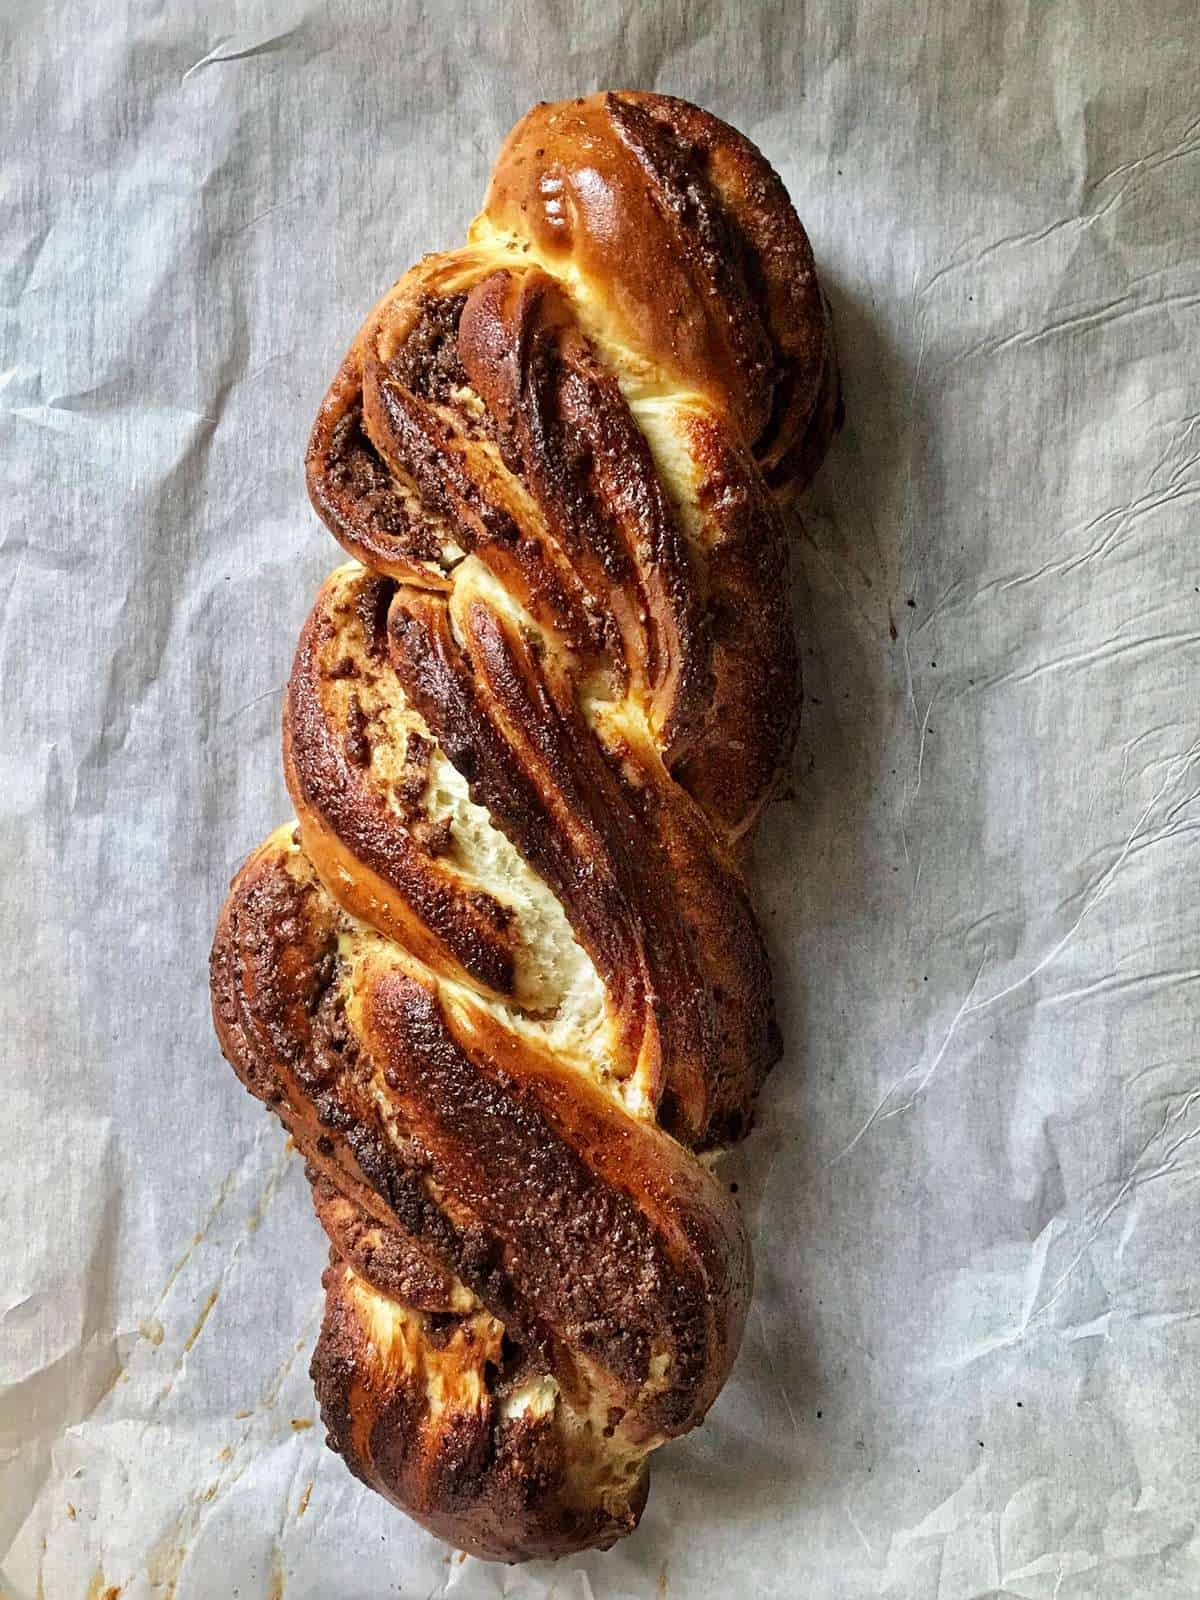
With a pastry brush, lightly brush the entire surface of the bread with egg wash.
Bake for about 30 minutes or until golden brown on top.
Remove the loaf from the baking sheet and transfer it to a wire rack to cool down. Cool for 15-20 minutes before slicing… if you can resist!
Tips
- Test your yeast to make sure it is still active.
- When kneading the yeast dough in the stand mixer, it should pull away from the bowl. If not, add 1-2 tablespoons of flour. The dough should be soft but not sticky.
- Roll out one ball at a time while leaving the other ball of dough covered in plastic wrap to prevent the dough from drying out.
- Brushing the surface of the bread with egg wash ensures a golden shiny crust.
- As every oven heats up differently, place a piece of foil loosely over the top of the bread if it is browning too quickly. Also, consider lowering the oven to 350° F (175° C).
- It is best served the same day it is made.

FAQ
To determine if the dough has risen enough, poke it with a lightly greased finger. If the indentation remains, continue with the next step. If it springs back, allow it to rise for another 15 minutes or so. 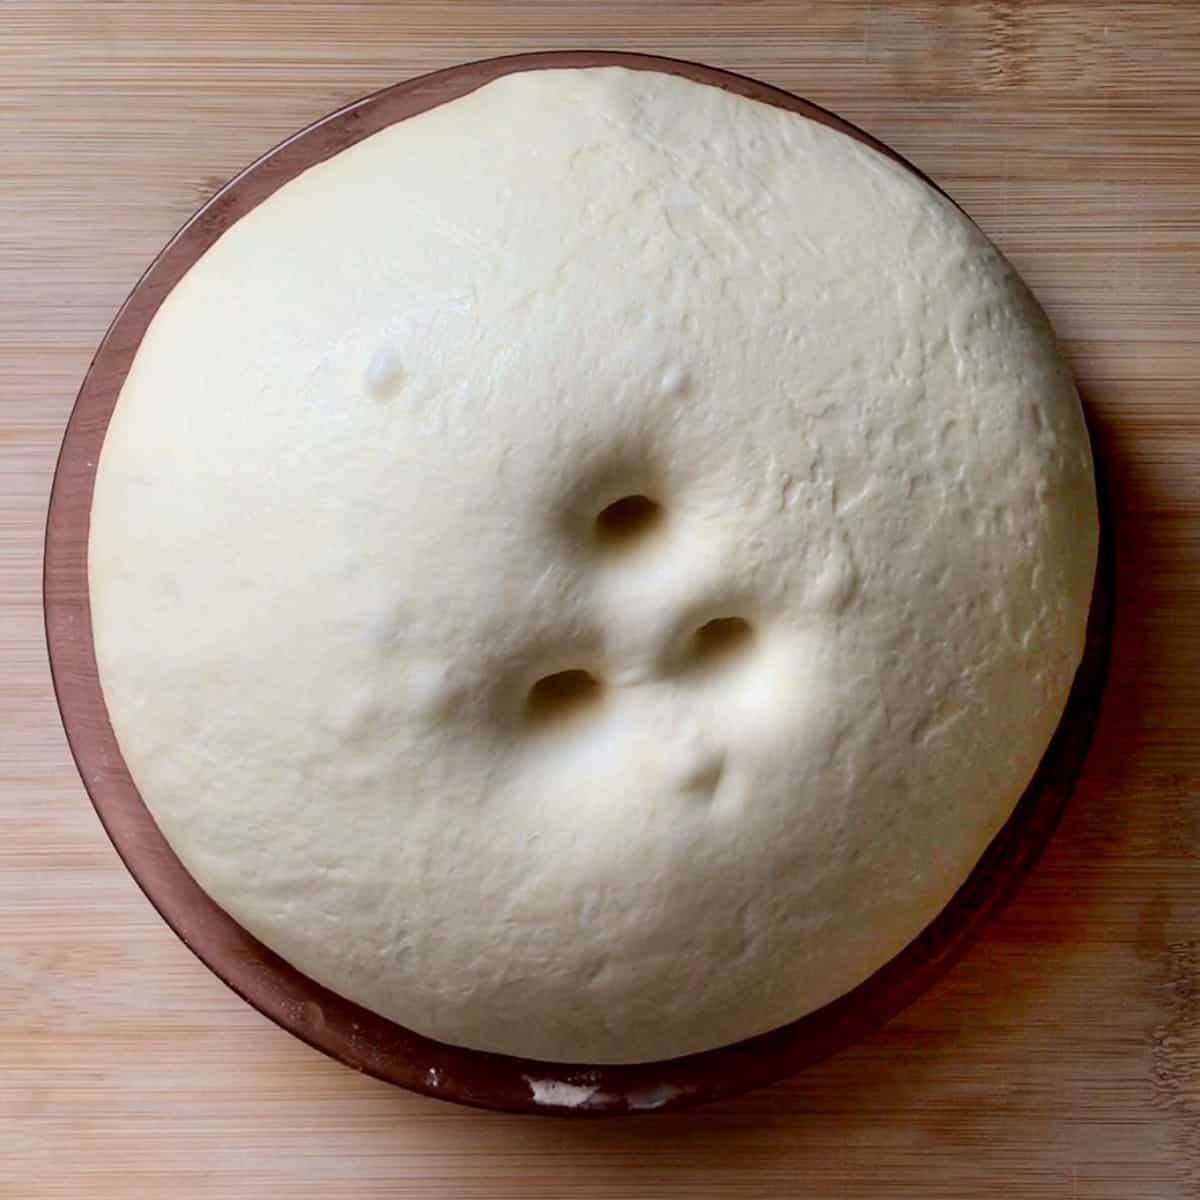
Yes, bake this bread in a 9 x 5 loaf pan if you prefer. Grease and line the pan with parchment paper.
Before attempting to slice this bread, allow it to cool down for 15-20 minutes, then use a serrated knife and slice using a sawing motion.
Sweet yeast bread is best when served the same day they are made, as they dry out quickly. They can be stored at room temperature for 2 days. Consider freezing for up to one month for longer storage.
Sweet yeast bread recipes
Recipe inspiration
Just like so many of you, I love experimenting with recipes.
Since I am revising so many of my recipes, I looked closely at this one. I originally posted this recipe in 2015. Back then, I used Nutella, but I thought it would be interesting to use this chocolate hazelnut butter instead.
I was inspired by my cozonac recipe, with its filling of walnuts and cocoa, to try it with a filling of hazelnut butter. It was a hit with my family.
As was mentioned, I combined it with my cinnamon rolls recipe because it is the best!
Super easy and so good.
I hope you get a chance to try it.
THANKS SO MUCH for following and being part of the She Loves Biscotti community, where you will find Simple & Tasty Family-Friendly Recipes with an Italian Twist.
Ciao for now,
Maria
★★★★★ If you have made this easy braided bread recipe, I would love to hear about it in the comments below and be sure to rate the recipe!
Recipe
Braided Sweet Bread Recipe
WANT TO SAVE THIS RECIPE?
Ingredients
The Sweet Dough:
- 4½-4¾ cups all-purpose flour separated 1½ and 3-3¼ cups
- 2¼ teaspoons active dry yeast 8 grams
- 1 cup milk
- 1 cup mashed potato cooked
- ⅓ cup butter cut up
- ¼ cup sugar granulated
- 1 teaspoon salt
- 2 eggs room temperature
The Filling:
- ½-⅔ cup chocolate hazelnut butter or Nutella
- ½ cup brown sugar
- 2 tablespoons all-purpose flour
- 1½ teaspoon cinnamon ground
Egg wash:
- 1 egg room temperature
- 1 tablespoon milk
Instructions
- In a large mixing bowl (of a stand mixer) combine 1½ cups of flour with yeast. Set aside.
- Combine milk, potato, butter, sugar, and salt in a medium saucepan. Heat on medium heat until butter starts to melt.
- Remove from heat.
- Add to flour mixture and mix at low speed for about one minute.
- Add eggs and continue beating until well incorporated (2-3 minutes).
- Switch to the dough hook.
- Add the rest of the flour (3-3¼ cups) and mix for about 5 minutes until smooth and elastic. Alternately, you can knead by hand.
- Once you have your ball of dough, place it in a lightly greased bowl, turning it over once to grease the top. This prevents it from drying out.
- Cover with plastic wrap and allow to rise for about 45 minutes or until double in size.
- While waiting, prepare the fillings.
To Make the Filling:
- While the dough is rising, prepare the chocolate hazelnut butter. We need about ½- ⅔ cups of this nut butter for our yeast bread recipe.
- We also need a brown sugar filling. In a small bowl, whisk together ½ cup brown sugar, 1½ teaspoon of ground cinnamon and 2 tablespoons of flour. Set aside for now.
Rolling and Braiding the Bread:
- Once the dough has doubled in size, punch it down.
- Transfer to a lightly floured surface and divide it in half since we are making two loaves.
- Cover and allow it to rest for 10 minutes. This will make it easier to roll out.
- Lightly flour your working surface.
- Working with one ball of dough at a time, roll into a 12 x 9-inch rectangle.
- Spread half of the chocolate hazelnut butter to within 1 inch of the edges. Sprinkle half of the brown sugar mixture over the top of the nut butter. Press it down lightly.
- Starting with the long side, tightly roll up the dough jelly-style.
- Pinch the seams and ends to seal properly.
- Transfer to parchment paper.
- Place the seam side down. With a pastry cutter or sharp knife, Cut the entire roll (lengthwise) in half.
- Carefully line up both halves to form an "X" leaving the cut side up. Loosley braid each half, keeping the cut sides up. Please watch the video.
- Cover and let rise for about 45 minutes or until double in size. Repeat for the same steps for the other ball of dough.
- Preheat oven to 375° F (190°C).
Baking the bread:
- With a pastry brush, lightly brush the entire surface of the bread with egg wash.
- Bake for about 30 minutes or until golden brown on top.
- Remove from baking sheet and transfer to a wire rack to cool down. Cool for 15-20 minutes before slicing…if you can resist.
Video
Notes
- Test your yeast to make sure it is still active.
- When kneading the yeast dough in the stand mixer, it should pull away from the bowl. If not add 1-2 tablespoons of flour. The dough should be soft but not sticky.
- Roll out one ball at a time while leaving the other ball of dough covered in plastic wrap to prevent the dough from drying out.
- Brushing the surface of the bread with egg wash ensures a golden shiny crust.
- As every oven heats up differently, place a piece of foil loosely over the top of the bread if it is browning too quickly. Also, consider lowering the oven to 350° F (175° C).
- Best served the same day it is made.
Nutrition
This post was originally published on February 5, 2015, and republished on February 7, 2021 with updated content and photos.
Victor
Maria, I tried this and as usual I was in a bit of a rush. So, instead of boiling potatoes I used ricotta cheese for volume and added some cornstarch to the milk mixture to thicken it a bit. And , yes I took the other shortcut and used hazelnut spread from the jar. And to one of the loafs I added about 1/4 cup of dark chocolate mini chips adding them on top of the hazelnut spread. Surprisingly it turned out fabulous except for the fact that I overcooked it just a bit.
One suggestion would be to add a note not to make your milk mixture too hot. That could kill off your yeast.
Otherwise a great recipe and I will repeat it again soon.
Maria
Great variation! Thanks so much for taking the time to share Victor! Appreciate the sound advice 🙂
Jen
Maria- I also make your Moms pizza with homemade sauce and it’s a hit- always. I wanted to make a sweet bread braid and found this recipe … how funny I thought when I realized this was also your recipe! Delicious. I’ve made a few batches now and give them as Christmas gifts. Ty. Merry Christmas
Maria
How wonderful Jen! So thrilled to read this, thank you. Merry Christmas to you and your loved ones as well.
Rose
would this work well in a bread machine?
Maria
Although I have never tried, I think it would work as it is a yeast bread. If you do decide to try it, I would love to hear how it turned out for you. Thanks for stopping by Rose.
Ur pal val
I just love hazelnut spread… can’t wait to try this. Thanks for the recipe!
Maria
I am sure you are going to love this. Thanks for stopping by 🙂