

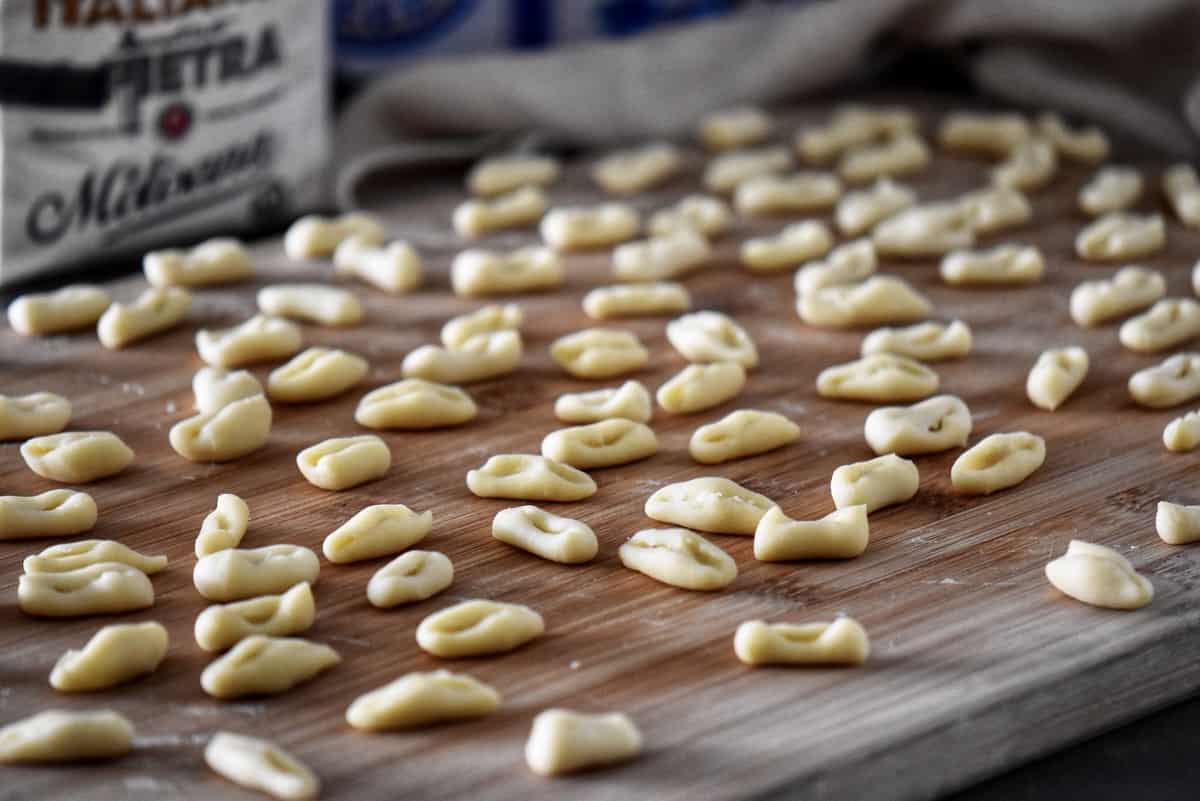
Discover the simplicity of creating homemade cavatelli pasta using only two ingredients and your fingertips to shape the dough. No equipment is necessary. This eggless pasta recipe freezes easily for later use.
Once you have made your dough, try this classic Italian recipe for cavatelli and broccoli for an authentic and comforting meal. Switch it up by making cavatelli broccoli rabe.
Indulging in the delightful taste of homemade pasta is a treat that every pasta lover can appreciate. Despite the initial intimidation of making pasta from scratch, it’s surprisingly easy to master.
In this comprehensive guide, I will share various methods for making cavatelli – from dough-making to shaping to cooking. As someone who has grown up making cavatelli with my nonna, who hails from the Molise region of Italy, where cavatelli originates, this pasta holds a special place in my heart.
Not only will I provide step-by-step instructions, but I will also share insights and tips gained from my own experience to help you achieve authentic and delicious cavatelli in your kitchen.
Whether you’re a pasta-making novice or a seasoned cook, this guide will equip you with the knowledge and confidence to create the perfect cavatelli every time, regardless of the flour or equipment you use.
So, let’s roll up our sleeves and embark on this pasta-making adventure together!
Jump to:
What is cavatelli pasta?
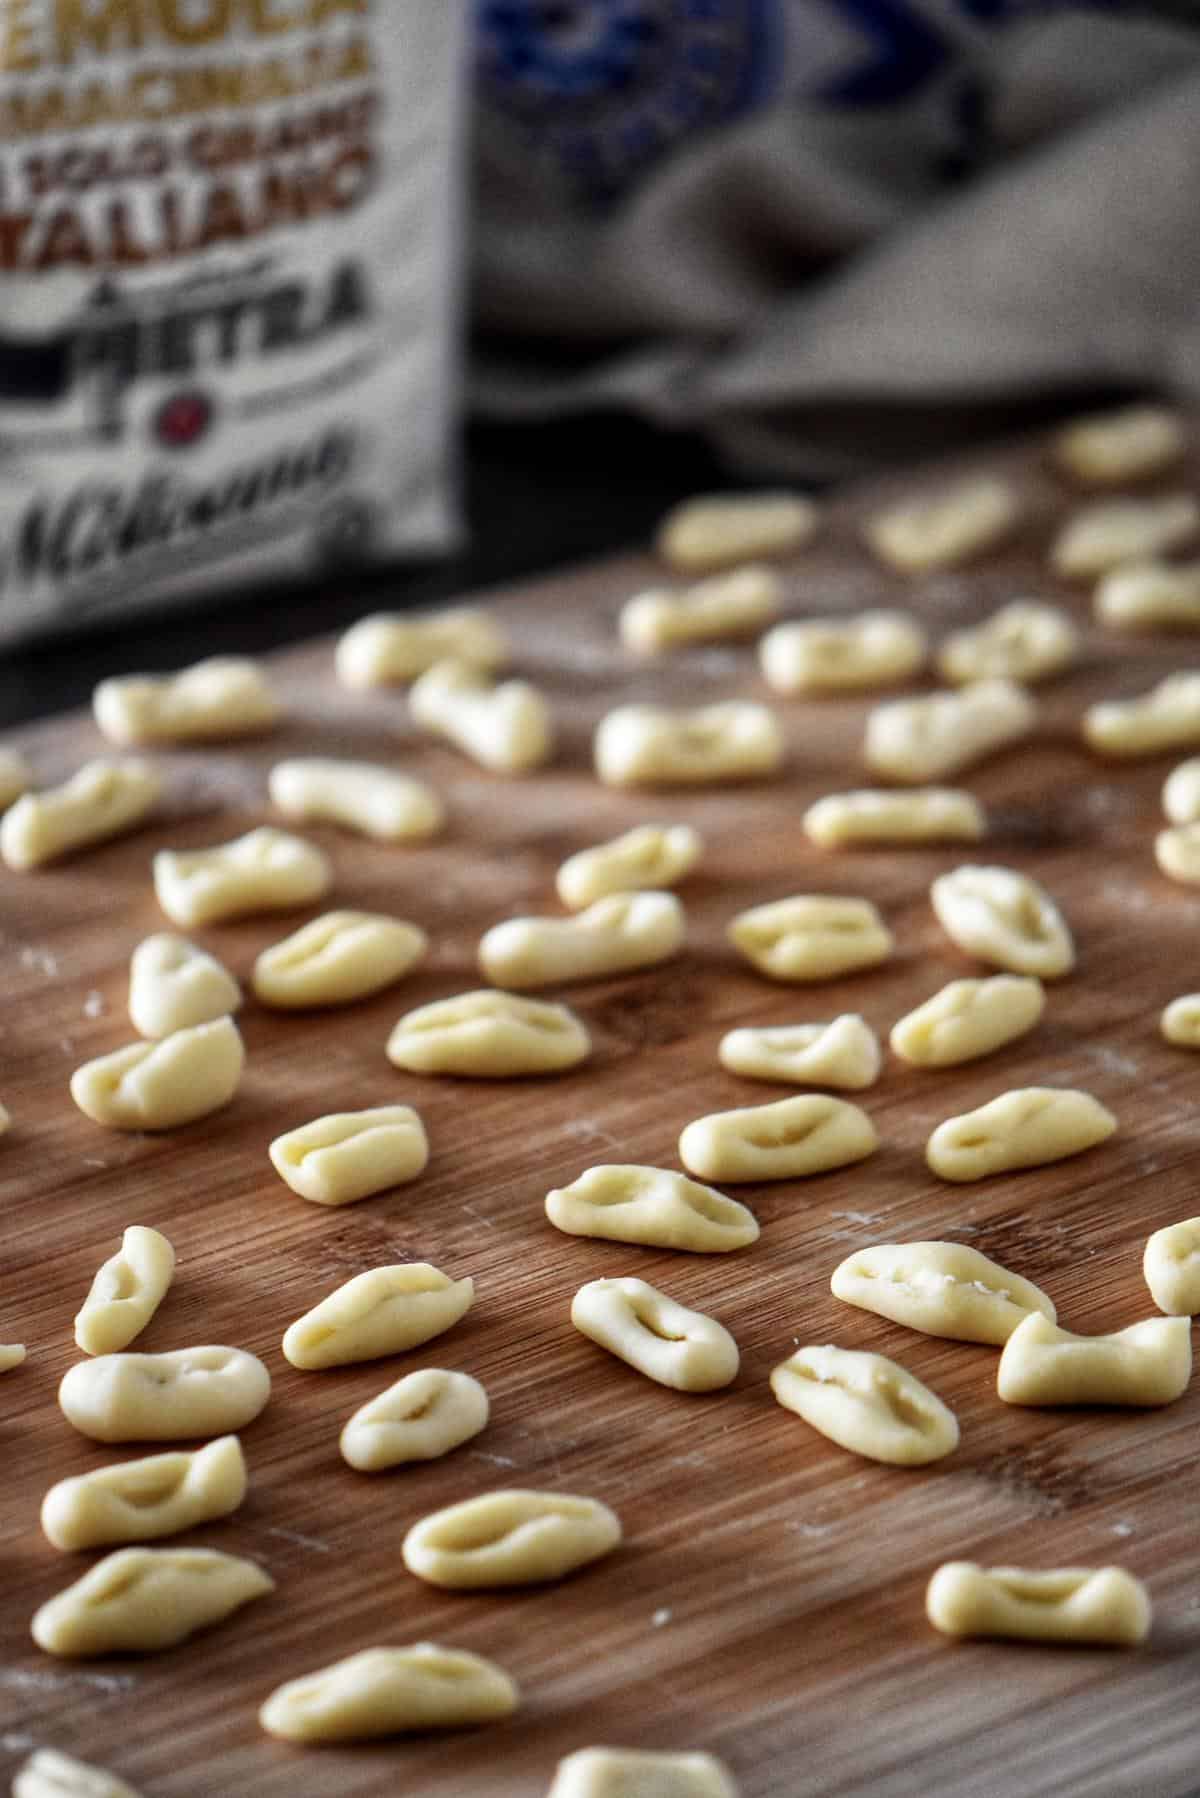
Cavatelli is a type of traditional Italian pasta that originates from Southern Italy. It is a small, shell-shaped eggless pasta typically made with semolina flour and water. Ricotta cavatelli is a delicious variation of this traditional Italian pasta made with ricotta cheese, eggs, and milk.
The word “cavatelli” is derived from the Italian word “cavata,” meaning "small hollow." As such, they are sometimes referred to as cavati pasta.
Cavatelli pasta is often served with various sauces, such as a simple marinara sauce, pesto, or meaty ragus. It also pairs wonderfully with vegetables like broccoli, rapini, or cherry tomatoes.
Cavatelli vs gnocchi
Cavatelli and gnocchi are both popular types of pasta originating from Italy, but they are distinct in their ingredients, shapes, and textures. While they may share some similarities, they are not the same.
Pasta: Cavatelli and gnocchi are both considered pasta, but they are made from different types of dough. Cavatelli is typically made from semolina flour, water, and sometimes eggs, resulting in a dense and firm texture. On the other hand, gnocchi is Usually made from potato-based dough, which gives it a softer and lighter texture. One of my favorites is ricotta gnocchi.
Shapes: Cavatelli and gnocchi also have distinct shapes. Cavatelli are small, shell-like pasta shapes often formed by hand. Conversely, gnocchi are typically small dumplings often rolled or pressed with a fork, resulting in a grooved texture.
Textures: The textures of cavatelli and gnocchi are also different. Cavatelli has a chewy and slightly firm texture, making it ideal for sauces to cling to its ridges. Gnocchi, on the other hand, has a softer and more delicate texture, often described as light and pillowy.
In conclusion, while cavatelli and gnocchi are both types of pasta, they are distinct in terms of their ingredients, shapes, and textures.
Each has unique characteristics that make them beloved in Italian cuisine and offer a delightful experience to pasta enthusiasts seeking variety in their culinary adventures.
Flour options for homemade cavatelli
Did you know you can make cavatelli from various flours? It all comes down to the texture you are looking for.
- All-purpose flour: This flour produces an easy dough to work with, resulting in a softer and slightly chewy texture in the cooked pasta.
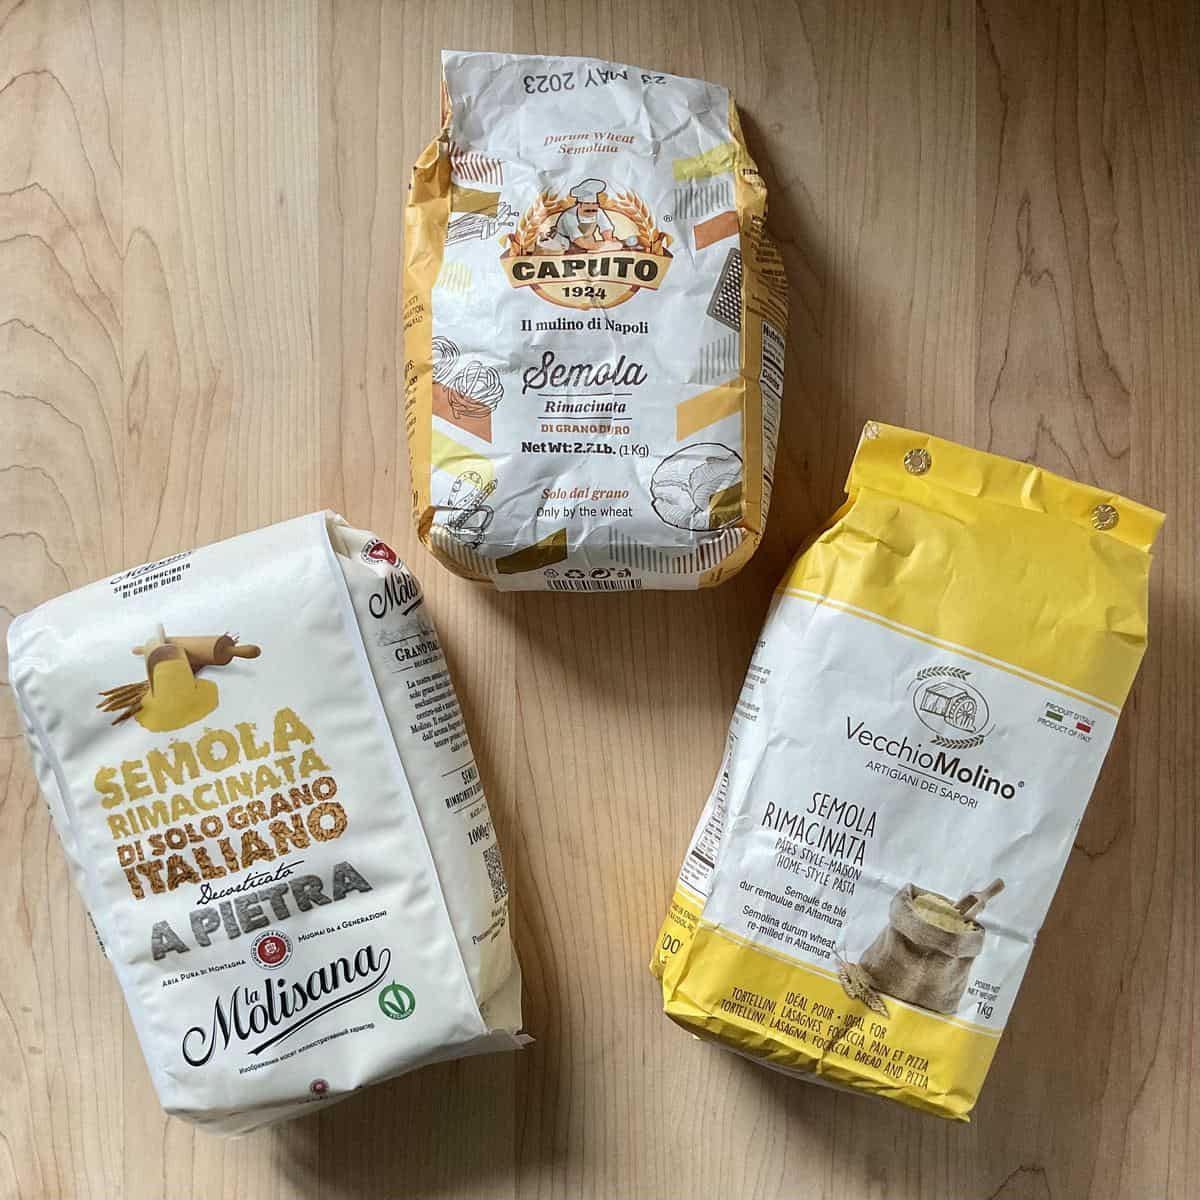
- Semolina flour: Semolina flour is a popular choice. It is made from durum wheat and is commonly used in Italian pasta-making. One unique characteristic of semolina flour is its vibrant yellow color, which adds a beautiful hue to the pasta. It has a coarser texture than all-purpose flour, resulting in a slightly firmer and chewier texture in the cooked cavatelli.
- “00” Italian-style flour: Durum wheat flour is specifically made from durum wheat, known for its high protein and gluten content. Using durum wheat flour for cavatelli can result in a more elastic dough that has a firmer texture when cooked.
- Whole wheat flour: Whole wheat flour can also be used to make cavatelli, resulting in pasta with a nuttier flavor and a slightly denser texture compared to all-purpose flour. It can add a wholesome and rustic touch to your homemade cavatelli.
A note on Semolina flour: This flour is typically made from durum wheat milled twice to create a finer texture. This double-milling process results in semolina flour’s unique texture and gives homemade pasta a firm and chewy texture when cooked. This texture allows the pasta to hold the sauce.
In Italian, making pasta dough with semolina flour and water is called pasta di semola. It is typically used to make homemade pasta such as cavatelli and orecchiette, to name a few.
In conclusion, you can make cavatelli with just about any flour except self-raising flour. You can even combine different flours, like this recipe for whole wheat cavatelli.
The important thing to remember is that you need to modify the amount of liquid added to the dough to achieve a smooth and workable consistency that isn’t excessively dry.
Ingredients
- Flour. As previously mentioned, any flour works. I used different types of flour in the video and photos to show how they can be used.
- Water. A simple ingredient.
- Kosher Salt. This is an optional ingredient. If using, you will need 1 teaspoon.
Are you surprised that something so delicious is made with flour and water?
Making the dough
The first step in creating delicious homemade cavatelli is making the dough. There are two main methods when making this pasta dough recipe: using a machine or making it by hand.
If you have a stand mixer with a dough attachment, using a machine can save you time and effort in combining and kneading the dough.
On the other hand, making the dough by hand is a traditional method that requires more effort and time but can be a rewarding experience. It is a great option if you do not have a stand mixer or want to make a smaller quantity of fresh pasta.
Ultimately, both methods can result in delicious homemade cavatelli. Let’s explore each of these methods in greater detail.
Kneading with a stand mixer
Start by combining 4 cups of flour (568 grams) and a teaspoon of salt (6 grams) in the mixing bowl of a stand mixer. Slowly add 1½ cups of warm/tepid water (12 ounces or 340 grams) and mix, using a fork or a sturdy wooden spoon, until a shaggy ball forms. This should take about 1-2 minutes. Attach the dough hook and knead it on low-medium speed for 8-10 minutes until it becomes smooth and elastic. Transfer the dough to a flat surface and knead for 1-2 minutes to form a smooth round ball.
Shape the dough into an 8-inch log. Wrap it in cling wrap and place a tea towel over the top. Let it rest for 30 minutes or up to 4 hours at room temperature before shaping. This resting period allows the gluten in the dough to relax. As a result, it will be easier to roll out the dough.

Kneading by hand
Mound 4 cups of flour (568 grams) on a clean, flat surface or in a large bowl. Make a well (or hole) in the center of the mound using your fingers. Add a teaspoon of salt (6 grams) to the well. Gradually add 1½ cups of warm water (12 ounces or 340 grams) to the well while stirring with a fork or a sturdy wooden spoon to slowly incorporate the flour. Continue adding water until the mixture forms a shaggy dough.
Use your hands to knead it for about 10-15 minutes until it becomes smooth, elastic and no longer tacky.
Shape the dough into an 8-inch log. Wrap it in cling wrap and place a tea towel over the top. Let it rest for 30 minutes or up to 4 hours at room temperature before shaping. This resting period allows the gluten in the dough to relax. As a result, it will be easier to roll out the dough.
Achieving the perfect consistency
Some adjustments may be necessary to achieve the perfect consistency for your cavatelli dough, depending on the type of flour you use.
If the dough is too dry, you can gradually add a small amount of water, making sure not to overdo it. Adding water little by little is important to avoid making the dough too wet, which can result in a sticky mess.
On the other hand, if the dough is too wet or sticky, you may need to add a little more flour. The goal is to strike the right balance between moisture and firmness.
Paying attention to its texture and feel is crucial when working with dough. The ideal dough consistency for cavatelli should be similar to playdough – pliable, smooth, and easy to shape.
It should hold its form without being too stiff or too soft. This is where your culinary intuition comes into play. You may need to rely on your senses of touch and sight to assess the dough’s consistency accurately.
Experimenting with different dough consistencies can be part of the joy of making cavatelli. It may take some practice to achieve the desired texture, but with experience, you’ll develop a feel for it.
Don’t be afraid to make adjustments as needed, and trust your instincts to create perfect cavatelli dough that will result in delicious homemade pasta.
Rolling and cutting
Rolling and cutting out the pasta dough to the desired thickness and size is the next step in making this homemade pasta.
The two main methods for rolling and preparing the dough are creating strips (my Nonna’s method) or a log (similar to making gnocchi).
Both methods can produce perfectly shaped cavatelli pasta, and it often comes down to personal preference and the tools you have on hand. Experiment with both methods to see which works best for you and produces the desired results.
I guarantee you’ll quickly develop your method of making cavatelli.
It’s important to realize that homemade pasta is rustic-looking and is not mechanically produced; as a result, there will be imperfections. Therein lies the beauty.
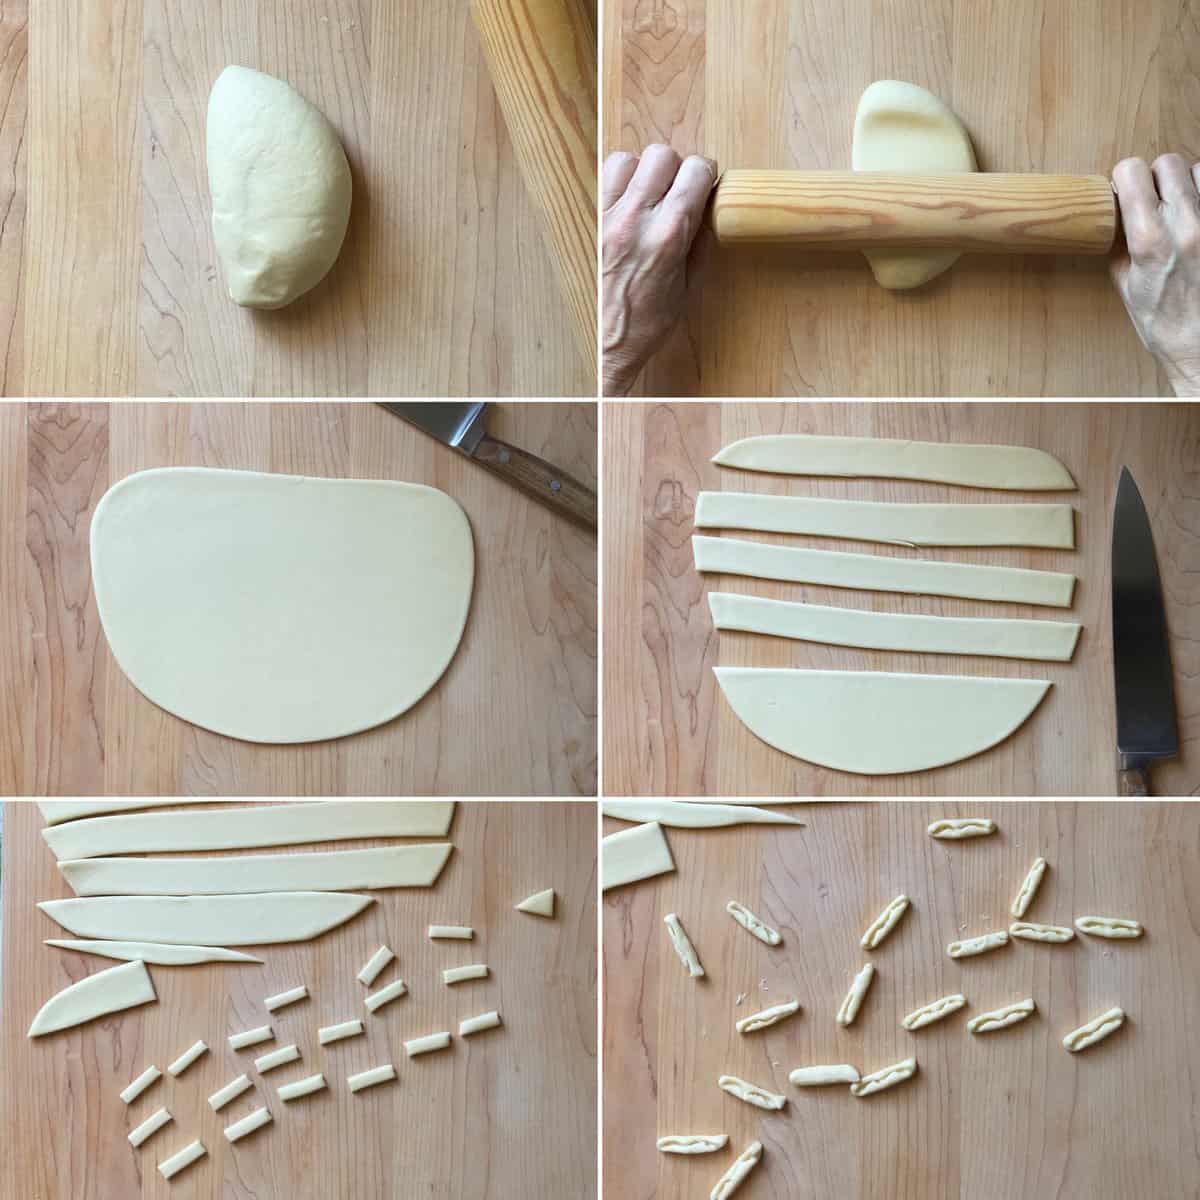
Rolling out the dough method
Rolling out the dough is a traditional method for shaping cavatelli passed down through generations. It involves using a rolling pin to flatten the dough into a thin, even sheet, which is then cut into strips and small pieces. This technique is ideal for those who appreciate cavatelli’s thinner and more delicate texture.
This was the exact method my Nonna used to shape her cavatelli, and it holds a special place in my heart for its nostalgic charm. Let’s look at how you can shape cavatelli using the rolling-out dough method.
Once the dough has rested, slightly flatten the top of it. Using a pastry cutter, cut off one-quarter of the log. Keep the rest of the dough covered to prevent it from drying out.
Roll out the pasta dough on a lightly floured surface into a thin sheet, about ⅜-¼ inch thick, using a rolling pin.
Then, use a sharp knife to cut the sheet of dough into long strips of ¾-1-inch. These ribbons can then be cut into small pieces, about ¼-⅜-inch rectangular pieces.
From here, the dough can now be shaped into cavatelli.
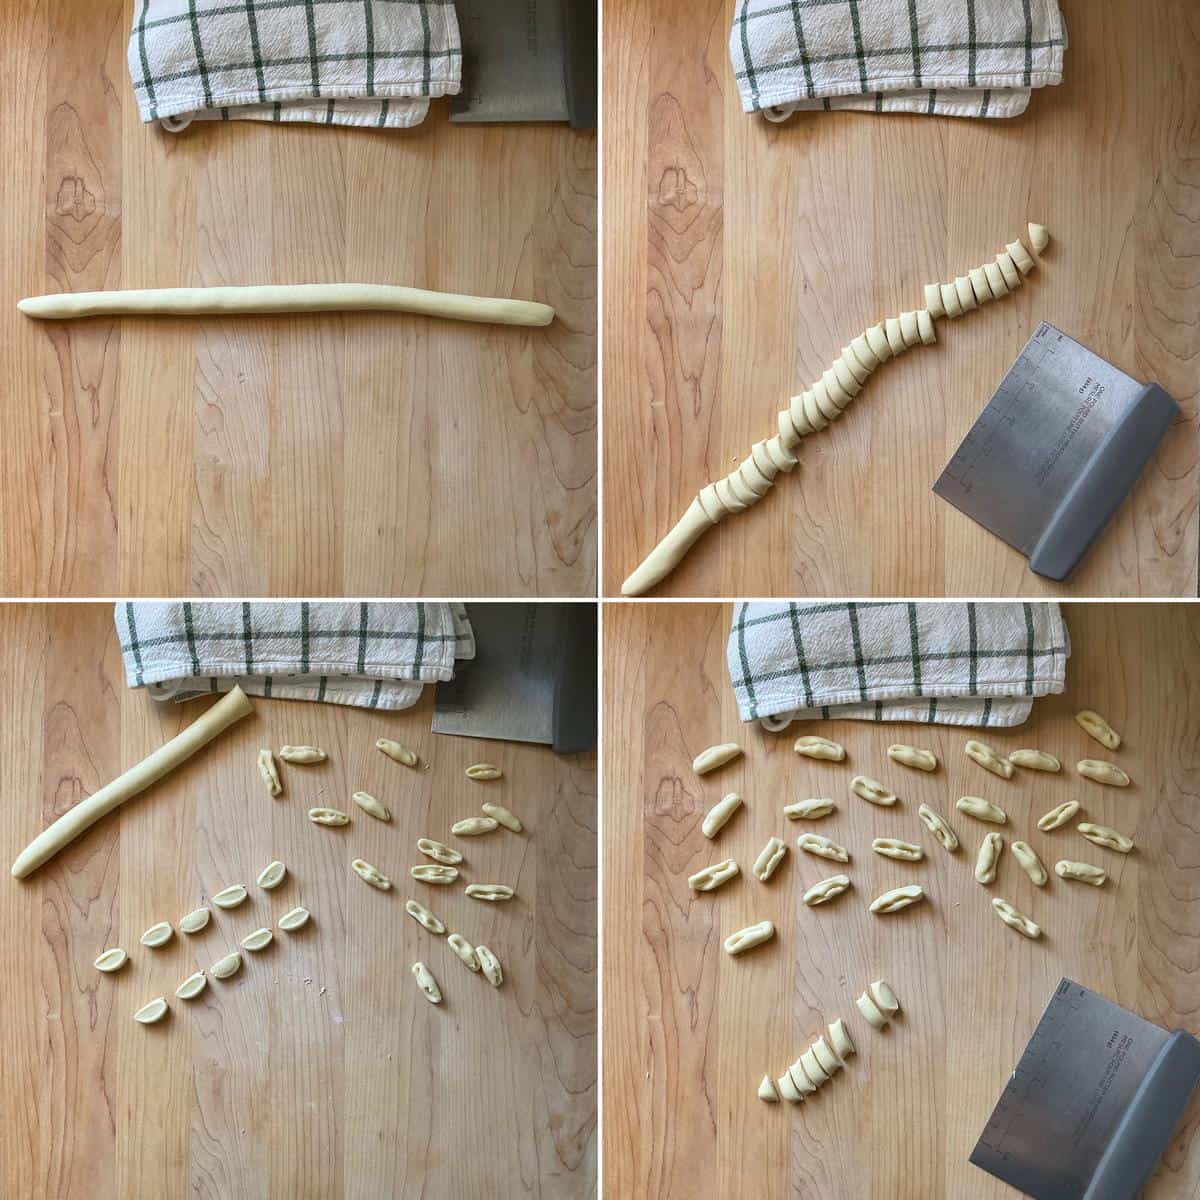
The log method
The log method is a popular technique for shaping cavatelli and gnocchi dough. It involves rolling the dough into a log and cutting it into small pieces.
Once the dough has rested, slightly flatten the top of it. Using a pastry cutter, divide it into 8 portions. Keep the rest of the dough covered to prevent it from drying out.
Working with one piece of dough at a time, apply gentle pressure and roll the dough back and forth to create an even log shape. Roll each portion into a thin log shape, ⅜- ½ inch thick. This is about the size of your pinkie finger.
Then, using a sharp knife, cut the log into ⅜-½-inch wide pieces. For this step, you can also use a bench scraper or a dough cutter.
Use a light dusting of flour only if you find the dough sticking to your work surface.
From here, the dough can now be shaped into cavatelli using either one of the following methods.
Top tip for rolling and cutting the cavatelli: You can obtain different sizes of the individual cavatelli by adjusting the length and width of the dough pieces. Experiment to see which size you prefer.
Shaping the cavatelli
Shaping cavatelli may take some practice, but you’ll find it fun and rewarding once you get the hang of it.
You can use one finger, two fingers, a knife, a fork, or a grooved wooden board to give your cavatelli a special shape. As they say, “All roads lead to Rome.”
There is also a special cavatelli machine that does all the work for you!
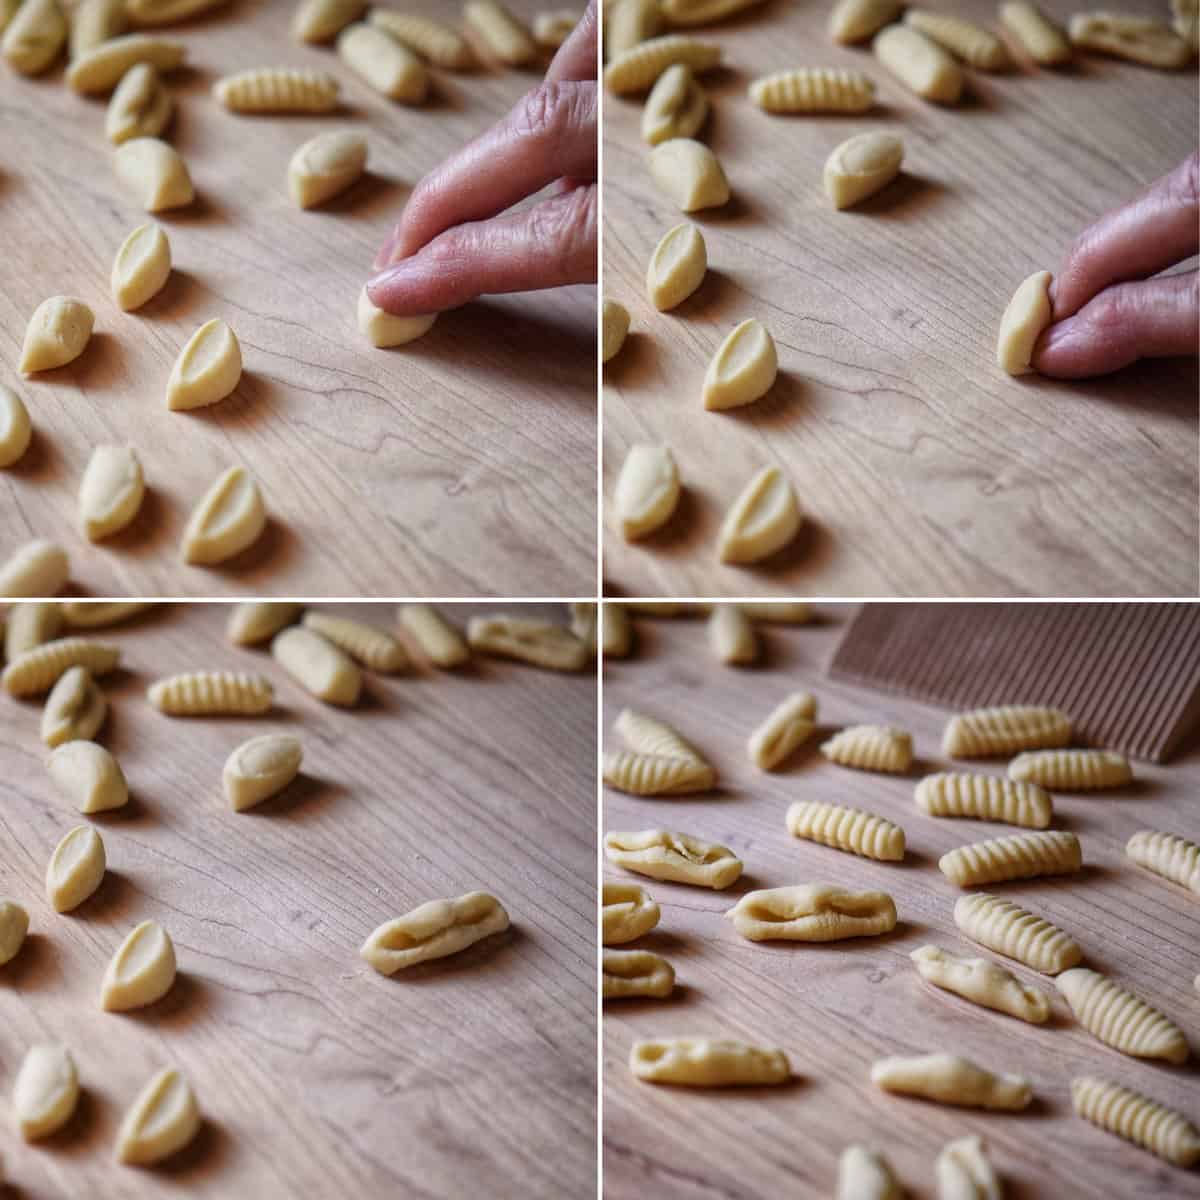
Finger and Thumb Method
This method involves pressing a small piece of dough with the index finger and then rolling it to create a curved shape.
The thumb can also create an indentation in the center of the pasta, giving it a unique appearance.
The number of fingers used can affect the size and shape of the cavatelli, with one finger producing a larger, rounder shape and three fingers creating a smaller, more elongated shape.
Experimenting with different finger techniques can create a personalized and rustic cavatelli shape.
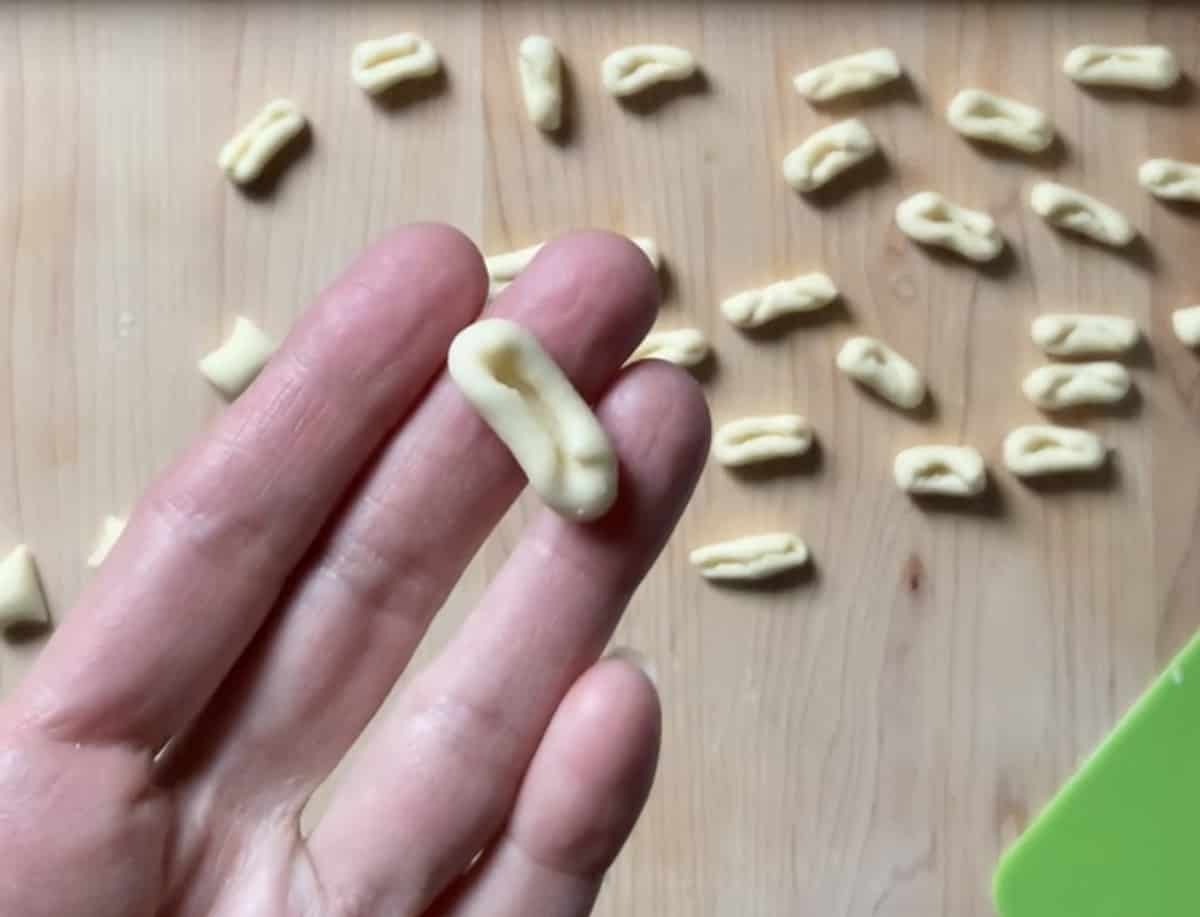
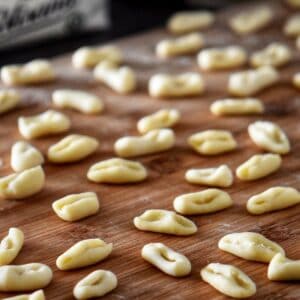
The most popular is lightly rolling each little nugget of dough using your index and middle finger. This gives it its distinctive shape - like a tiny shell with a groove down the center.
On a personal note, I was taught to use the index finger and apply gentle pressure on the dough, dragging it towards you to create a slight curl.
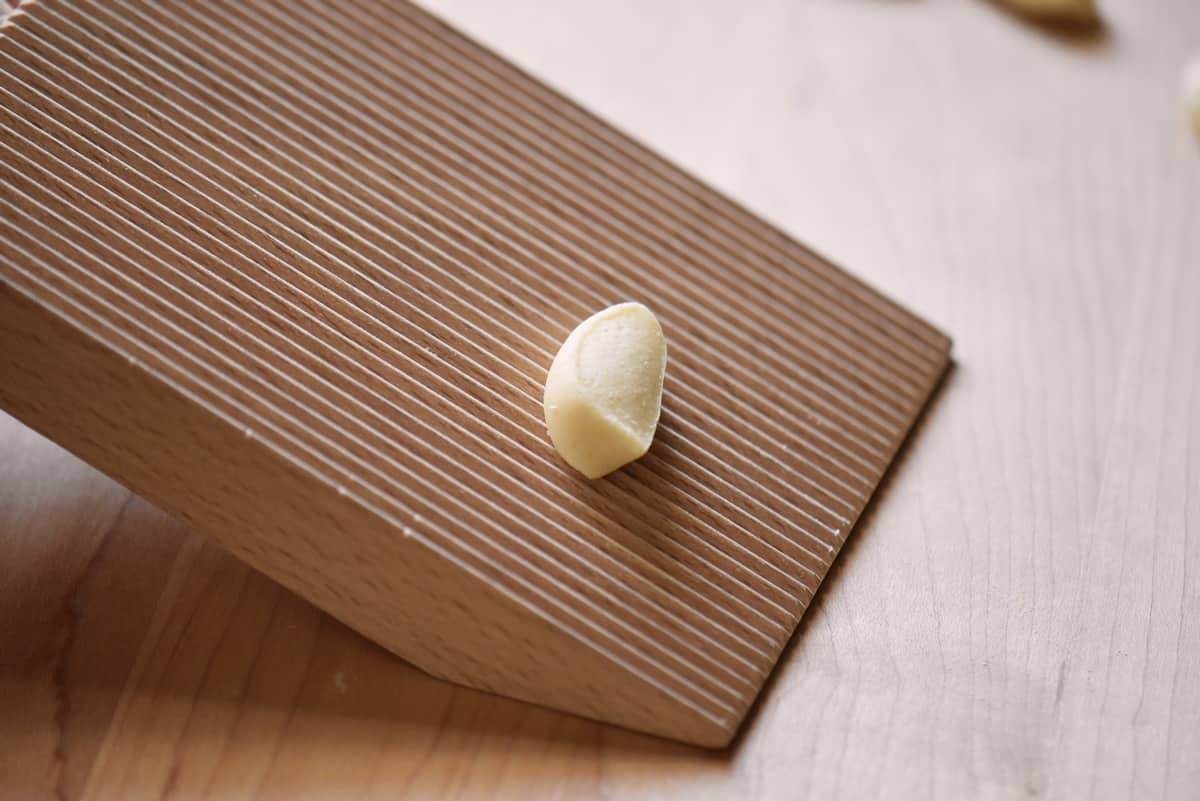
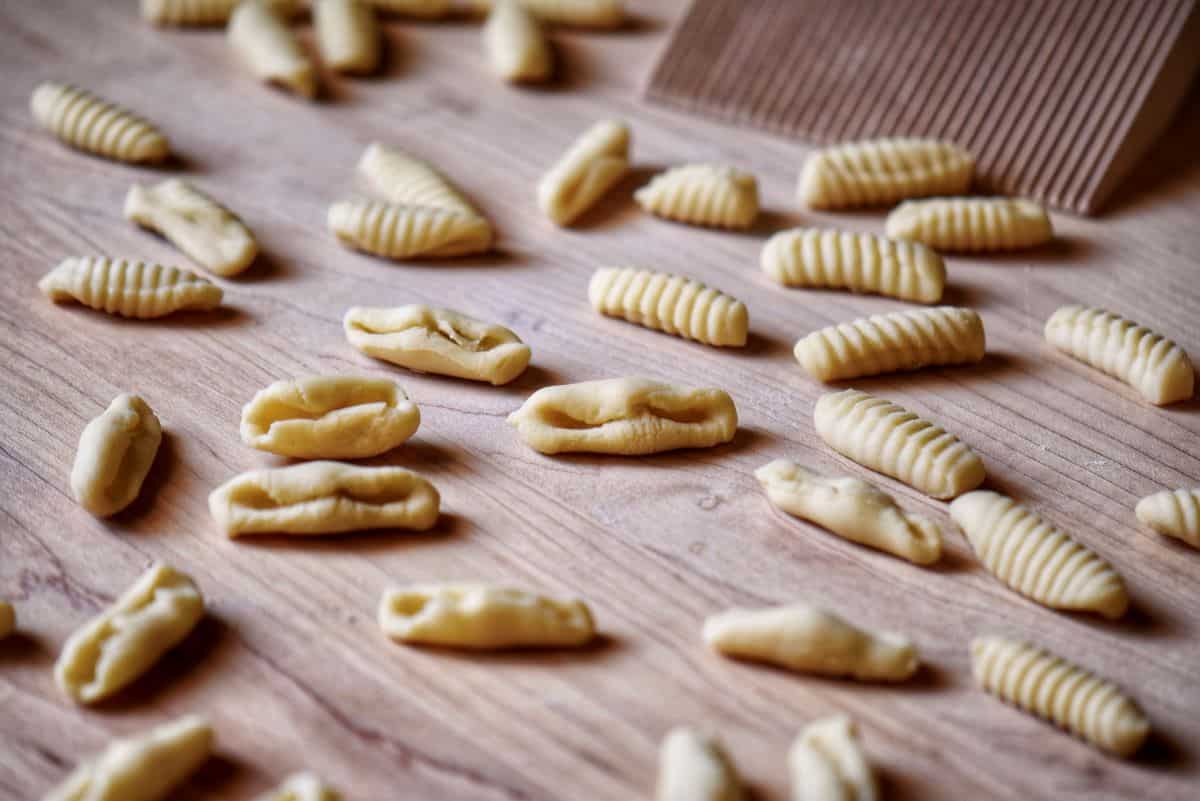
The board method
The board method is another popular way to shape cavatelli. It uses a gnocchi board, a small wooden board with ridges, to create the pasta shape.
To use this method, place a small dough piece on the board with the cut side down. Then, use your thumb or a finger to press and roll the dough across the board, creating a ridged texture on one side and a curved shape on the other.
This method allows for consistent and uniform cavatelli shapes, perfect for a visually appealing plate of pasta.
The fork method
To shape cavatelli with a fork, hold the tines of the fork against the cutting board while you slide the dough piece along it by pressing gently with your thumb or index finger.
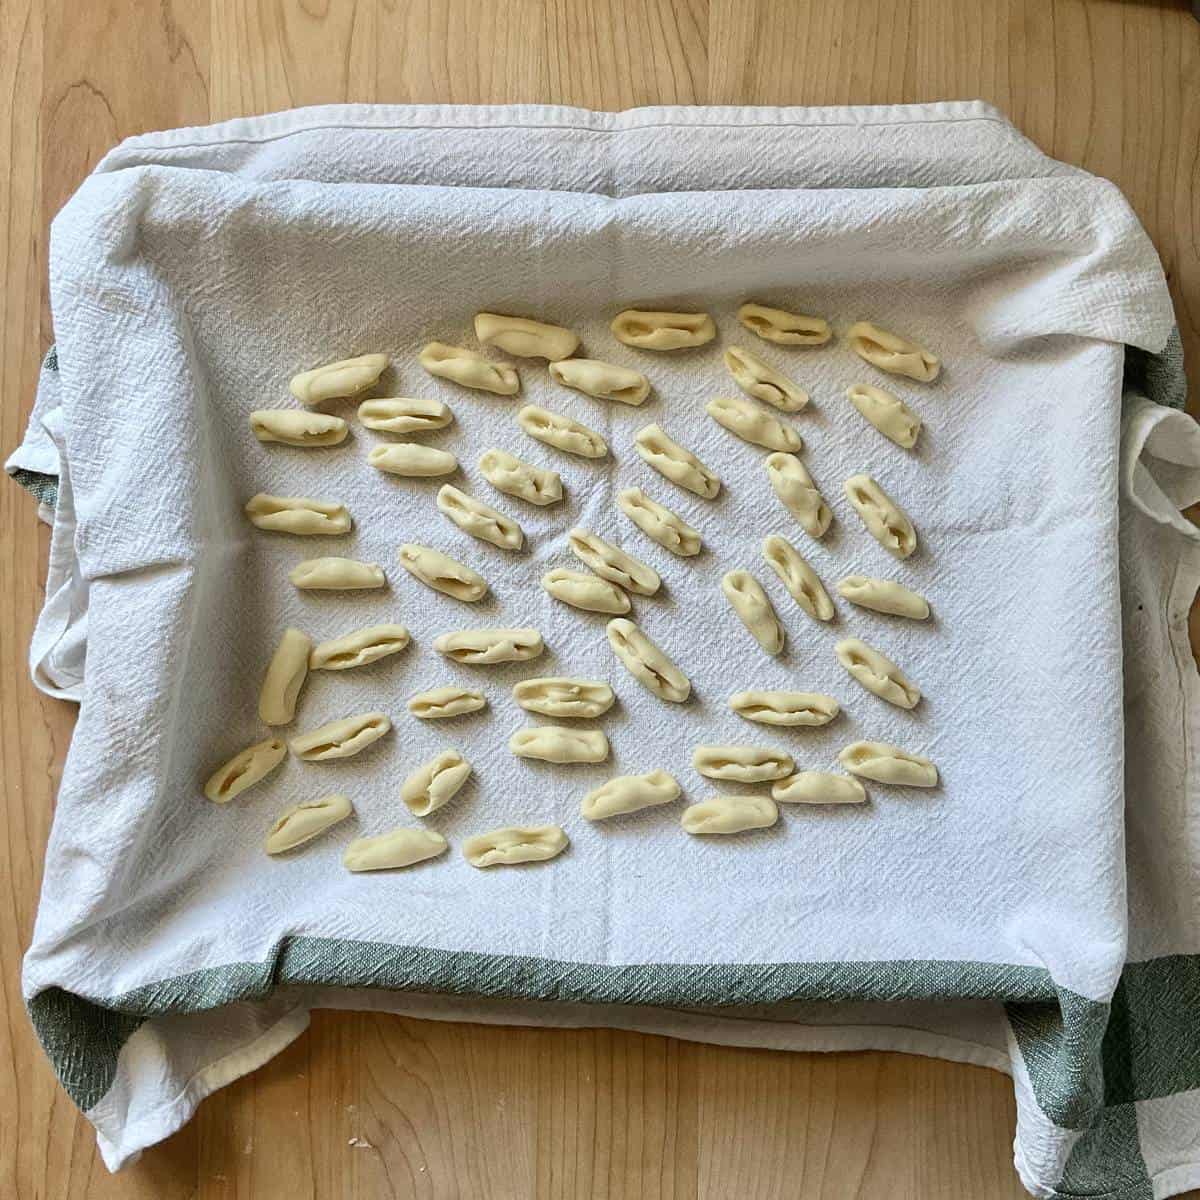
Place your shaped pasta on a baking sheet or tea towel lightly dusted with flour in a single layer as you make them. The dough is soft and will stick together if not separated, so make sure they don’t touch each other.
Continue until all the dough has been formed into cavatelli.
Allow to air dry for about 30 minutes before cooking.
Cooking freshly made pasta
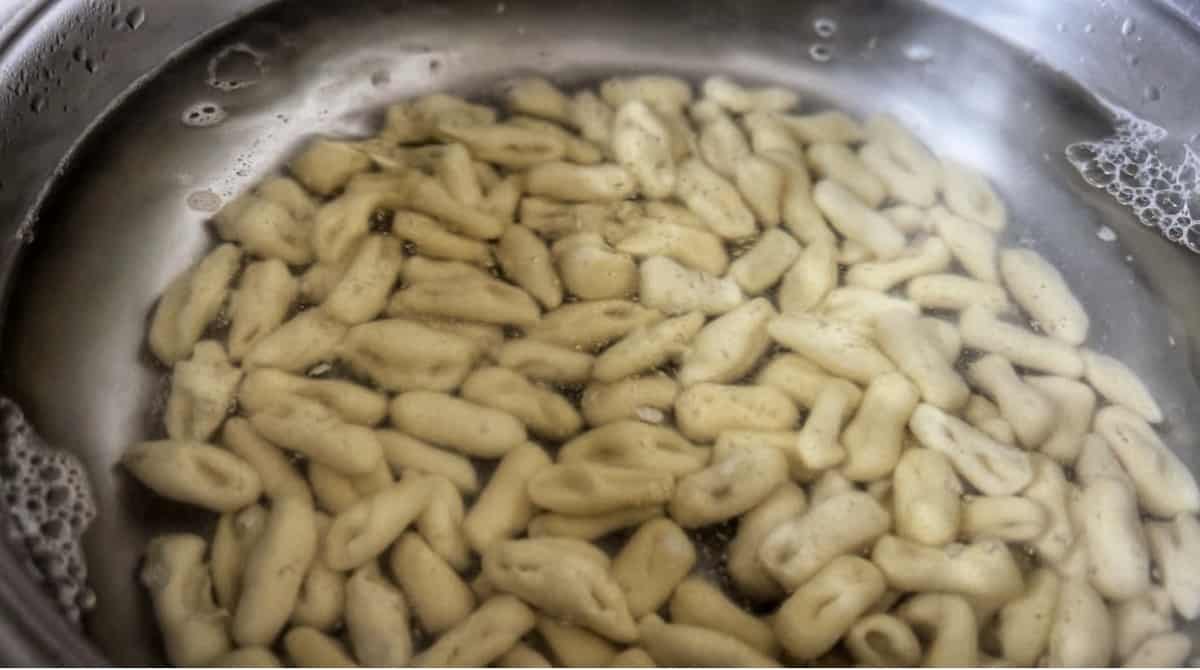
Bring a pot of salted water to a rolling boil. Use about 1 tablespoon of salt per quart of water. (For more tips on how to cook any pasta, refer to this article on How to Cook Pasta.)
Once the water is boiling, slowly add the cavatelli pasta to the pot. Try to shake off as much flour as possible before boiling them. Stir gently (and often) to prevent the pasta from sticking together or to the bottom of the pot.
Cook the fresh pasta for 2-3 minutes or until “al dente.” That is, tender but still firm to the bite. They are usually done when they float to the top. Start tasting the pasta for doneness after a minute to ensure you don’t overcook it. Overcooked pasta will be mushy and unpleasant to eat.
Drain the pasta using a colander and immediately toss it with your favorite pasta sauce. (For inspiration, continue reading.)
FAQ
Can I use a different flour instead of semolina flour?
You can use all-purpose flour, 00 flour, or even bread flour instead of semolina flour. When making this cavatelli pasta recipe, you can experiment and combine semolina flour with any other flour for great results.
Why is my dough shrinking back when I try to roll it?
There are a few reasons this might be happening to you. The pasta dough might be a little too dry. Add a little more water, a teaspoon, until the dough becomes more pliable. You can also try letting the dough rest for 10-15 minutes before rolling it out to help the gluten relax and for the flour to properly hydrate.
How to store fresh cavatelli
Ideally, freshly made cavatelli pasta should be consumed on the day it is made unless you intend to freeze it for future use. If you don’t plan on freezing it, the pasta can be kept at room temperature for 30 minutes or refrigerated for up to 4 hours.
Can I freeze this homemade pasta?
Absolutely! To freeze, place on a baking sheet and freeze for a few hours. Then, transfer them to a freezer bag and store them in your freezer. Use within 1 month.
How do I cook frozen cavatelli?
Place the frozen pasta directly in your pot of boiling water. No need to thaw. Frozen cavatelli will take about 6 minutes to cook. Always taste them to make sure they are cooked to your liking. For more tips on how to cook any pasta, refer to this article on How to Cook Pasta.
Can this recipe be halved?
Yes, use half of all the ingredients listed and follow the same method explained in the article.
What to serve with homemade cavatelli?
Cavatelli is a versatile pasta that pairs well with various sauces and sides. Experiment with different combinations to find your favorite! I’ve combined all my favorites in this recipe collection of cavatelli pasta recipes. Here’s an example below.
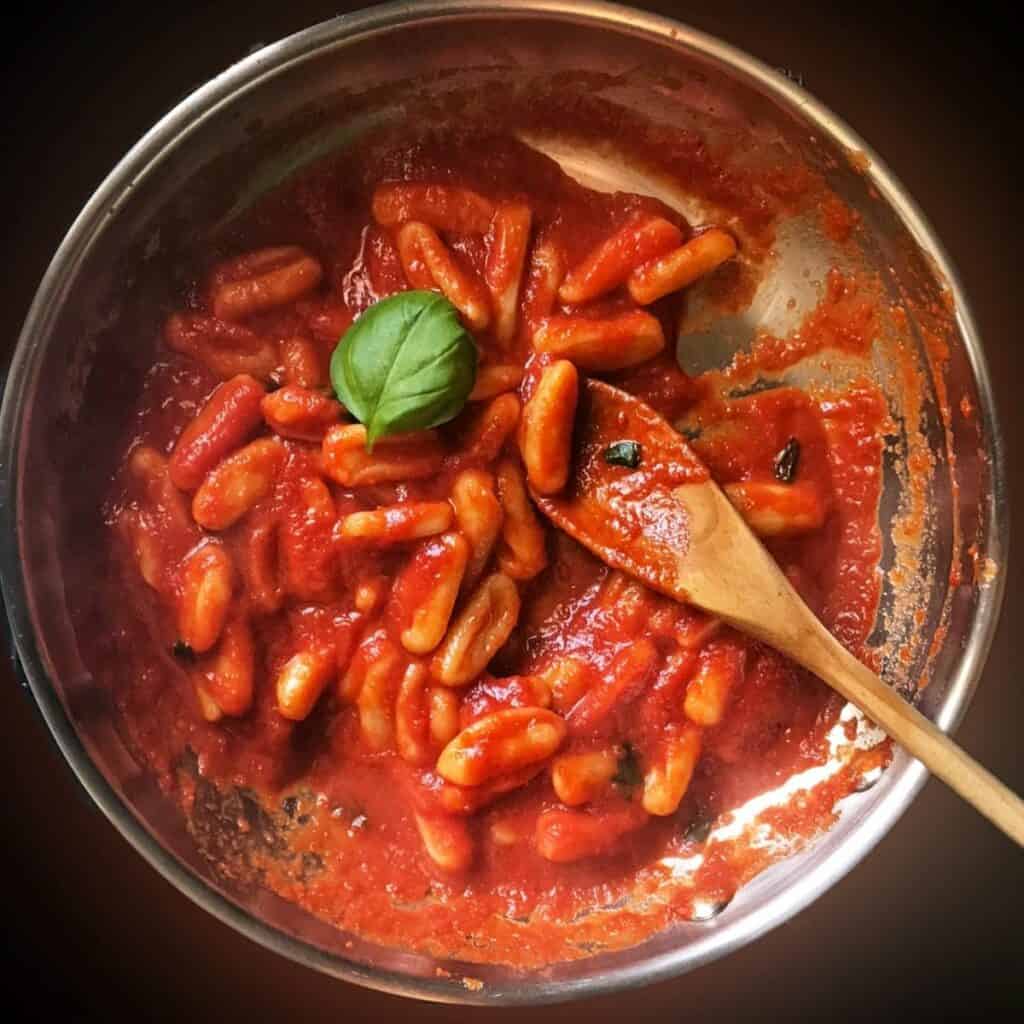
Marinara Sauce
For a light pasta dinner, try tossing cooked cavatelli with this recipe for marinara sauce. This focaccia bread recipe is perfect for sopping up the sauce!
Recipe origins
Would you believe it if I told you that my nonna and Mom would make cavatelli (and taralli and these sweet ricotta shadone, among other goodies!) on a 3 x 5 feet wooden board?
They would roll out one large piece of dough on this gigantic board using a rolling pin measuring 4 feet to keep it in line with the board.
This pasta dough recipe is one that I grew up with. My grandmother and mom would make these gavadeel at least once a month, combining it with ricotta and tomato sauce.
I guess that is why I still enjoy making and eating this pasta. It brings me back to my childhood when it was “normal” to make homemade pasta and to get the kids involved in the process.
Making cavatelli is also a great way to involve younger kids in cooking. You’d be amazed at how much kids enjoy making this pasta with flour and water – it’s like the original playdough!
With just a few hours, you can make this easy homemade pasta dough recipe and indulge in the simple, rustic casalinga-style cavatelli that evokes traditional Italian cooking.
It’s a wonderful way to keep family traditions alive and create cherished memories in the kitchen.
If this is your first time visiting, welcome! I would love to offer you my FREE weekly e-mail newsletter delivered straight to your inbox. When you subscribe, you will also receive a FREE DOWNLOAD that summarizes my top 10 tips on How to Cook Pasta. You can unsubscribe any time you want.
THANKS SO MUCH for following and being part of the She Loves Biscotti community, where you will find Simple & Tasty Family-Friendly Recipes with an Italian Twist.
Ciao for now,
Maria
★★★★★ If you have made this pasta dough recipe, I would love to hear about it in the comments below and be sure to rate the recipe!
Recipe
Homemade Cavatelli Pasta Dough: 2 Ingredient Recipe
WANT TO SAVE THIS RECIPE?
Ingredients
- 4 cups semolina flour or all-purpose flour, sifted, 568 grams
- 1 teaspoon salt 6 grams
- 1½ cups warm water 12 ounces or 340 grams
- extra flour for rolling
Instructions
- Place the sifted flour on a wooden board and make a well in the center.
- Add the water and the salt in the center of the well.
- Using a fork or a sturdy wooden spoon, combine until a shaggy ball forms. Pull in the flour from the bottom of the well.
- With the help of a dough scraper, incorporate the rest of the flour (it may appear to you that there isn’t enough water…just keep kneading…magically everything comes together).
- Knead for about 10 minutes or until the dough is smooth and elastic. If the dough feels sticky, add a little bit of flour. If, on the other hand, the dough feels dry, sprinkle a few drops of water over the dough and continue kneading.
- Wrap the dough in cling wrap and let it rest for about 30 minutes at room temperature (I will usually place a tea towel over the top).
- Cut the dough into 4 pieces.
- Roll out one-quarter of the dough to approximately ¼ inch thick. Make sure your board and rolling pin are floured.
- Cut the dough into ¾-1-inch strips. Then, cut each strip into ¼-⅜-inch rectangular pieces.
- Alternatively, working with one piece of dough at a time, apply gentle pressure and roll the dough back and forth to create an even log shape. Roll each portion into a thin log shape, ⅜- ½ inch thick. This is about the size of your pinkie finger.Then, using a sharp knife, cut the log into ⅜-½-inch wide pieces. For this step, you can also use a bench scraper or a dough cutter.
- Using the index finger, apply a gentle pressure on the dough, dragging it toward you. There should be a slight curl that forms.
- Place cavatelli on large baking sheets that are lightly dusted with flour. Place the cavatelli in a single layer and not touching one another.
- Continue until all the dough has been formed into cavatelli.
- Allow to air dry for at least 30 minutes.
- If using immediately, drop in a large pot of salted boiling water for a few minutes. The cavatelli are done when they float to the top. (Try to shake off as much as the flour as possible before boiling them). Taste to make sure they are cooked to your liking.
- If freezing, place the tray of cavatelli in the freezer and once frozen, place in plastic bag in the freezer. Can be cooked frozen. (Should take 6-8 minutes to cook. Once they rise to the top, they should be done. Taste to make sure they are cookedto your liking).
- Serve with your favorite tomato sauce or pesto.And if you enjoy ricotta, make this ricotta cavatelli recipe to then relish it in this Italian classic pasta dish of cavatelli and broccoli. Enjoy!
- Please refer to the article for a detailed description and step-by-step procedure.
Video
Notes
Nutrition
I originally published this post on January 12, 2016, and republished on April 20, 2023, with updated content and photos. Thanks for sharing!
Cindy
My grandparents made this exactly like your recipe. Board and all. My job was to use my two little girl fingers to roll it. They called it gnocchi She was from Naples and he was from Rome.
Maria
Thanks so much for sharing Cindy. So many wonderful memories…
Connie
This is the way my mom made cavatelli! I was always in the kitchen helping when l was a child. We rolled them on a fork. I was always told the name cavatelli derived from “cava” meaning “cave”, the indentation you make in them, and that the purpose of the “cave” was to help cook them through. At any rate, l was very happy to find your recipe because l never got my mother’s because she didn’t measure anything! Haha! Thank you!
Maria
Thanks so much for sharing Connie. It was the same for my mom and nonna… I managed to document a couple of recipes… it’s a slow process but so worth it!
Maureen
I had these as a child, and now that I’ve retired I have the time to cook. I thought I’d try this recipe at my first attempt at making pasta and it turned out AWESOME. Just like my mom made. It’s labor-intensive but so easy. Definitely a keeper!
Maria
How wonderful Maureen! Thanks so much for taking the time to share. I am absolutely thrilled to read this!
JANICE
You know it, I love them grew up with them. And still love them today.
Maria
Thanks so much Janice! I agree, such a great pasta!
Donna Mammano
I love this recipe! Simple and delicious.
Maria
Thanks so much Donna!
Caroline Pustowka
I don’t usually comment on recipes – but this is excellent and easy. I used a sushi roller and a teaspoon to form the pasta and for the indentations, and it looks like restaurant quality pasta. It is always a hit in our house. I serve it with a wild boar bolognese and there is rarely leftovers. Thanks so much for posting it.
Maria
Thanks so much for taking the time to share Caroline.
Sara
Awesome ‘gavatell’ recipe!!! so easy and all of them are so unique. I’ve had homemade Cavs before in various Italian restaurants in Cleveland, this recipe was terrific!
Maria
Thanks so much Sara!
Katherine Rochelle
So good and easy enough for a first timer!! Thank thank youuuuu
Maria
Amazing Katherine! Thanks for sharing!
Lucy
This recipe was absolutely perfect. I love all of your comments — you’re right: the beauty is in the imperfection. Thank you so much for sharing!!! They came out great! It was a perfect Easter meal.
Maria
Thanks Lucy!
Holly
Making this today. Thanks for.the recipe
Maria
My pleasure Holly!
Rosemary D Warren
I can’t wait to make this recipe. I have many but I am excited about this one. I watched the video, it was great
Maria
Thanks so much Rosemary!
Claudia
We made the cavatelli recipe today for Mother’s Day, while at home due to COVID 19. We also made a batch of homemade gnocchi. I cook all the time but it was my first time making fresh pasta. We are a family of four and I had my husband and two grown sons helping. We used a cavatelli pasta maker which I inherited from my mother-in-law. But we made half of them by hand on the back of a fork. They all came out awesome and tasted delicious. It’s a memory I will cherish now that my boys are getting ready to move out on their own. Great recipe, I will definitely make again.
Maria
Love this Claudia! Thanks so much for sharing!