

Have you ever wondered How to Make Hash Browns at home? The perfect hash brown potatoes are crispy on the outside and tender on the inside. But how do you achieve this perfect texture? Is there a secret?
You won't believe how simple and easy it is to make the best homemade hash browns with a cast iron pan! Great with eggs, bacon, and a slice of whole wheat honey bread!
Do you enjoy classic breakfast recipes?
Without a doubt, one of the most popular breakfast dishes is hash browns.
Whether looking for a great side dish or the star of your Sunday breakfast, hashbrowns are always a crowd-pleaser!
Just like making these skillet potatoes, making homemade hash browns is an easy process that requires only 5 ingredients.
You may have never considered making hash browns at home, but trust me – they will taste even better than the ones you get from a restaurant! All it takes is a few simple ingredients and some basic techniques, and in no time, you’ll be cooking up delicious hash browns that your family and friends won’t be able to resist!
Jump to:
- What is a hash brown?
- More reasons to love this recipe
- What do I need to make crispy hash brown potatoes?
- What are the best potatoes?
- Grated potatoes are a must!
- What does soaking potatoes in water do?
- Why remove the moisture from the potatoes?
- How to make hash browns stick together?
- Time to flip
- Tips
- FAQ
- Hash brown breakfast ideas
- Recipe inspiration
- Recipe
What is a hash brown?
Some of you may be wondering, what exactly are hash browns?
It is a breakfast potato recipe made by simply shredding potatoes, then sautéing them in a skillet until golden and crispy. Part of the process involves soaking the potatoes to remove the starch and then squeezing the moisture before cooking them.
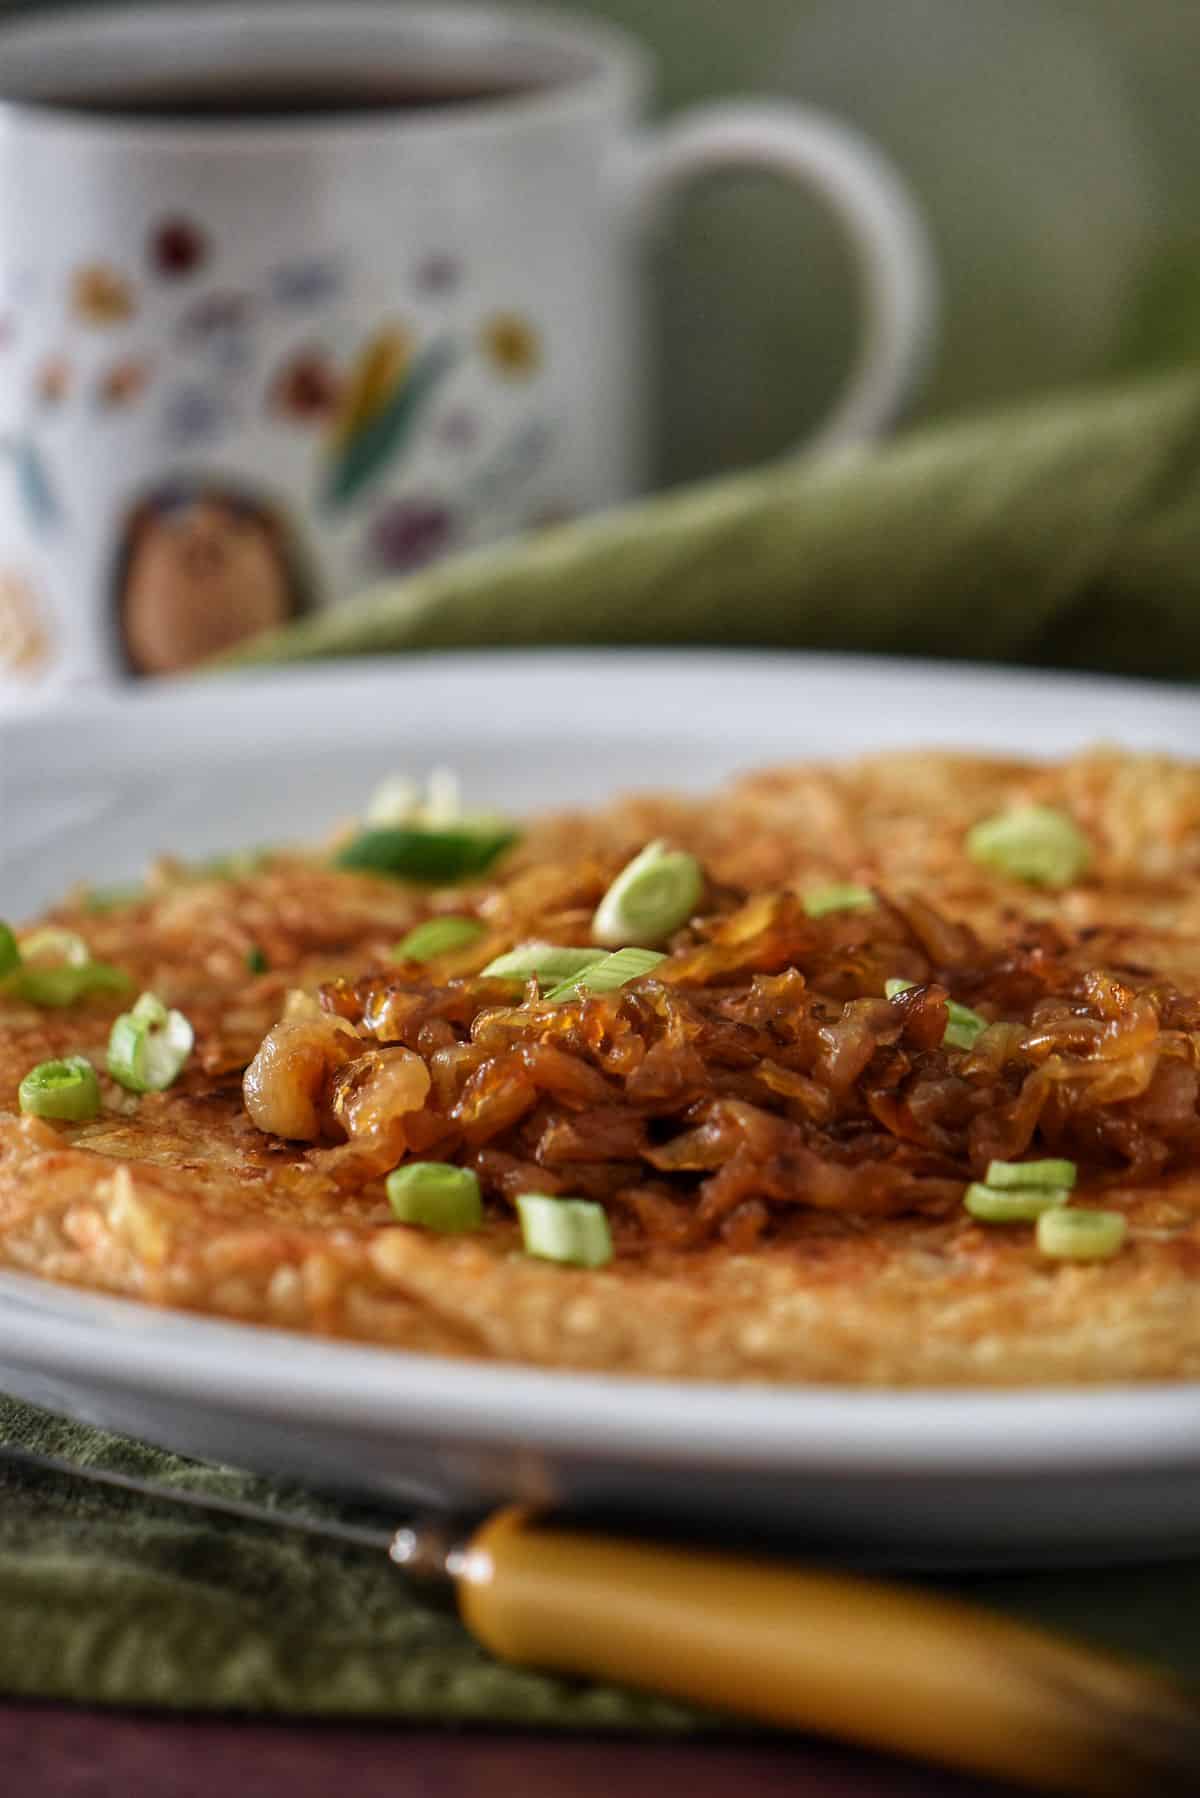
Hash browns (also spelled hashbrowns or hashed browns) and sometimes called home fries, can be seasoned with salt and pepper and served as is. They can also be seasoned with various spices and become the base of delicious toppings like caramelized onions.
Crispy on the outside and soft on the inside, hash browns are the perfect breakfast food!
More reasons to love this recipe
- This recipe is gluten-free.
- These breakfast potatoes are budget-friendly and kid-approved.
- Hash browns are a versatile option for any meal – breakfast, a side dish, or even the main course!
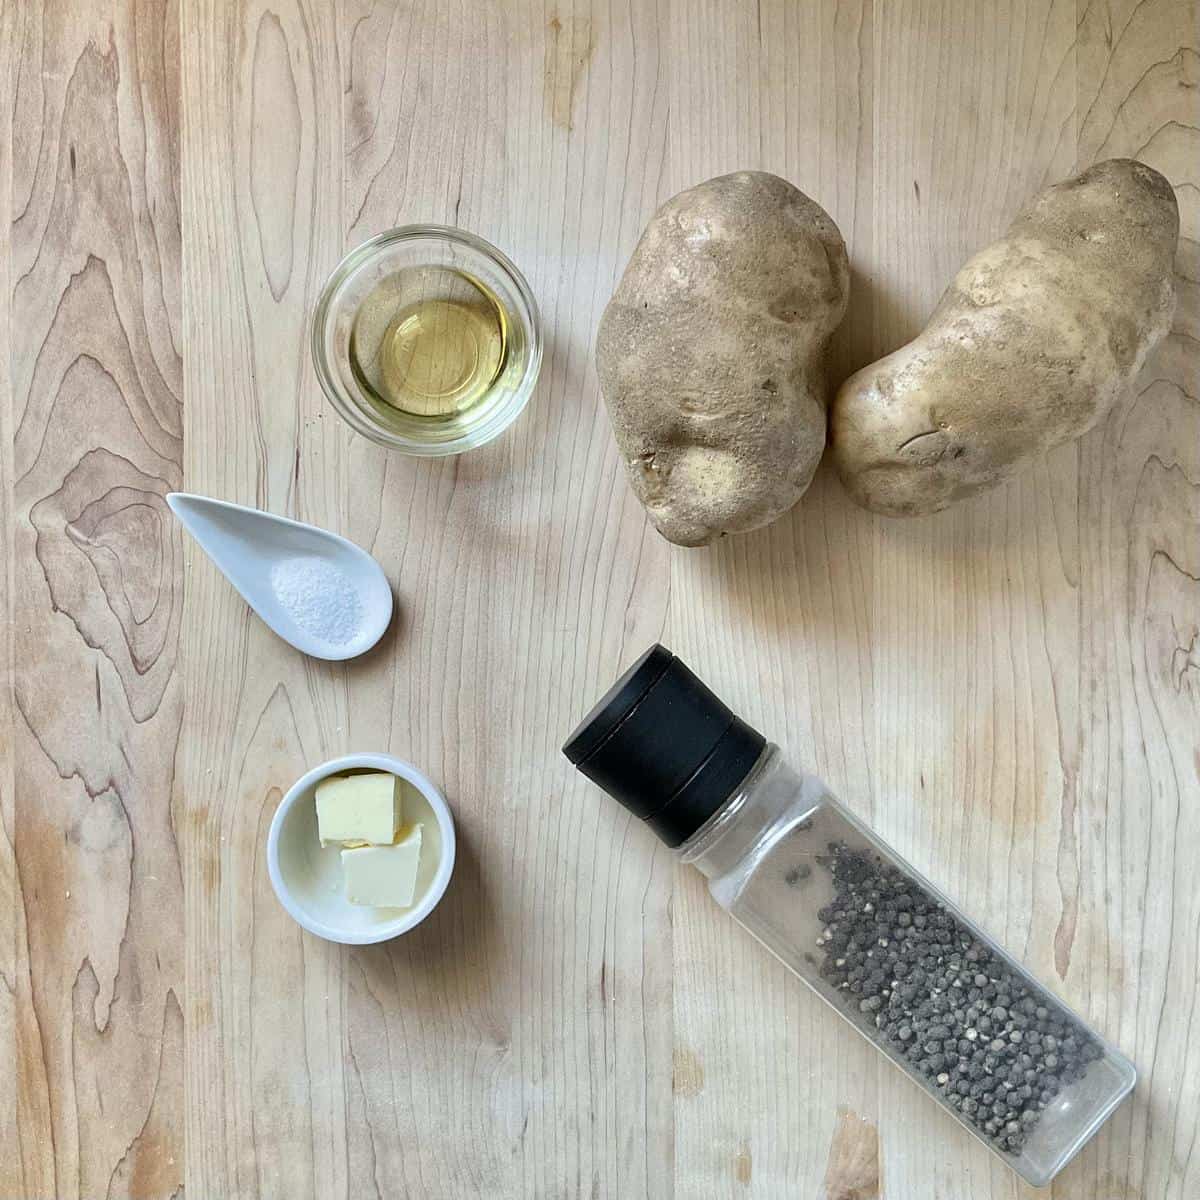
- They are quick and easy to make, requiring minimal ingredients – potatoes, butter, oil, salt, and freshly ground black pepper.
- You can customize them with your favorite spices, herbs, or other ingredients. Consider adding garlic powder, paprika, or chili flakes, to name a few.
- You can make individual hash browns, which can easily be frozen, or one large one that can be cut into wedges and then frozen.
As a retired dietitian, I would say that homemade hash browns can be a great option for those looking to incorporate more whole foods into their diet. Using freshly grated potatoes and minimal oil, homemade hash browns can be a healthier alternative to store-bought or restaurant-made versions. Potatoes provide great nutrition and vital minerals like potassium, fiber, and Vitamin C.
What do I need to make crispy hash brown potatoes?
- Potatoes. No surprise here. More details to follow.
- Vegetable oil. Any kind will do.
- Butter. Just a few tablespoons are needed.
- Salt and Pepper. These will be added at the end.
It would be best to have a box grater, a large bowl, and a pan, preferably a cast iron skillet. It would help if you also had a salad spinner, a potato ricer, or some clean tea towels -more details to follow.
What are the best potatoes?
Hash brown potatoes, also referred to as hash browns, are made with potatoes and only potatoes.
No surprise there.
But did you know that there are thousands of potato varieties and each variety has different characteristics?
Whether baking or cooking, you always need to ensure that you use the right potato for the job.
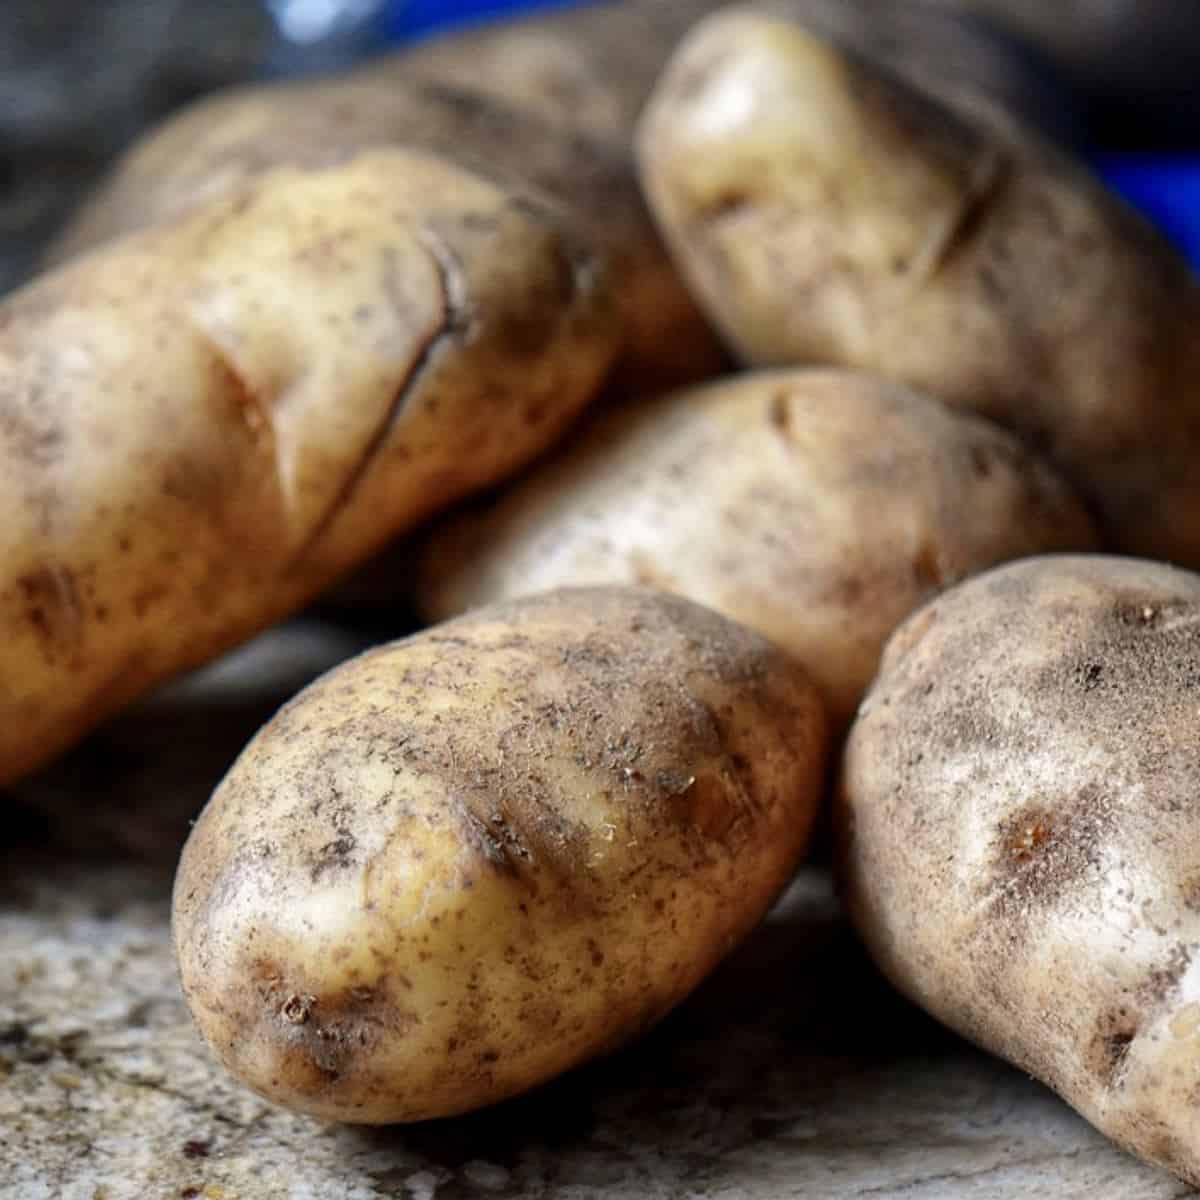
Today, we use the almighty russet, also known as Idaho or baking potato.
These oblong starchy potatoes with rough brown skin are the best for baking whole and fluffy mashed potatoes because they have firm flesh and maintain their structure when cooked. Russet potatoes are the number one choice to make the perfect hash browns.
This is the spud for us today.
Grated potatoes are a must!
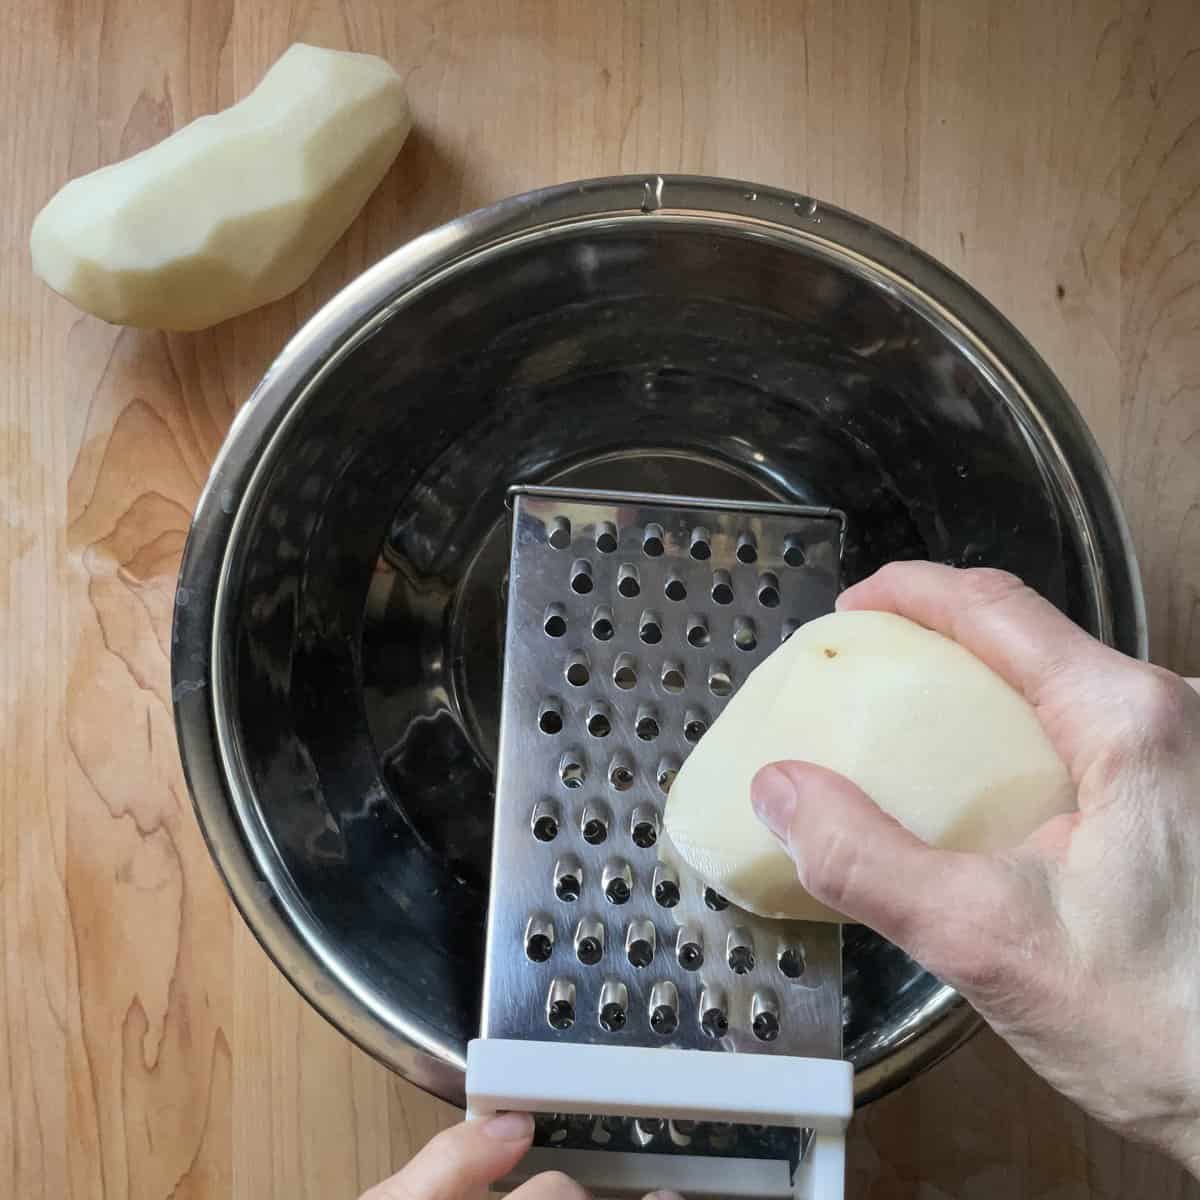
Shredded potatoes can easily be made with a simple box grater. If making a large quantity, a food processor can also be used.
Once you have peeled your potatoes, grate them with the large side of a box grater. It is crucial to use the big, large holes in your grater.
What does soaking potatoes in water do?
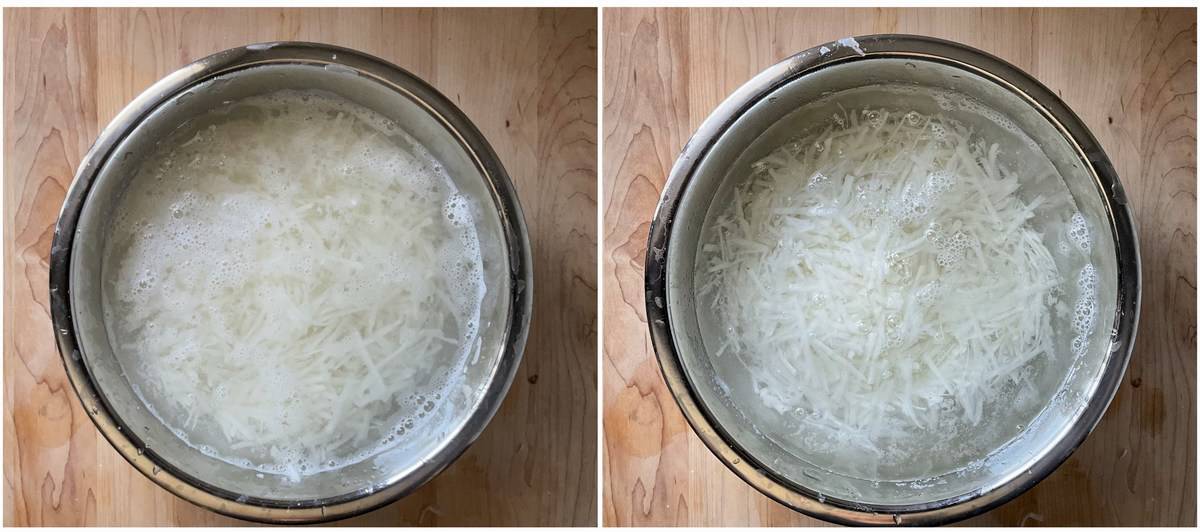
Once you have grated your potatoes, soak them in a large bowl of cold water.
The first thing you will notice is that the water immediately becomes cloudy. Swirl the grated potatoes around the bowl and drain the excess water. Repeat this at least 3 times or until the water runs clear.
What you are doing here is rinsing away the excess starch.
Eliminating the extra starch is a key step that ensures a texture that is not gummy. In other words, your hash browns will get crispy when being pan-fried.
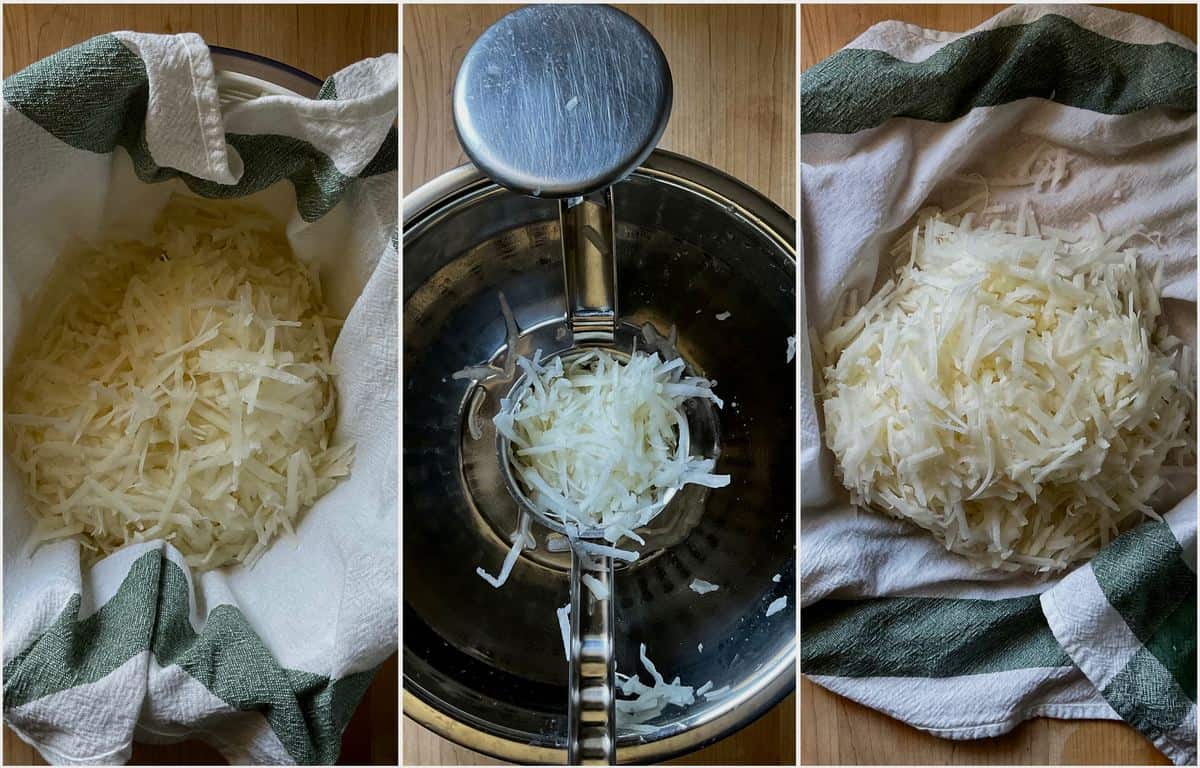
Why remove the moisture from the potatoes?
Another contributing factor to obtaining golden, crispy hash browns is using shredded potatoes that are as dry as possible.
At this point, you might be asking why did we soak them if we needed dry potatoes?
The soaking got rid of the starch, which makes them crispy; the other factor is getting them as dry as possible.
You have three options…
Option 1: A salad spinner. Place a clean tea towel inside the salad spinner, followed by the potato shreds and spin away. This is my least favorite option.
Option 2: A potato ricer. You need to work in batches for this option. Place a cup or so of shredded potato and gently squeeze it. We want to eliminate the excess moisture; we do not want to force them through the ricer.
Option 3: A clean tea towel. If neither of these 2 options is available to you, use a clean cloth and squeeze out as much liquid as possible. If you recall, we used the same principle when we made these tasty zucchini fritters.
How to make hash browns stick together?
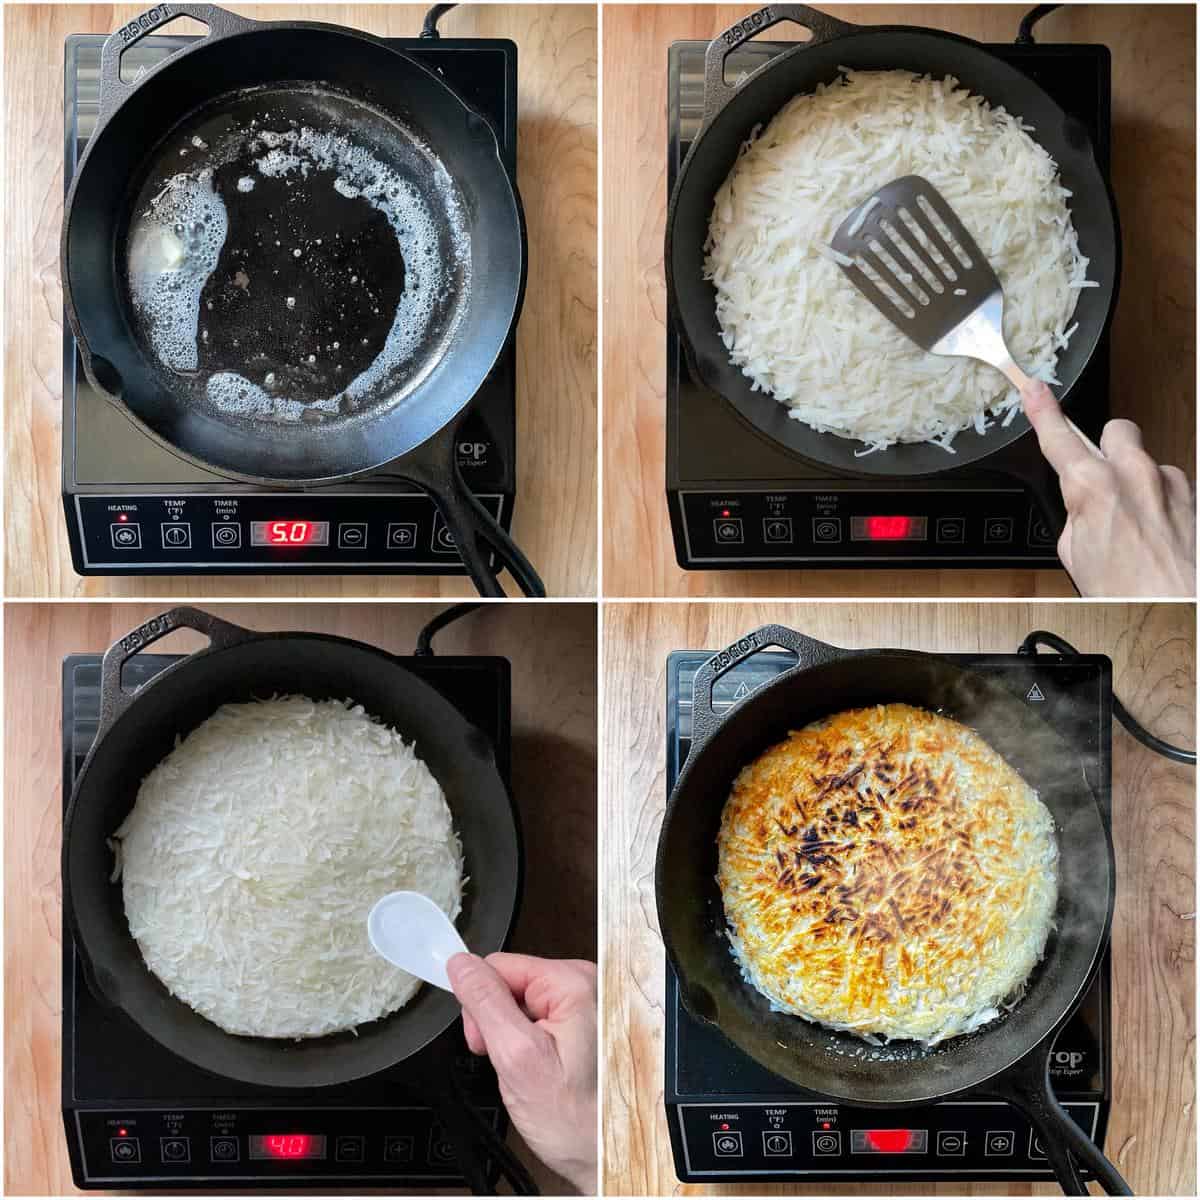
Once you’ve added your favorite seasonings (everything EXCEPT the salt) to your dehydrated, coarsely shredded potatoes, it’s time to turn on the heat.
A cast-iron pan is great for this recipe. If you don’t have one, a large nonstick skillet works just as well. For 2 medium-sized russet potatoes, approximately 1¼ pounds, you will need a 10-12-inch cast iron or nonstick frying pan.
Get your pan nice and hot over medium-high heat. Add 1 tablespoon of butter and listen to it sizzle. This will ensure a crispy exterior. We will also be adding 1 tablespoon of vegetable oil.
Ensure a thin layer of oil covers the bottom of the pan, as this will prevent the potatoes from sticking to the pan.
It’s time to add your shredded potatoes to the pan; spread them out evenly and gently press with a flat spatula -ideally, they should be between ¼-½ inches thick.
Reduce to medium heat and walk away. They need to cook for about 10 minutes. This will give your shredded potatoes enough time for the bottom to become golden brown. You have now attained 50% of the perfect hash brown potatoes: crispy on the outside.
Just before you flip, you need to season them with salt. As you know, salt has the super ability to draw out moisture. If we were to add the salt any earlier, you would get super-soggy hash browns.
Time to flip
When you’re ready to turn your hash brown over, you have two easy options. Both of these methods involve using a plate.
The first method is sliding the giant hash brown onto a large plate. Place a second plate over the hash brown and turn the plates upside-down. The cooked side should now be facing up.
The second method is to place an inverted plate over the skillet, grab both the pan and the plate with oven mitts, and turn them over in one swift motion. You can view this method in the recipe video included in this article.
Place the pan back on the burner. Add 1 tablespoon of vegetable oil and butter and carefully slide the half-cooked hash brown back onto the pan.
Once again, let it cook without moving it. Set the timer for about 8 minutes or until golden and crispy. You will now attain the other 50% perfection: a tender interior.
That’s all there is to it! The perfect hash brown potatoes. With these simple steps, you can make restaurant-quality hashbrowns in your kitchen.
Remove from heat, and garnish with your favorite toppings.
Tips
- Before cooking the shredded potatoes, squeeze away as much moisture as possible to guarantee a crispy crust.
- Using a well-seasoned cast iron skillet will help in achieving the perfect crust.
- To ensure that the potatoes don't stick to your cast iron pan, ensure it’s heated for a few minutes before adding the butter and oil.
- Allow the potatoes to cook for the recommended time before flipping them. Flipping them too early may cause them to fall apart.
FAQ
There are several reasons. First, the oil raises the smoking point, which helps to prevent the butter from burning. Second, both the butter and oil provide a different flavor profile, and finally, combining both helps to create a crisp exterior and tender interior.
The total cooking time depends on the size of the grated potato shreds and your personal preference for crispiness. Generally, using a cast iron pan takes about 10 minutes to cook one side and 8 minutes for the other side on medium heat, flipping only once.
Yes, you can freeze your hash browns to enjoy later. To do this, cool your cooked hash browns and then wrap them in an air-tight container or freezer bag before placing them in the freezer. When ready to eat, thaw and reheat in a skillet over medium heat before serving.
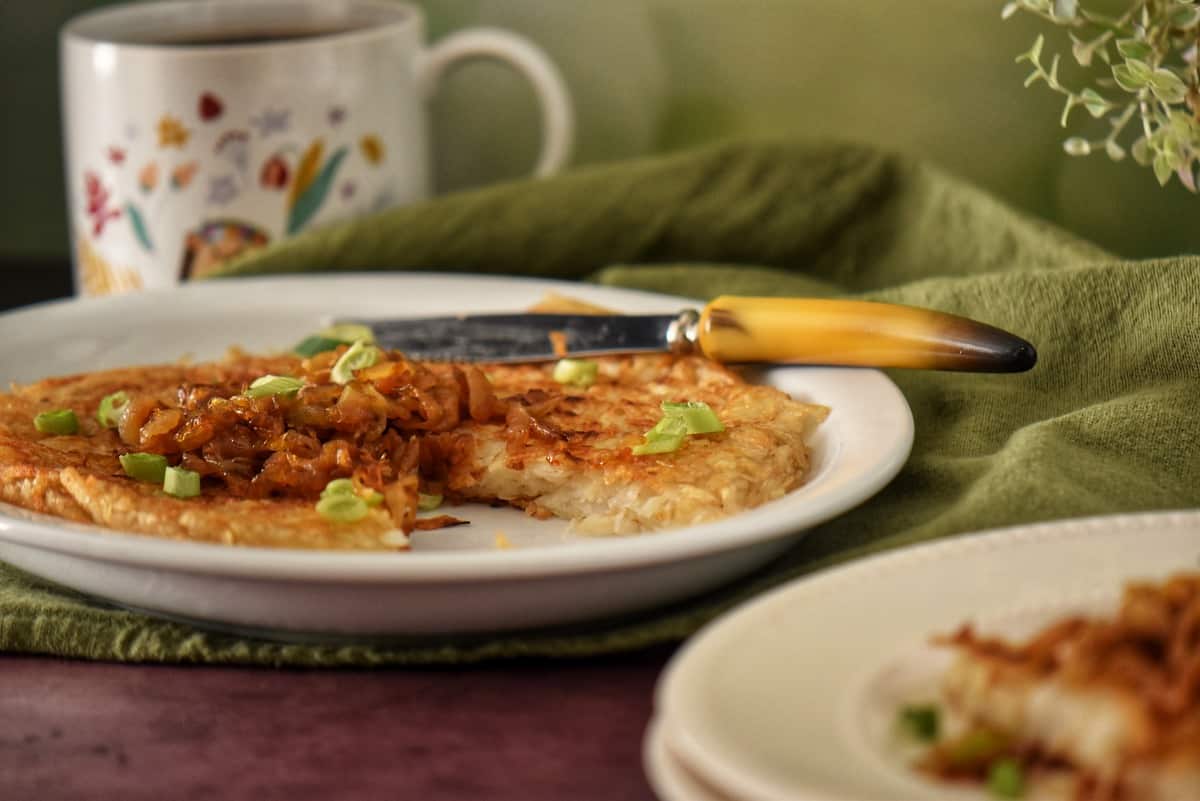
Hash brown breakfast ideas
Hash browns are the perfect accompaniment to any breakfast entree. Some popular options include eggs, bacon or sausage, avocado slices and roasted tomatoes.
You can also try using them as a base for your favorite omelet or crustless quiche. Or, top them with smoked salmon and capers for a delicious brunch dish.
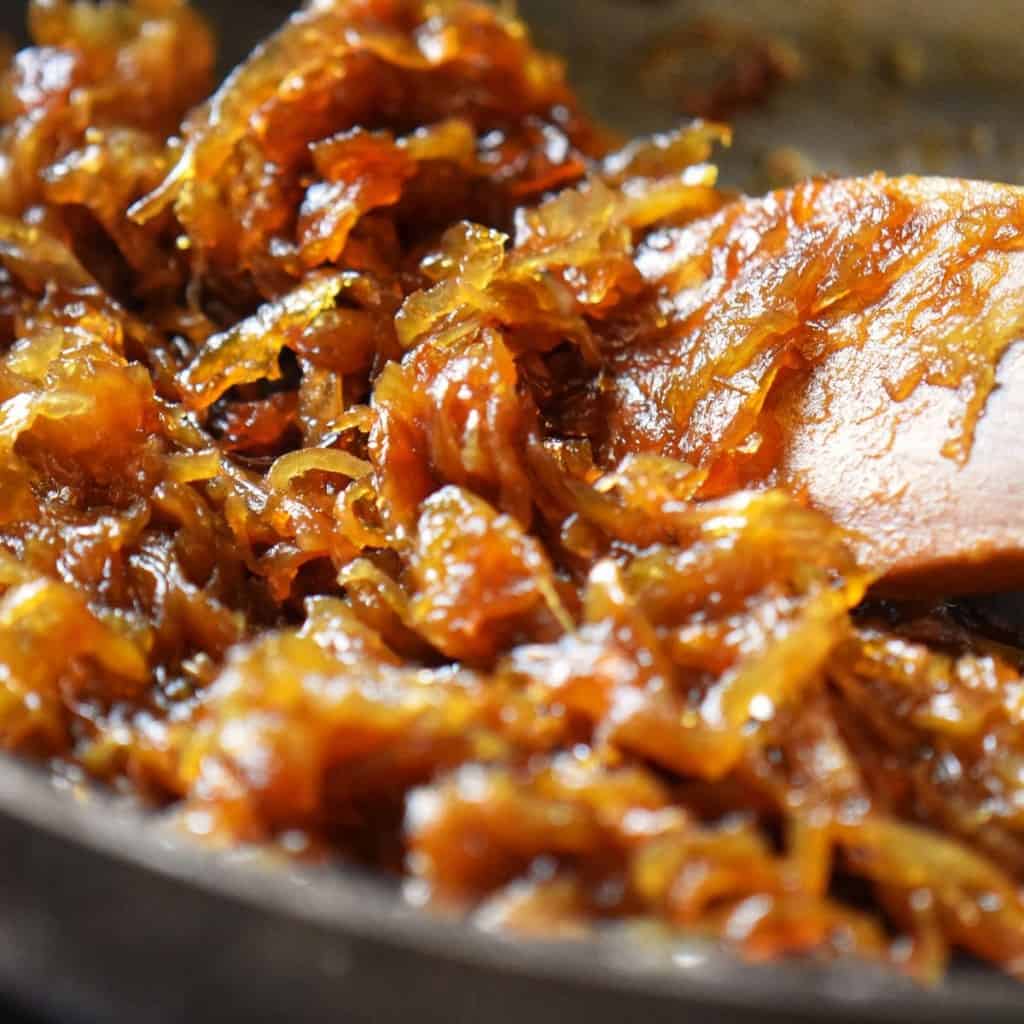
Caramelized Onions
Caramelized onions add a wonderful deep rich flavor to these delicious crispy homemade hash browns.
You can also enjoy them with fresh homemade ricotta or yogurt and a fresh fruit salad. And remember to garnish with fresh herbs. Parsley, thyme, chives, or any of your favorite herbs are all great options, as they add another layer of flavor to this simple dish.
As you can see, the options are endless, and the possibilities are all delicious.
Recipe inspiration
A couple of years ago, I purchased a Better Homes and Gardens magazine called “Cook’s Secrets.” There indeed are some wonderful recipes in this publication, including this one.
I’ve shared all my secrets to making the perfect hash brown potatoes.
Do you know any other secrets? I’d love to hear about them!
This weekend, treat yourself and your family. Skip the commercial wannabe perfect hash brown potatoes, and say hello to your perfect homemade version!
THANKS SO MUCH for following and being part of the She Loves Biscotti community, where you will find Simple & Tasty Family-Friendly Recipes with an Italian Twist.
Ciao for now,
Maria
And if you are new here, welcome! You may want to sign up for my weekly e-mail newsletter. You can unsubscribe any time you want.
★★★★★ If you have made these homemade hash browns, I would love to hear about it in the comments below and be sure to rate the recipe!
Recipe

How to Make Hash Browns
WANT TO SAVE THIS RECIPE?
Ingredients
- 1¼ pounds Russet potatoes about 2 medium
- 2 tablespoons vegetable oil separated
- 2 tablespoons butter separated
- pinch pepper
- ¼ teaspoon salt
Instructions
- Peel the potatoes.
- Using a box grater (or food processor), shred potatoes using the coarse side (or coarse shredder attachment).
- Place the shredded potatoes in a large bowl of cold water.
- Swirl and drain.
- Repeat three times or until the water runs clear.
- Place the shredded potatoes in a clean tea towel and squeeze out the moisture or use a potato ricer to draw out the moisture. You can also line a salad spinner with a clean tea towel and spin until the potatoes are dry.
- Place "dry" potatoes in a large bowl.
- Add your favorite seasonings (if using).
- Over medium-high heat, heat 1 tablespoon of oil and 1 tablespoon of butter in a 10-12-inch cast iron or nonstick frying pan. Make sure to cover the entire pan.
- Add the potatoes and spread evenly throughout the pan.
- With the help of a spatula, press down and flatten into an even layer (¼-½ inch).
- Lower heat to medium, and cook, without stirring, for about 10 – 12 minutes.
- Just before flipping, add salt.
- Place an inverted plate over the skillet, grab both the pan and the plate with oven mitts, and turn them over in one swift motion. You can view this method in the recipe video included in this article.
- Place the pan back on the stove. Add 1 tablespoon of vegetable oil and 1 tablespoon of butter and carefully slide the half-cooked hash brown back onto the pan.
- Slide the hash brown back into the pan and continue to cook for another 8 minutes.
- Once again, let it cook without moving it. Set the timer for about 8 minutes or until golden and crispy.
- Remove from heat and garnish with your favorite toppings.
Video
Notes
- Before cooking the shredded potatoes, squeeze away as much moisture as possible to guarantee a crispy crust.
- Using a well-seasoned cast iron skillet will help in achieving the perfect crust.
- To ensure that the potatoes don't stick to your cast iron pan, ensure it’s heated for a few minutes before adding the butter and oil.
- Allow the potatoes to cook for the recommended time before flipping them. Flipping them too early may cause them to fall apart.
Nutrition
This post was originally published on April 11, 2015, republished on January 5, 2018, and more recently on January 14, 2023 with updated photos, content and a video.
Maureen
Great recipe. I teach a 4-H cooking class via zoom to youth around the ages of 13-14. Many of the youth have dietary restrictions. Everyone was able to make and enjoy the hashbrowns. Each member added the seasonings they wished; and, since there was enough potatoes for three pans, many put in different seasonings in each batch. They were so good that there was no need for ketchup or other toppings. We made the hashbrowns while the salmon (with asparagus, cherry tomato, and cannellini beans) recipe was baking.
Maria
I am so thrilled to read this Maureen! Thank you so much fro sharing!
Wishing you continued success with your youth! God bless!
Emily
To shorten cooking and prep time, cook the potatoes ahead of time (bake a few extra potatoes with dinner) and store in fridge up to 3-5 days. This eliminates the need to rinse starch after shredding and cuts cooking time down to five minutes or less per side.
Maria
Thanks for sharing Emily!
Judith Ekstrom
I tried this recipe for Easter breakfast. They came out so crispy and yummy. I didn’t peel the potatoes first but at the end of grating there is usually a big piece of peel that I put in the compost. Love this recipe. All other recipes add salt before cooking but it makes sense it would draw out the moisture. Thank you.
Maria
Fantastic Judith!
Lilian Burch
Use coconut oil instead of butter. Then recipe will work for vegans.
Maria
Thank you Lilian, great suggestion! Thanks so much for taking the time to leave a comment. Appreciate it 🙂
Ur pal val
Made them this morning, they were great! Thanks for sharing this hash browns recipe.
Maria
My pleasure! Glad you liked them. Hash browns and week ends go hand in hand! Thanks for taking the time to comment ♥
Paula Barbarito Levitt
They aren’t only for breakfast, anytime of day in my humble opinion. Your directions are spot on, details which are essential.
Maria
I like your way of thinking Paula! I could have “breakfast” food like these hash brown potatoes three times a day… Thanks so much for stopping by Paula ♥♥♥